
Installation Instructions


9
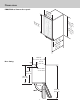
INSTALLATION OVERVIEW
The ice machine must:
• Be connected to cold, potable water.
• Be connected to a drain.
• Be connected to the proper power supply.
• Be able circulate air through the vents at the front.
Note: DO NOT build in so that the door is recessed. Door is meant to be flush with surronding cabinetry, but
not recessed.
INSTALLATION PARTS
The following installation parts are supplied with the ice machine:
2-Hinge covers 2-Door stop pins
2-Hinge side covers 10-#8 sheet metal screws
2-Hole plugs 2-8-32 Machine screws
2-Hinge opening covers 4-Leveling leg caps
1-Upper door bracket (LH) 2-Black kickplate screws
1-Lower door bracket (LH) 1-Access panel button cover
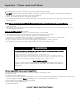
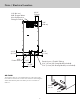
ACCESSORY DOOR PANEL
The ice machine is supplied without a finished door panel. Accessory door panels are offered or a custom panel may
be used.
Accessory Door Panel Attachment
Note: If door swing is to be changed, it must be done before panel is attached.
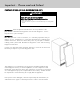
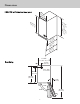
To attach a door panel:
The panel will be held on by 6 screws (supplied with door panel) and 2 machine screws (supplied with ice machine).
1. Remove the gasket and retain for later use.
2. If the door panel is stainless steel, remove any plastic covering the stainless steel panel.
3. Place the panel onto the outside of the door, and secure it
to the door using two machine screws, located at the left
center and right center ( behind door gasket).
4. Fasten the panel to the door using the 6 screws (supplied
with door panel). In the hinge area, use the outermost screw
holes.
5. Place the covers over the hinge areas, and secure each cover
to the door using a screw (supplied with door panel).
6. Insert hole plug over screw installed in step 5 (supplied).
7. Return the gasket to its original position.
Installation
Hole
plug
Cover
Gasket