PLEASE READ FOR BEST RESULTS CEMENT TILE Installation guide WWW.VILLALAGOONTILE.COM VILLA LAGOON TILE 901 COMMERCE DRIVE STE C GULF SHORES, AL 36542 1-251-968-3375 INFO@VILLALAGOONTILE.
Read first IMPORTANT Cement tiles show nuances in design and colors. Individual tiles will not be identical. This is a result of the handcrafted process and the nature of cement. Mixing tiles from different boxes during setting is necessary to produce a beautiful naturally rich appearance. Expect tonal variations of color in any batch of tile. This is the nature of hand-crafted cement products. Variations in color tone are not valid for claims or refunds. precautions Cement tiles are very absorbent.
PREPARE Setting our cement tile is not difficult. Preparation is a key component to success. Remember these tiles are porous and can be stained by dirt, thinset, chalk, pencil marks, and greasy hands. Try to plan your installation so it is the last major step of your project, to prevent other trades from needing to traffic or work over the new installation.
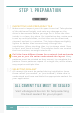
Step 1. preparation 1.1 INSPECTING AND PREPARING TILE Make sure to inspect your tile upon its arrival. Take photos of the delivered freight, and note any damage on the driver's documents before you sign for it. Store the tiles inside, in a clean, dry place. On installation day, make sure to set up multiple boxes, so that tiles can be examined, cleaned, and set in a rotation. This helps disperse slightly lighter or darker tiles harmoniously through the installation.
1.3 SUBSTRATE PREPARATION Make sure you have a surface appropriate for tile installation. The surface should be a cement slab, cement backer board, uncoupling membrane, or other product meant to take a tile installation with thinset. The surface should be clean, level, and stable. Any rigid tile or stone installed on a surface that flexes will develop cracks. Make sure that your installation is water-tight.
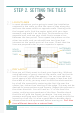
Step 2. setting the tiles 2.1 LAYOUT LINES In most situations, you're going to want the installation centered in the room, so that the rows of tiles along the walls are the same width on opposite walls. Starting with the longest walls, find the center point with your tape measure, and mark it on the floor. Do the same on the opposite wall, and use your chalk line to snape a line between the two points.
2.3 PREPARING THINSET 2.4 APPLY MORTAR, AND SET TILES Using a modified thinset or unmodified thinset, read the directions from the thinset manufacturer. Make sure that the product is intended for the substrate and tile being used. You will be mixing what is essentially a bag of cement with water. Mixing is typically performed in a 5 gallon bucket, using a mixing paddle attachment with a corded power drill. Make sure to follow the directions for ratio of water and mixing method.
2.5 ALLOW TO CURE Allow sufficient time for the thinset to cure and dry. Typically at least 24 to 48 hours. For best results, test that the installation is dry using a moisture meter. If unsure, try taping down a square of plastic film using painter's tape (other tapes may dirty the tile with adhesive). Allow to sit for several hours or overnight, and look for condensation on the underside of the film.
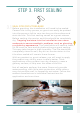
Step 3. First sealing 3.1 SEAL FOR GROUT RELEASE Before grouting, the installation will need to be sealed. Cement tile is very porous, so grout can easily be pushed into the pores or left to cure too long on the surface and stain the tile. This first sealing serves as a grout release. Before sealing, the mortar and tiles should be completely dry. Trapping moisture into the installation can cause moderate to severe aesthetic problems, such as ghosting, or a blotchy appearance.
Step 4. GROUTING 4.1 GROUT, CLEAN, CURE You should ensure that you have a grout that is appropriate for the installation (See Step 1.4). Mix as directed by the manufacturer. Working in 2-3 square foot areas, spread the grout on the tile surface, then using the grout float move the grout at 45 degree angles to the grout lines. This ensures a smooth even grout joint. Quickly clean up excess from the face of the tiles using a soft sponge and clean water.
Step 6. love your tile! 6.1 ART FOR GENERATIONS TO COME With a little tender loving care, cement tile installations will last for generations. Even at demolition, cement tiles have a great resale value as antique reclamations. To increase the service life and maintain an attractive appearance, a proper maintenance and cleaning schedule is recommended for all cement tiles. Cement tiles should be regularly mopped with clean water and PH-neutral floor cleaners.
rev212907 contact us! www.villalagoontile.com info@villalagoontile.com 1-251-968-3375 oNLINE resources: www.villalagoontile.com/cement-tile/how-to-install/ www.villalagoontile.