V 150 SG2E / V 190 SG2E Instructions for use
GB Thank you for purchasing your new wine cooler from Vintec. Please note that these instructions apply to all wine coolers in the Vintec range. Illustrations and fittings may therefore not necessarily correspond exactly to your model. you of how collection and recycling of such units take place in your area. Before use Before operating your new appliance, please read the following instructions carefully as they contain important information on safety, installation, operation and maintenance.
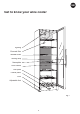
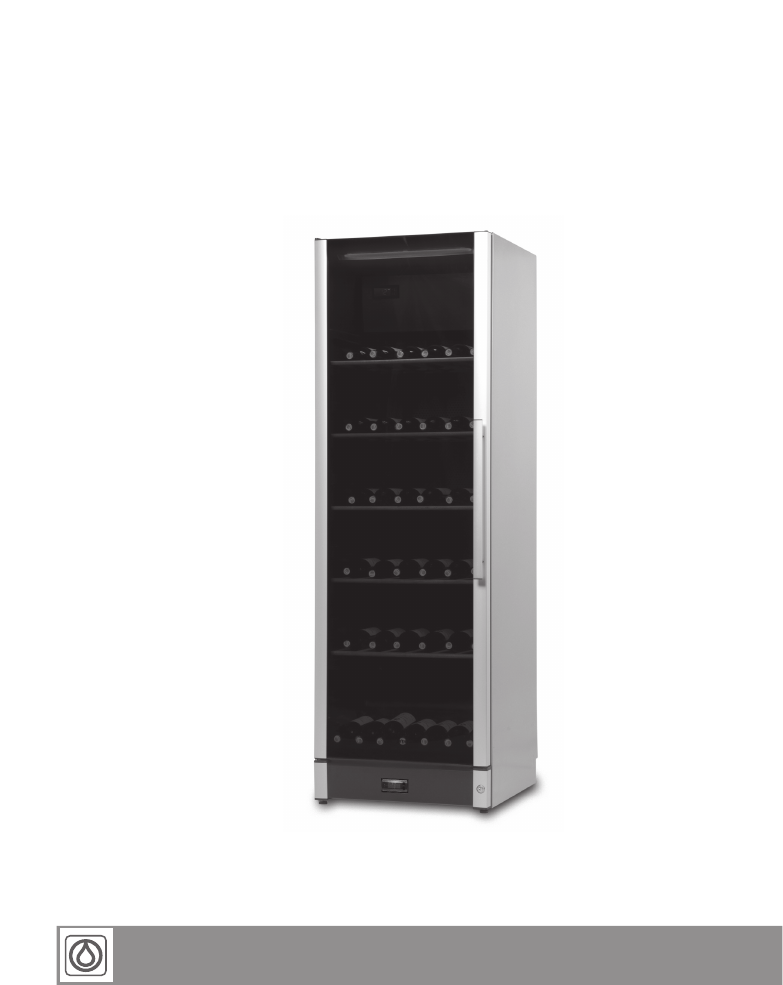
GB Get to know your wine cooler Lighting Charcoal filter Wooden shelf Sealing strip Nameplate Door handle Kick plate Control panel Lock Adjustable feet fig.
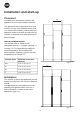
GB Installation and start-up Placement 600 600 For safety and operational reasons, the appliance must not be installed outdoors. 615 600 The appliance should be placed on a level surface in a dry, well ventilated room (max. 75% relative air humidity). Never place the appliance close to sources of heat such as cookers or radiators, and avoid placing it in direct sunlight. Room temperature The climate class is stated on the nameplate (see fig. 1 on page 3 and fig. 11 on page 13).
GB The appliance viewed from above Ventilation It is important that the appliance be well ventilated and that air can circulate unhindered above, below and around it. The figures below illustrate how the necessary air circulation around the appliance can be ensured (figs 5-6). If the appliance is placed beside a wall, there must be sufficient room for its door to be opened wide enough to allow the shelves to be pulled out (fig. 4). 615 50-100 50 -100 1650/1950 1560/1860 1075 fig. 4 fig. 5 5 fig.
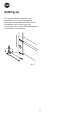
GB Setting up It is important that the appliance be absolutely level. It can be levelled by screwing the adjustable feet at the front of the appliance up or down (figs 8-9). Use a spirit level to check that the appliance is absolutely level sideways. fig.
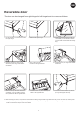
GB Reversible door The door can be changed from right-hinged to left-hinged and vice versa as follows: 1. Lay the appliance on its back and loosen the upper hinge. 2. Remove the upper hinge. 3. Rotate the glass door through 180° (on V 150 SG2E, pull the handle to loosen it on the inside from beneath the sealing strip). 4. Carefully remove the covers on the side of the plinth using a flat-headed screwdriver. 5. Pull up the hinge pin... ...and fit it on the opposite side. 6.
GB Electrical connection The appliance is intended for connection to alternating current. The required voltage (V) and frequency (Hz) are stated on the nameplate inside the appliance. Power must be connected via an independent wall socket outlet. If the mains lead has been damaged, it must be replaced with a corresponding type supplied by the manufacturer or an approved service centre. Technical data This appliance complies with CE marking regulations, directives and standards.
GB Operation and function Light switch On/off switch fig. 9 Electronic controls temperature display has a built-in filter that simulates the actual temperature in the bottles. The displayed temperature is therefore not affected by transient fluctuations in air temperature. The electronic controls ensure that the set temperatures are maintained at the top and bottom of the cabinet. This is accomplished by complex control of the refrigerating system the heating element and the fan.
GB Low-temperature alarm If the temperature has been below 2°C for more than 1 hour, the display flashes and Lo/actual temperature are alternately shown. Wine cannot mature properly at sub-zero temperatures. Two-zone setting for serving temperature Typical serving temperature settings for the top and bottom sections are 16°C and 6°C respectively.
GB Defrosting, cleaning and maintenance Automatic defrosting Replacing the light tube The wine cooler is defrosted automatically. Defrost water runs through a pipe and is collected in a tray above the compressor where the heat generated by the compressor causes it to evaporate. The defrost water tray should be cleaned at intervals. Disconnect the power by pressing the on/off button. Remove the lamp cover using a small flat-headed screwdriver. Replace the PLC tube (11 W).
Fault finding Fault Possible cause Remedy The appliance is “dead”! The appliance is switched off. Press the on/off switch. Power failure; the fuse is blown; the appliance is not plugged in correctly. Check that power is connected. Reset the fuse. Water collects in the bottom of the cabinet. The defrost water pipe is blocked. Clean the defrost water channel and the drain hole on the rear wall of the cabinet. Vibration or bothersome noise. The appliance is not level.