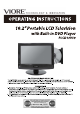
CONTENTS Safety Precautions - Power Supply - Installation - Use and Maintenance - Important Safety Instructions 1 2 3 4-5 User Guidance Information - Accessories - Names of each part - Remote Control 6 6-8 9 Connection - Power connection - Antenna connection - Input connections - Headphone connection 10 10 11 11 Basic Use - Powering the LCD TV - Selecting input source 12 12 Application - Operating the menu - Customizing the PICTURE Settings - Customizing the FUNCTION Settings - Customizing the TUNIN
Safety Precautions Power Supply Warnings Do not touch the power plug with wet hands. . Doing so may result in electric shock. Do not bend the power cord excessively or place heavy objects on it. . Doing so may result in fire or electric shock. Do not plug several devices into the same outlet. Do not use a damaged power cord or plug or a loose outlet. . Doing so may result in fire or electric shock. . Doing so may cause the outlet to overheat and start a fire.
Safety Precautions Installation Warnings Do not place the unit where it is exposed to rain, excessive moisture or grease. Do not use or store flamm able or combustible materials near the unit. . Doing so may result in fire electric shock, malfunction, or deformation. . Doing so may result in fire or explosion. Do not place a burning candle, burning anti-mosquito incense, or lighted cigarette on top of the unit. Do not place the unit near any heat source sunch as a fireplace or space heater. .
Safety Precautions Use and Maintenance Warnings Disconnect the power cord from the wall outlet during an electric storm. Do not insert any metal objects, such as a screwdriver, paper clip, or A/V terminals.. . Not doing so may result in fire or electric shock. . Doing so poses a serious risk of fire or electric shock. Never disassemble or modify the unit in any way. Do not attempt to service the unit yourself. . Doing so may result in fire or electric shock.
Safety Precautions Important Safety Instructions Servicing is required when the apparatus has been damaged in any way, such as power supply cord or plug is damaged, liquid has been spilled or objects have fallen into the apparatus, the apparatus has been exposed to rain or moisture, the apparatus does not operate normally, or the apparatus has been dropped.
Safety Precautions Important Safety Instructions Servicing is required when the apparatus has been damaged in any way. Your TV could require servicing if any of the following occur: • Supply cord or plug is damaged • Objects have fallen into the apparatus • Apparatus has been exposed to rain or moisture • Apparatus has been dropped • Apparatus does not operate normally Apparatus with Class I construction shall be connected to a Main socket outlet with a protective earthing connection.
User Guidance Information Accessories The following accessories are included in the package STANDBY INPUT TV/AV MUTE DISPLAY LANG AB/EPG CC A-B SUBTITLE EPG SUB -/-- ANGLE 10+ ANG EXIT SLEEP VOL- VOL+ TITLE LCD MENU CH+ MENU LCD MENU MENU TITLE CH- CH+ FAV TEXT DVD SETUP ZOOM DVB MENU ZOOM SLOW DVD SETUP STEP PROG User’s Guide INTRO REPEAT GOTO Power adapter Remote Control TV antenna AV connection cable Headphones Car adapter Names of each part Front view Profile view 5 4 3 2
User Guidance Information Names of each part Disassembly of TV Base Wall-Hanging slots Standing the TV with Bracket 7
User Guidance Information Inserting Discs There are two ways to open the disc tray: The disc tray will open slightly. Pull the tray gently to open completely.
User Guidance Information Remote Control Function of remote control buttons The remote control uses infra-Red(IR). Point it towards the front of the LCD TV. The remote control may not work correctly if it is operated out of range or out of angle. STANDBY TV/AV MUTE DISPLAY LANG CC STANDBY : Press to turn the TV on/standby. TV/AV: Press to display the input source menu. MUTE: Press to mute the TV, press again or press VOL+/button to unmute. DISPLAY: Press to display the current program information.
Connection Power connection Power Connecting 1. Connect the small round plug on the power adapter cable to the power input socket at the rear of the set. 2. Connect the power adapter to the main supply. Note: This model has a built-in rechargeable Li-ion battery. You can enjoy watching TV for approximately 2 hours using battery power after a full charge. You can charge the battery by connecting the supplied AC adapter. It will take about 3 hours to charge fully.
Connection Input Connections Composite Cable (Not included) AV OUT External video source such as VCR AV Connection Cable (Included) * Connect the LCD TV’s AV IN/OUT terminal to the output/input terminals with a Composite Cable and an AV Connection Cable(supplied) as the picture shows. Watching Video Signal 1. Connecting the DC power supply, pushing the power switch “OFF/ON” up, and press “STANDBY” button to turn on the LCD TV. 2.
Basic Use Powering the LCD TV To turn on the LCD TV. Connect the DC power supply. Push the switch up, and then press STANDBY on the LCD TV. To turn off the LCD TV. Press the STANDBY button on the LCD TV, and push the switch down. To turn on/off the LCD TV by remote control STANDBY Pressing button. Selecting Input Source * You can select between the TV signal and the input signal of other equipments connected to the TV. * Use this function to switch to the input source you wish to view.
Application Operating the menu 1. Press STANDBY button to turn the LCD TV on. 2. Press LCD-MENU button on the remote control; the on-screen menu will appear on the screen. 3. Use and buttons to select your main menu option. 4. If you do not have a remote, use the following buttons to select an option from the sub-menu: LCD-Menu = menu or exit CH+/- = Scroll up and down Vol. + = Select 1. TV / DTV menu Allows you to make adjustments to your picture settings. (Select TV/DTV source for example) 2.
Application Customizing the PICTURE Settings Press LCD-MENU button on the TV set to display the OSD MENU. The OSD menu includes the following options: Brightness Controls the overall brightness of the picture Contrast Controls the difference between the brightest and darkest regions of the picture. Saturation Controls the saturation of the picture. Sharpness Increase this setting to see crisp edges in the picture; decrease it for soft edges. Hue Controls the hue(only used in NTSC mode).
Application Customizing the FUNCTION Settings Press LCD-MENU button twice on the TV set to display the OSD MENU. The FUNCTION menu includes the following options: Language Select the OSD menu language. Blue Screen Turn on/off the blue screen display when there’s no signal. Wide Screen Control the OSD menu display mode on the screen: 16:9, 4:3. Reset Press button to reset all the set above.
Application Customizing the TUNING Settings Tuning menu in DTV mode Tuning menu in TV mode TIMEZONE SAMOA DAYLIGHT SAVE OFF ANTENNA AIR AUTOSEARCH Press LCD-MENU button thrice on the TV set to display the OSD MENU. The TUNING menu includes the following options: Skip (in TV mode) Skip the channel when you scan the channels with CH+/- button if you turn on the function.
Application EPG menu Press EPG button on the remote control in DTV mode, the screen will display the Guide menu as below. Press EPG button to cancel. Note: The content shown in the picture above is just an example. Closed Caption Press CC button on the remote control in DTV mode, the screen will display the Closed Caption as below. Press CC button to cancel. CC Display Turn on/off the Closed Caption display. CC Type Select the Closed Caption service.
DVD Operation Getting Started 1. Select DVD source - Turn on the LCD TV and press TV/AV button to display the input source menu, select DVD by press OK button to enter the DVD source. / button, and 2. Insert Disc - Insert the disc according to the instructions on page 8. The screen will display “READ” and the disc contents will be read. NOTE: When inserting the disc, make sure that the printed side of the disc is facing forward. Inserting discs incorrectly may damage the player.
DVD Operation DVD Functions operating instructions 1 2 - Press TITLE button. The screen will show “TITLE”. - Playback will commence from the first chapter of the selected title.
DVD Operation DVD Functions operating instructions 5 6 7 8 9 STEP 10 20
DVD Operation DVD Functions operating instructions 11 12 13 14 21
DVD Operation DVD Functions operating instructions 15 16 17 18 19 20 21 22
DVD Operation Card Reader and USB Playback - The following files formats are supported by this TV: JPG, MP3, WMA, MP4 (DivX3.11-5.11, Xvid), MPEG1 (DAT, MPG, MPEG), MPEG2 (mpeg, mpg). - File formats including the following are not supported by this TV: BMP, PNG, AAC, DivX 6, DivX HD, Vob, ts. - The following cards are supported by this TV: SD, MMC, Memory Stick (MS). - Only full-size card formats are supported. If you wish to use compact formats such as miniSD, microSD, Memory Stick Duo etc.
DVD Operation DVD system operation System operation will define the setting of the set; these definitions will be stored until you change them again. Accessing the Setup Menu 1. Pause or Stop the player. Press DVD-SETUP on the remote control. The main menu will be shown as below. / buttons to select the Icon of the desired section, e.g. “TV System" and press button 2. Press the to open that section. button to open that section. 3. Press / to select the desired feature and again press 4.
DVD Operation DVD system operation RATING The Rating feature is a rating limit feature, like movie ratings. This helps you to control what DVD the family watches. There are 8 levels of selection, from KIDS SAFE to ADULT. Adult is the "play all" selection. 2. LANGUAGE SETUP The language setup options are illustrated below: - OSD LANGUAGE: The OSD will display in the language you choose. - AUDIO LANG: If the disc you are playing has the language you choose, it will output audio in that language.
Cleaning and Maintenance Maintenance for disc 26
Maintenance and service Trouble shooting - In case a problem occurs with your LCD TV, please take the following steps first. - If the problem still occurs, turn the power off and contact your dealer or an authorized service center. Problem Action The screen does not appear. Is the power plug pulled out? Insert the power plug. Press the power button. The screen appears too slowly after the power is turned on.
VIORETM LIMITED WARRANTY Model: PLCD10V59 This VIORE brand Product, as supplied and distributed by VIORE and delivered new in the original carton to the original purchaser is warranted by VIORE against manufacturing defects in materials and workmanship for a limited warranty period of one (1) year on parts and labor. However, there will be only a 90 day parts and labor limited warranty for commercial use.
VIORE, Inc.