
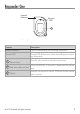
Owner's Manual


9
© 2012 Directed. All rights reserved.
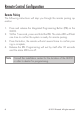
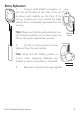
Battery Replacement
1. Using a small slotted screwdriver, in-
sert into slot located on the side of the unit
as shown and carefully pry the front of the
unit up, working your way around the edge
until the front is completely separated from the
housing.
Note:
Make sure that the small elastomer con-
tact located inside the unit as shown does not
fall out during the replacement process.
2. Turn the circuit board over, remove
batteries from clip and replace.
Note:
Verify that the battery polarity is
correct when replacing. Batteries are
stacked in series and polarity is indicated.
3. Reposition all parts and snap together.
Front
Elastomer
contact
Front
Elastomer
contact
Front
Elastomer
contact
+
+
+
Circuit Board
Transmit
LED
Internal
Antenna
1
Transmit
LED
Internal
Antenna
1
Transmi
t
LED
Internal
Antenna
1
Front
Elastomer
contact
Front
Elastomer
contact
Front
Elastomer
contact
+
+
+
Circuit Board
Transmit
LED
Internal
Antenna
1
Transmit
LED
Internal
Antenna
1
Transmit
LED
Internal
Antenna
1
Front
Elastomer
contact
Front
Elastomer
contact
Front
Elastomer
contact
+
+
+
Circuit Board
Transmit
LED
Internal
Antenna
1
Transmit
LED
Internal
Antenna
1
Transmit
LED
Internal
Antenna
1