VPM-62289 Ture Metal USB 2.0 and FireWire1394 Combo External Enclosure for 5.25-inch CD/DVD ROM, CD/DVD-RW, DVD+RW and 3.5-inch HDD User’s Manual We are your DataBridge TM http://www.vipower.
PROPRIETARY NOTICE We make no warranty of any kind with regards to this material, including, but not limited to, the implied warranties of merchantability and fitness for a particular purpose. We shall not be liable for errors contained herein or for incidental or consequential damages in connection with the furnishing, performance, or use of this material. This document contains proprietary information which is protected by copyright. All rights are reserved.
Contents 1. Introduction ................................................................ 4 1-1 Features and Specifications ................................................. 5 VPM-62289 External Enclosure ............................................ 5 Operating Systems ............................................................... 5 1-2 Package Checklist ................................................................ 6 2. Hardware ..........................................................................
1. Introduction Congratulations on your purchase of the VPM-62289/ Ture Metal USB 2.0 and FireWire1394 Combo External Enclosure for 5.25-inch CD/DVD ROM, CD/DVD-RW, DVD+RW and 3.5-inch HDD. It is the perfect solution for data backup, transporting data, and adding more storage space to USB and/or FireWire-equipped computers. The VPM-62289 enables hotswapping and Plug-n-Play compatibility with any 5.25-inch device.
1-1 Features and Specifications VPM-62289 External Enclosure • Fully compatible with both USB 2.0 and FireWire 1394 standard specifications. Built-in one USB port and two FireWire ports. Works with USB-equipped and/or FireWire 1394equipped PC, Notebook and Mac computers. • Supports high-speed USB 2.0 interface transfer rates up to 480 Mbps on Windows 98SE/ME/2000/XP, and Mac OS X. (Your system must have USB 2.0 host port(s) and USB 2.
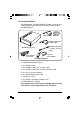
1-2 Package Checklist The VPM-62289 / True Metal USB 2.0+FireWire 1394 5.25-inch CD/DVD ROM combo External Enclosure package contains the following items: USB 2.0 Cable Driver CD FireWire 1394 6-pins to 6-pins Cable FireWire 1394 6-pins to 4-pins converter Cable VPM-62289 enclosure Power adapter Power Cord +5V/+12V Power Adapter Package Contents 1. VPM-62289 external enclosure 2. One USB 2.0 cable 3. One FireWire 1394 6-pins to 6-pins cable 4. One FireWire 1394 6-pins to 4-pins converter cable 5.
2.
OFF 8 ON VPM-62289 USER MANUAL
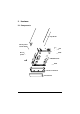
Assembly with one 5.25-inch IDE device Step1. Remove the three retaining screws on the back of the external enclosure. Separate the top and bottom enclosure covers.
Step2. a) Place the 5.25” IDE device in the bottom enclosure cover. Align the 5.25” IDE device mounting holes with the mounting holes on the bottom cover and secure with four screws (two on each side). b) Attach the IDE 40-pin data cable from the rear panel of the bottom cover to the 40-pin connector on the back of the 5.25” device. To ensure pin-1 to pin-1 connection, orient the cable so the colored stripe edge is closest to the power connector.
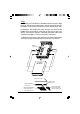
Step3. a) Replace the top cover over the drive assembly, making sure the side groove guide of the top cover slides within the side groove guide of the bottom cover. b) Slide the top cover forward until it fits tight within the front groove guide. c) Make sure the top and bottom groove guides are matched and form a tight fit. d) Replace the three screws which were removed in Step 1 from the back of the enclosure. Top Cover Bottom Cover 5.
VPM-62289 USER MANUAL
VPM-62289 USER MANUAL 13
VPM-62289 USER MANUAL
Step4. Place the front cover into the drive assembly, and adhere the four pads on the bottom of the drive assembly. Front Cover The installation is complete and the VPM-62289 external enclosure is now read to use.
2-6 Connecting the VPM-62289 to a Computer Computer Requirements • USB and/or FireWire equipped notebook or desktop computer • Windows 98SE/Me/2000/XP, or Mac OS 9.0 or above Proceed with the following steps to connect the VPM-62289 to your computer. Step 1: Turn your computer ON. Step 2: Connect the smaller/square USB connector end of the USB cable into the USB Port on the VPM-62289 External Enclosure.
OFF VPM-62289 USER MANUAL ON 17
VPM-62289 USER MANUAL
3. Driver Installation After completing the hardware installation, refer to the following driver installation instructions for the operating system you are using. 3-1 Windows 98SE If this is the first time using your VPM-62289 USB 2.0 & 1394 Combo External Enclosure, you must first run the [SETUP.EXE] from the “USB Drivers and Utility Installation” CD after connecting it to your computer. Then proceed with the following: Step 1. Connect your VPM-62289 External Enclosure to your computer. Step 2.
Step 3. The program will automatically run the installation process. Then the finish screen will appear, please click [FINISH] and the installation is complete. Step 4. You can now connect your VPM-62289 external enclosure to the computer. Double-click on [My Computer]. A new drive [Usbdisk] icon should have been added. This identifies the USB 2.0 External Drive you just installed.
Step 5. A green Unplug or Eject hardware icon will also be added in the system tray. Note: If a new drive does not appear in [My Computer], it means this USB 2.0 External Drive is a brand new hard disk drive which does not contain a partition. Please refer to Chapter 5 “Partitioning an External USB 2.0 Hard Disk” to prepare your USB 2.0 External Disk.
Notes: • This VPM-62289 External Enclosure is supported by the Mass Storage Device Driver in Windows Me/2000/XP operating systems. You do not need to install any driver after you finish installing the Windows 2000 Service Pack 4/Windows XP Service Pack 1 in the Windows operating system. • If a new drive does not appear in [My Computer], it means this USB 2.0 External Drive is a brand new hard disk drive which does not contain a partition. Please refer to Chapter 5 “Partitioning an External USB 2.
4. Using the VPM-62289 External Enclosure After the first installation of the driver, you can thereafter connect or disconnect the VPM-62289 External Enclosure without powering off the computer. Please follow the steps below when using the VPM-62289. 4-1 Connecting the VPM-62289 to Computer Step 1: Turn your computer ON. Step 2: Connect the smaller square USB connector end of the USB cable into the USB Port on the VPM-62289 External Enclosure.
VPM-62289 Connects to USB Port on computer Power Adapter Power Cord +5V/+12V Power Adapter Plug into AC Power Outlet USB 2.0 Cable VPM-62289 Assembly with 5.25” Device Plug into USB Port on Computer VPM-62289 Connects to FireWire Port on computer Power Adapter Power Cord +5V/+12V Power Adapter Plug into AC Power Outlet FireWire Cable VPM-62289 Assembly with 5.
Step 3: Connect the Power Adapter Power Cord to the +5V/+12V Power Adapter. Then, plug one end of the power cord into an AC power outlet, and the other end to the power inlet of the VPM-62289 External Enclosure. Step 4: Power ON your VPM-62289 External Enclosure. The LED indicators on the external enclosure should light after a slight delay. Step 5: Plug the second USB connector end of the USB cable into a USB port on your computer.
4-2 Disconnecting the VPM-62289 from Computer Windows 98 Step 1: Double-click the green Unplug or Eject hardware icon in the system tray and click the drive that you want to remove [USB Mass Storage Device] and click on [STOP]. Step 2: When the system prompts ‘Confirm device to be stopped’, click [OK]. When the green arrow icon disappears, you may safely unplug the VPM-62289 External Enclosure from the computer. Step 3: Switch the power on the VPM-62289 External Enclosure OFF.
Mac OS When disconnecting your VPM-62289 USB 2.0 &FireWire 1394 Combo External Enclosure from a Mac computer, first close all windows and quit all running applications that are stored on the VPM-62289 External Enclosure. Next, drag the USB 2.0 External Drive’s icon into the “Trash” to dismount it from the Desktop. You can now safely disconnect the USB 2.0 External Drive from the USB port. CAUTION!! Do not unplug the USB 2.
5. Partitioning the External USB 2.0 Hard Disk 5-1 Partitioning Under Windows 98/ME Boot-up the computer into Windows 98/ME. Next, with the power ON, connect your Hard Disk Drive installed in the VPM-62289 external enclosure to the USB port. There are two methods of partitioning and formatting your hard drive. Method 1 Step 1: Click on [Start], select [Control Panel] in [Settings], double-click [System] and open [Hard disk controllers].
Method 2 Step 1: Go into MS-DOS mode by clicking on [Start], then choose the [MS-DOS Prompt] in [Programs]. Step 2: At the DOS prompt, type [FDISK] and press [Enter]. Step 3: If FDISK quits without any message, go back to the Windows 98 screen, disconnect the Hard Disk installed in the VPM-62289 extenal enclosure and reboot the computer. Reconnect the HDD and go back to Step 1 to proceed.
IMPORTANT: You must type [5] in this screen to change the current fixed disk drive to build a partition. The default fixed drive set by FDISK is your internal hard disk drive. WARNING!! If you don’t change the fixed disk drive to the USB 2.0 Hard Disk, the data of your internal hard disk will be destroyed! Step 6: In the [Change Current Fixed Disk Drive], type the disk drive number that is assigned to the Hard Disk installed in the VPM-62289 external enclosure. Step 7: Go back to the [FDISK OPTIONS] screen.
5-2 Partitioning under Windows 2000/XP Step 1: To partition the USB 2.0 Hard Disk Drive installed in the VPM-62289 external enclosure under Windows 2000, connect the VPM-62289 external enclosure to the USB port on your computer. Next, click [Start], select [Control Panel], [Settings], open [Administrative Tools] and double-click [Computer Management].
Step 2: Click on [Disk Management]. All connected disk drives will be listed. Find the USB 2.0 Hard Disk that you added and to the right of the disk, view the status of the partitions of this disk drive. You can create a new or delete an existing partition by right-clicking on this area.
Step 3: Right-click on the partition status area of the USB 2.0 Hard Disk Drive. Click on [Create Partition….] and the “Create partition wizard” will appear. Step 4: Follow the instructions of the wizard to partition and format your USB 2.0 Hard Disk Drive. After you have completed the partitioning and formatting of the USB 2.0 Hard Disk Drive installed in the VPM-62289 external enclosure, you can write data to it.
Printed on recycled paper.