iBiking Folding Bike User manual For questions or missing parts please contact Fitness Benelux: Fitness Benelux Uw partner in fitness Twekkelerweg 263 7553 LZ Hengelo The Netherlands ENG T +31 (0)74-7600219 E service@fitnessbenelux.nl W www.fitnessbenelux.
CONTENTS SAFETY INSTRUCTIONS ............................................................................................................................................................... 3 CHECKLIST........................................................................................................................................................................................ 4 ASSEMBLY . .................................................................................................................
sAFEtY INstRUctIoNs WARNING: Before you undertake any programme of exercise that will increase cardiovascular activity please be sure to consult with your doctor. Frequent strenuous exercise should be approved by your doctor and proper use of your product is essential. Please read this manual carefully before commencing assembly of your product or starting to exercise. AttENtIoN - Please keep all children away from exercise products when in use.
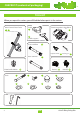
chEckLIst (contents of packaging) tooL kIt When you open the carton you will find the below parts in the carton: 2 Exercise monitor & Handlebar Saddle Main Frame & Rear Frame 24 7 1 16 6 Saddle support 9 Front stabilizer Adjuster Knob 26 Locking pin 3 8 Rear stabilizer water bottle holder water bottle holder 75 75 water bottle holder water bottle holder 75 757575 water bottle holder water bottle holder water bottle holder 75 water bottle holder 75 water holder waterwater bottle holder water
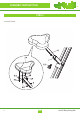
AssEMBLY INstRUctIoN stEP 1 Assemble Rear & Front Stabilizer, Pedal (L / R).
AssEMBLY INstRUctIoN stEP 2 Assemble Saddle.
AssEMBLY INstRUctIoN stEP 3 Assemble Handlebar & Exercise Monitor complete! 7 ENG VirtuFit iBiking Folding Bike
ExPLodEd dRAWING 08 8 ENG VirtuFit iBiking Folding Bike
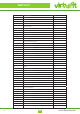
PARTS LIST 9 # Description QT 1 Handlebar 1 2 Rear Frame 1 3 Locking Pin 1 4 M5*10 Screw 2 5 Oval Line Plug 3 6 Saddle Support 1 7 Main Frame 1 8 Rear Stabilizer 1 9 Front Stabilizer 1 10 Crank (R&L) 2 11 Main Shaft 1 12 Lower Drive Wheel Shaft 1 13 Magnetic Bracket 1 14 Round Steel 2 15 Handle Grip Foam 2 16 Exercise Monitor 1 17 Pulse Sensor Pad 2 18 Chain Cover (U) 1 19 Tension Control knob 1 20 EVA Sticker 1 21 Control Line 1 22 Pulse
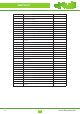
PARts LIst 10 # description Qt 44 M5*15mm Srew 3 45 M6*12mm Allen Bolt 4 46 M5*50mm Screw 1 47 Drive Belt 230J 1 48 Drive Belt 220J 1 49 Spring 1 50 M8*20 mm Allen Bolt 2 51 M8 x 65 mm Carriage Bolt 4 52 M6*40 mm Screw 2 53 M6*15 mm Screw 8 54 M4*20 Self-tapping Screw 4 55 M10 Nut 2 56 M6 Curved Washer 2 57 M6 Flat Washer 2 58 Flat Washer 1 59 Sensor Wire 1 60 M8 Flat Washer 3 61 M8 Dome Nut 4 62 M8 Nylon LockNut 3 63 Flat Washer 2 64 Outer B
REsIstANcE AdjUstMENt To ensure smooth efficient cycling action, the tension belt braking system on your folding bike has been correctly adjusted by our factory during production. To adjust the pedalling resistance during use, start by turning the Tension Control (19) fully ANTI-CLOCKWISE at the start of your workout. Gradually increase the pedalling resistance by turning the Tension Controller Knob CLOCKWISE as required.
FoLdING INstRUctIoN WhEN UNFoLdEd Using the Locking Pin (3) to fold and unfold the bike. When in use, the Locking Pin (3) is in Position A. WhEN FoLdEd Using the Locking Pin (3) to fold and unfold the bike. When folded, the Locking Pin (3) is in Positon B.
hoW to AdjUst The Saddle Support has “Max” Sign to show the maximum height of Saddle. You should not exceed this height. Unscrew the Seat Adjustment Knob (26) a couple of turns then pull the knob outwards to release the Seat Support Tube (6). Position the Seat Support Tube to the desired height allowing for a slight bend in the knee at the lowest pedal position and retighten the Seat Adjustment Knob (26) .
CONTROL PANEL OPERATION FUNCTION TIME 0 : 00 99 : 59 (Minute) SPEED 0.0 999.9 (KM/H) DISTANCE 0.0 999.9 (KM) ODOMETER 0 CALORIES 0.0 9999 (Cal) PULSE 30 230 (Beats per Minute) 9999 (KM) 1 2 9 8 7 SCAN SPEED DISTANCE TIME 3 ODOMETER CALORIES PULSE 4 6 5 14 ENG 1. MONITOR 2. ODOMETER 3. CALORIES 4. PULSE 5. MODE 6. TIME 7. DISTANCE 8. SPEED 9.
CONTROL PANEL OPERATION FUNCTION DESCRIPTION MODE SCAN Changing from function to function every 2 seconds TIME Count up SPEED Cycle speed DISTANCE Exercise distance ODOMETER Computed theoretical calorie burn CALORIES Accumulated total distance PULSE Actual exercise pulse rate Note 1. Compatible with iOS and Android system 2. Console and mobile device connection via Bluetooth (4.0), once connecting, the display will be off after 4 minutes. 4.
coNtRoL PANEL oPERAtIoN oPERAtIoN 1. When monitor power on (or press MODE, RESET key and hold for 3 seconds), LCD screen will display all segments with Beep sound for one second and enter to SCAN mode as Drawing B. 2. With any signal been transmitted into the monitor, the value of TMR, DST, and CAL will start to count up as Drawing C. 3. Without any signal been transmitted into the monitor for 4 minutes, the monitor will enter to SLEEP mode.
APP INSTRUCTION Download the APP in Google play or App Store. Turn on Bluetooth on your smart devices, and then start Fit Hi Way or iBiking+ APP on smart devices for connection. Start workout with devices. Fit Hi Way and iBiking+ APP download: Fit Hi Way and iBiking+ instruction manuals : The manuals will be updated from time to time, the consumer can get the newest version by scanning the QR code. Fit Hi Way iBiking+ NOTE: 1. Once console is connected to device via Bluetooth, the 2.
For questions or missing parts please contact Fitness Benelux: Fitness Benelux Uw partner in fitness Twekkelerweg 263 7553 LZ Hengelo The Netherlands T +31 (0)74-7600219 E service@fitnessbenelux.nl W www.fitnessbenelux.