
Instructions / Assembly


B
A
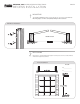
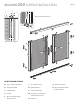
INSTALLING THE TOP AND BOTTOM GUIDE RAILS
Slide the B-Bottom Guide Rail fully onto the tab on the A-Screen Cassette
End Cap [6.1]. Repeat for the C-Top Guide Rail [6.2].
On the opposite end of the top and bottom guide rails, insert the tabs of the
second Cassette.Move the Cassette and guide rails into position within the door
opening then clip the second Cassette into the Recess Mounting Clips.
6
6.1
MILANO 200 INSTALLATION INSTRUCTIONS PAGE 5
RECESS INSTALLATION
A
C
6.2
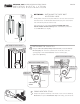
ADJUSTING THE HANDLES
Adjust the G-Handle heights by loosening the Allen-Head Set Screw, move the
G-Handle as desired and retighten screw.
8
K
K
G
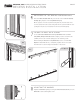
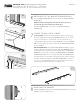
SECURE THE RAILS WITH SCREWS
Secure the B-Bottom Guide Rail and C-Top Guide Rail with four I-#8 x
3/4”(19mm) Phillips Panhead Screws each [7.1]. Position screws 6 inches
(150mm) in from each end and equally space the remaining screws.
When installing the Bottom and Top Guide Rail, use the convenient Pile
Opener included with this kit, to temporarily separate the two insect piles.
This will make for easier viewing and installation of the screws.
7
Pile Opener
C
I
I
I
I
I
I
I
B
I
7.1