
Instructions / Assembly


MILANO 200 INSTALLATION INSTRUCTIONS PAGE 9
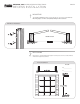
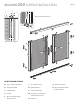
SURFACE INSTALLATION
A
L
M
L
M
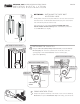
INSTALLING THE CASSETTES
Remove and discard the P-Pile/Weather Strip from the back of A-Screen
Cassette. Slide two L-Surface Mount Clips into the groove on the rear of the
Screen Cassette before proceeding [4.1]. Position the Screen Cassette, and
use I-#8 x 3/4”(19mm) Phillips Panhead Screws to secure L-Surface
Mount Clips to the opening [4.2]. Repeat for other side of opening.
4
4.1 L-Clips for Surface Install
4.2 Surface Installation
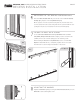
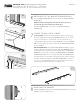
CRIMP WEATHER STRIPS
Crimp in the upraised channel lip on the inside of each corner of the C-Top
Guide Rail to keep the J-Pile/Weather Strip from moving, as shown at left.
5
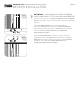
OPTIONAL • INSTALLING THE SLIDE BOLT
ACCESSORY LOCK
Identify which of the two screen panels will be the one most often used to enter
and exit the home. You will install the Slide Bolt Accessory Lock on the interior
side of this inactive panel (the side less used).
In the interior groove of the pull bar, slide in an S-Slide Bolt at the
bottom and then another at the top. Make certain that the pointed end
of each Slide Bolt faces out [3.1].
3
O
O
PULL BAR
PULL BAR
TOP
BOTTOM
3.1