Preface Copyright ©2017 Vivitek. is a trademark of Delta Electronics, Inc. All other trademarks are the property of their respective owners. All values, weights and sizes in this Manual are approximate values. Specifications are subject to change without notice. Disclaimer The information in this document is subject to change without notice.
Important Safety Information Important: It is strongly recommended that you read this section carefully before using Qumi. These safety and usage instructions that will make sure you enjoy many years of safe use of Qumi. Keep this manual for future reference. Symbols Used Warning symbols are used on the unit and in this manual to alert you of hazardous situations. The following symbols are used to call attention to important information.
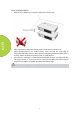
Qumi Installation Notice Allow at least a 500mm (20”) clearance around the exhaust vent. Make sure that the intake vents do not recycle hot air from the exhaust vent. When operating Qumi in an enclosed space, make sure that the surrounding air temperature within the enclosure does not exceed operating temperature while Qumi is running, and the air intake and exhaust vents are unobstructed.
Power Supply Safety Only use the supplied adapter. Do not place anything on the cord. Place the cord where it will not be in the way of foot traffic. Remove the battery from the remote control when storing or not in use for a prolonged period. Cleaning Qumi Before cleaning, disconnect the power supply cables. See “Cleaning Qumi” on Page 43. Note: Qumi will be warm after usage. Allow Qumi to cool down before storing away.
Table of Contents Preface .......................................................................................................................................... 2 Important Safety Information ..................................................................................................... 3 Main Features .............................................................................................................................. 5 Chapter 1 At a Glance ...............................................
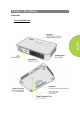
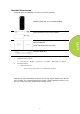
Chapter 1 At a Glance Overview Front/Top/Right View 7
Rear/Top/Left View 8
Standard Accessories Along with Qumi, the following accessories are include in the box: Remote Control (with one 3V CR2025 battery) Regional Power Cord and Power Adapter Documentation Kit* (Quick Start Guide, Warranty Card) Standard HDMI cable *Note: The user manual is located inside the projector’s internal memory: 1. Projector’s internal memory: 2. Home Screen → My Apps → File Brower → Local Disk → Qumi_Q38_User_Manuals Visit Vivitek website www.vivitekcorp.com: i.
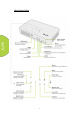
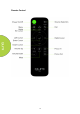
Remote Control 10
Setting Up the Remote Control The remote control comes with one (1) 3V lithium battery (CR2025). The battery is pre-installed in the remote control. To begin using the remote control, remove the plastic tab (A) from the battery compartment. Replacing the Remote Control’s Battery 1 . Remove the battery compartment cover 2 . Remove the old battery and insert by turning the cover the new battery towards the arrow with the positive (A). Then lift the side facing up. 3 .
Chapter 2 Getting Started What you need Qumi can be connected to many types of external devices and peripherals. To play music, connect Qumi to an external or portable music player. To play films, connect Qumi to a DVD player, Blu-Ray player or media player. To display files and other types of media, connect Qumi to peripherals like a personal computer via the provided HDMI cable or a USB drive. These devices can be connected to Qumi using an appropriate cable.
Setting Up Qumi Connecting Peripherals by HDMI Connect HDMI-compatible peripherals to Qumi using an HDMI cable (Included). Inserting a USB device or microSD Card Connect a USB device (USB Flash Drive, Keyboard, Mouse) or microSD card to the Qumi by inserting the desired device (s) into the appropriate port. Connecting Audio Connect earphones or speaker to Qumi by inserting into the Audio-in port. Bluetooth Audio out is also available under Settings, Bluetooth. Turn Bluetooth "ON" and pair audio device.
Charging the Battery Follow the below steps to charge Qumi: Connect the AC power adapter to Qumi. Connect the other end of AC power adapter to a wall outlet. Notes: The battery will be fully charged in about 3 to 4 hours.
Starting and Shutting Down Qumi 1 . Connect the AC power adapter to Qumi. Connect the other end of AC power adapter to a wall outlet. Note: The adapter models may differ between countries. 2 . Press on Qumi. power button to turn When AC power adapter is connected, press the power button for 1 second. When AC power adapter is not connected, press the power button for 5 seconds. Qumi splash screen displays and connected devices are detected but not displayed.
3. If several input devices are connected, repeatedly press the SOURCE selection (signal source) button on the remote to toggle through connected inputs. HDMI Android 4. Press 5. When the “Power off” message appears, please press power button to power off Qumi. the power button again . The projector will turn off. Power off? Please press the power button again Adjusting the Projector Level Flip down the kickstand to adjust the projector level.
Chapter 3 Qumi Home Screen Views The Qumi Q38 Home Screen is designed as the starting point for accessing all of the projector’s key functions and features. The Home Screen helps provide ease-of-use for conveniently operating and configuring the projector. It displays the main functions, app links, and notification bar. The Home Screen also allows for direct access to media files from a smart device (smartphones or tablets), microSD card or USB drives for a complete media experience.
Entertainment - Apps or tools for entertainment are placed here. The Apps that appear here can be customized and updated based on the user’s preference. Productivity - Apps or tools for working or being productive are placed here. The Apps that appear here can be customized and updated based on the user’s preference. Connectivity - Apps or tools for connecting other devices via WiFi or Bluetooth are placed here. The Apps that appear here be customized and updated based on the user’s preference.
Notification Bar Notification Bar appears on the top right of the screen. The notification icons indicate the Qumi connectivity status. microSD Card Icon – microSD card is inserted. Bluetooth Icon – Bluetooth function is activated. USB Drive Icon – USB flash drive is inserted. WiFi Icon – WiFi is connected. Power/Battery Icon – Power is connected or battery power level.
Photo The available images in the connected USB drive, microSD card or Internal Memory are listed in the Photo menu. Press , , and buttons on top of the projector or remote controller to select files and press to display the chosen file. The control panel display will change based on the file. The table below lists the available functions. Menu Bar/Icon Description Albums, Locations, Times, People, Tags 1.
Video Available videos in the connected USB drive, microSD card or Internal Memory are listed in the Video menu. Press , , and buttons on top of the projector or the on the remote controller to select files and press to display the chosen file. The control panel display will change based on the file. The table below lists the available functions.
Music Available music in the connected USB drive, microSD card or Internal Memory are listed in the Music menu. Press , , and buttons on top of the projector or buttons on the remote controller to select files and press to display the chosen file. The control panel display will change based on the file.
Document Available documents in the connected USB drive, microSD card or Internal Memory are listed in the Document menu. Press , , and buttons on top of the projector or the on the remote controller to select files and press to display the chosen file. The control panel display will change based on the file. The table below lists the available functions.
Close App Store Manage downloads, updates and access to the APP Store. Search for the desired App.
Browser Navigate the web with the built-in browser. Press , , and buttons on top of the projector or the remote controller to select files and press for display. The control panel display will change based on the file. The table below lists available functions. Menu Bar/Icon Description Bookmark this page Search or type URL Find local bookmark Notes: When navigating the web with the built-in browser, it’s recommended to connect a USB mouse and keyboard to Qumi.
My Apps Manage and operate all applications installed on Qumi. Applications downloaded through the App Store will be show in the My Apps drawer.
WiFi Setup and manage wireless connections (Example: Tablet, Smartphone) Enable WiFi -- Select network name Input user name and password -- Click Connect Press , , and buttons on top of the projector or the remote controller to select files and press for display. The control panel display will change based on the file. The table below lists available functions.
Mirroring Setup This feature will allow the wireless mirroring of connected personal computers, smartphones and tablets (iOS/MacOS/Windows/Android operating systems) to the Qumi Q38 without requiring any physical cables. The Qumi Q38 supports 3 types of mirroring technology and this includes AirPlay with AirReceiver, Google Cast with AirReceiver and Miracast. AirPlay with AirReceiver AirPlay with AirReceiver lets you wirelessly stream content from an iOS or MacOS device to the Qumi Q38.
B. C. There is no need to download the AirReceiver App to your iOS/MacOS Smartphone/Tablet/PC. a. On your iOS Smartphone/Tablet, slide up from the bottom of the screen to display the control console. The AirPlay button should appear, then click on it. Select the suitable device to switch on the screen mirroring. In this case, the name will appear as “Vivitek”. b. On your MacOS PC, activate the status menu from the top right-side of the screen to display the Status menu.
D. 2. Now you should be connected and mirroring your iOS/MacOS device’s content to the Q38 .AndroidOS device setup for Google Cast with AirReceiver Note: The AirReceiver application is defaulted to always be on, so no need launch it. A. Connect your AndroidOS Smartphone/Tablet and Qumi Q38 to the same office or home wireless network. B. On your Android Smartphone/Tablet, launch the Google Cast function. Select the suitable device to switch on the screen mirroring.
D. 4. Reminder: Every Android Smartphone/Tablet brand has a different name to describe their “Miracast” function. Check your Smartphone/Tablet’s user manual or call the brand’s service center to find out what “Miracast” is called. Now you should be connected and mirroring your Android Smartphone / Tablet’s content to the Q38. WindowsOS device setup for Google Cast with AirReceiver Note: The AirReceiver application is defaulted to always be on, so no need launch it. A.
Settings Access to a variety of settings including Wi-Fi, Display, Sounds, Apps, Storage, Bluetooth, System and more. Press , , and buttons on top of the projector or on the remote controller to select files and press for display. The control panel display will change based on the file. The table below lists available functions.
Chapter 4 On-Screen Display (OSD) Settings OSD Menu Controls Qumi has an On-Screen Display (OSD) settings menu (Menu button can be found on top of the projector or on the remote control) that allows you to make adjustments and change settings, such as display and audio settings. The OSD menu has 11 sub-menus: Language – Allows for the selection of the language for the OSD Menu. Press OSD Menu key for entry.
OSD Menu Overview Use the following table to quickly find a setting or determine the range for a setting.
OSD Language Settings Qumi’s OSD language menu can be easily changed. Perform the following steps to change the OSD language: 1. Press the OSD Screen Menu button remote control to enter the Settings menu. on the top of the projector or on the 2. Move the cursor to highlight the menu language, and press 3. Press 4. Press , , and . buttons to choose the preferred language. button to exit language settings.
Input Source Perform the following steps to change the display mode: 1. Press the OSD Screen Menu button remote control to enter the Settings menu. on the top of the projector or the 2. Move the cursor to highlight the Input Source, and press to enter this mode. buttons to select the desired Input Source (HDMI、ANDROID). 3. Press and 4. Press button to exit display mode settings. Note: User display modes may be adjusted as required by the applications.
Display Mode Settings Perform the following steps to change the display mode: 1. Press the OSD Screen Menu button remote control to enter the Settings menu. on the top of the projector or the 2. Move the cursor to highlight the Display Mode, and press to enter this mode. 3. Press and buttons to select the desired display mode (Presentation, Bright, Movie, User). 4. Press button to exit display mode settings. Note: User display modes may be adjusted as required by the applications.
Sound Mode Settings Perform the following steps to change the sound mode: 1.Press the OSD Screen Menu button remote control to enter the Settings menu. on the top of the projector or the 2. Move the cursor to highlight the Sound Mode, and press to enter this mode. 3. Press and buttons to select the desired sound mode (Standard, Music, Movie, Sports and User). 4. Press button to exit sound mode settings. Note: Treble and Bass can be adjusted as required by the applications.
Color Temperature Settings Perform the following steps to change the color temperature settings: 1. Press the OSD Screen Menu button remote control to enter the Settings menu. on the top of the projector or the 2. Move the cursor to highlight the color temperature, and press mode. 3. Press and 4. Press button to exit the Color Temperature mode settings. to enter this buttons to select the desired Color Temperature mode.
Aspect Ratio Settings Perform the following steps to change the projector’s aspect ratio: 1. Press the OSD Screen Menu button remote control to enter the Settings menu. on the top of the projector or the 2. Move the cursor to highlight the Aspect Ratio settings and press mode. 3. Press 4. Press and to enter this buttons to select the desired Aspect Ratio mode. button to exit the Aspect Ratio mode settings.
Projection Method Settings Perform the following steps to change the projector’s projection method: 1. Press the OSD Screen Menu button remote control to enter the Settings menu. on the top of the projector or the 2. Move the cursor to highlight the Projection Method settings and press this mode. to enter 3. Repeatedly press button to select the desired projection method (Front, Front/Ceiling, Rear/Ceiling, Rear). 4. Press button to exit the Projection Method settings.
Keystone Correction Settings Perform the following steps to change the projector’s keystone correction: 1. Press the OSD Screen Menu button remote control to enter the Settings menu. on the top of the projector or the 2. Move the cursor to highlight the Keystone Correction settings, and press enter this mode. 3. Press mode. 4. Press , , and to buttons to select the desired Keystone Correction button to exit the Keystone Correction settings.
Reset All Settings Perform the following steps to reset all on the projector: 1. Press the OSD Screen Menu button remote control to enter the Settings menu. on the top of the projector or the 2. Move the cursor to highlight the Reset All settings and press mode. to enter this 4. Press button to select Yes and to select No. After selecting Yes, the Qumi system will be reset to original factory settings.
Status Settings Perform the following steps to view the projector’s status: 1. Press the OSD Screen Menu button remote control to enter the Settings menu. on the top of the projector or the 2. Move the cursor to highlight the Status settings and press 44 to enter this mode.
Software Update Settings (USB) 1. Download software and unzip file 2. Place software into USB flash drive File Name: MERGE_DLP30.bin Note: Place file directly into USB drive (Not in folder) 3. Insert USB flash drive into the USB port (Right side port) 4. Click Menu on the remote control, the Settings menu will appear 5.
Chapter 5 Taking Care of Your Qumi Cleaning Qumi Periodically cleaning Qumi to remove dust and grime will help ensure for a trouble-free projection and operation. Warning: 1. Qumi should be turned off and unplugged before cleaning. Failure to do so may result in injury or damage to the system. 2. Use only a dampened cloth when cleaning. Do not allow water to enter the ventilation openings on Qumi. 3.
Troubleshooting FAQs and Solutions These guidelines provide tips to deal with problems you may encounter while using Qumi. If the problem remains unresolved, contact your dealer for assistance. The problem sometimes can be as simple as improper connection of cables. Review the following possible issues before proceeding to the problem-specific solutions. • Use another electrical device to confirm that the electrical outlet is properly working. • Make sure that Qumi is turned on.
Image Problems Problem: No image appears on the screen. 1. Check whether the source (PC, Flash Drive, Camera, Smartphone, etc…) is properly configured. 2. Turn off all of the equipment and power up the equipment again in the correct order. Problem: The image is blurred 1. Adjust the focus directly via the focus buttons on the projector or remote control 2. Ensure that the distance between the Qumi and the screen is within specified range 3. Clean Qumi lens with optical lens cleaning cloth if it is dirty.
Audio Problems Problem: There is no sound 1. Adjust the volume on the audio source. 2. Check the audio cable connection. 3. Test the output of the audio source with other speakers. 4. If using Bluetooth, Turn Bluetooth on in Settings and ensure that pairing has occurred. 5. Have Qumi serviced. Problem: The sound is distorted 1. Check the connection of audio cable. 2. Use other loudspeaker to test output of audio source. 3. Have Qumi serviced. FAQs 1.
8 What type of photo formats does Qumi support? JPEG/BMP/GIF/PNG 9. How long will the LED light source in Qumi last and can it be replaced? Qumi does not use a typical light source. It uses a set of Light Emitting Diodes (LED) to illuminate and project images. LED’s have a greater lifespan than conventional lamps. The Qumi’s LED is estimated to last for approximately 30,000 hours. The lifespan of the LED depends on factors such as brightness, usage, environmental conditions.
Specifications Model No.: Qumi Q38 Native Resolution FullHD 1080p (1920 x 1080) Maximum Resolution WUXGA (1920 x 1200) / UHD 4K video playback support on Android OS Throw Ratio (Distance/Width) 1.2:1 Image Size (Diagonal) 0.5m - 3.3m (19” - 130”) Projection Distance 0.5m - 3.5m (1.6ft – 12.5ft) Projection Lens Motorized focus feature on remote control or menu control on projector Aspect Ratio 16:9 Native Keystone Correction Vertical ±40°(±40 Steps) Operating System Android™ v6.
Projection Distance vs Projection Size Projection Distance and Size Table Image Diagonal (cm/inch) Image Width (cm/inch) Image Height (cm/inch) Projection Distance (cm/inch) 76/30 66/26 33/13 77/30 102/40 89/35 43/17 103/40 127/50 111/44 54/21 128/50 152/60 133/52 65/25 154/61 178/70 155/61 76/30 179/71 203/80 177/70 87/34 205/81 229/90 199/78 98/38 231/91 Note: The offset table has a 10% tolerance due to optical component variations.
Timing Mode Table Resolution VESA640x480_60 VESA640x480_72 VESA640x480_75 VESA800x600_60 VESA800x600_72 VESA800x600_75 VESA1024x768_60 VESA1024x768_70 VESA1024x768_75 VESA1280x768_60-RB VESA1280x768_60 VESA1280x800_60 VESA1280x800_75 VESA1280x1024_60 VESA1280x1024_75 VESA1280x960_60 VESA1400x1050_60 VESA1440x900_60 VESA1600x1200_60 VESA1680x1050_60-RB VESA1680x1050_60 VESA1920x1080_60 VESA1920x1200_60-RB IBM-720x400-70 MAC-640x480-66 MAC-832x624-75 MAC-1024x768-60 MAC-1152x870-75 SDTV-480i60 SDTV-480P59 SDT
Qumi Dimensions 54
Regulatory Compliance FCC Warning This equipment has been tested and found to comply with the limits for a Class B digital device pursuant to Part 15 of the FCC Rules. These limits are designed to provide reasonable protection against harmful interference when the equipment is operated in a commercial environment.