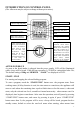
BREAD MAKER INSTRUCTION MANUAL STAINLESS STEEL BREAD MAKER INSTRUCTION MANUAL WITH AUTOMATIC FRUIT DISPENSER OK STOPSTART MODEL: BM1352-UL SKU:VH839 Read this manual thoroughly before using and save it for future reference Guangdong Xinbao Electrical Appliances Holdings Co.
CONTENTS IMPORTANT SAFEGUARDS KNOW YOUR BREAD MAKER INTRODUCTION OF CONTROL PANEL DELAY FUNCTION KEEP WARM MEMORY ENVIRONMENT WARNING DISPLAY AUTO ADD INGREDIENT FUNCTION FOR THE FIRST USE USING YOUR BREAD MAKER SPECIAL INTRODUCTION CLEANING AND MAINTENANCE INTRODUCTION OF BREAD INGREDIENTS INGREDIENTS MEASUREMENT TROUBLE SHOOTING GUIDE 2
IMPORTANT SAFEGUARDS: Before using the electrical appliance, the following basic precautions should always be followed: 1. READ ALL INSTRUCTIONS. 2. Before using check that the voltage of wall outlet corresponds to that shown on the rating plate. 3. Do not operate any appliance with a damaged cord or plug or after the appliance malfunctions, or it is dropped or damaged in any manner.
be able to escape freely. A fire can be caused if it is covered by, or comes into contact with combustible material. 17. Do not operate the appliance for other than its intended use. 18. Always use the appliance on a secure, dry level surface. 19. Do not use outdoors. 20. This appliance has been incorporated with a grounded plug. Please ensure the wall outlet in your house is well earthed. 21.
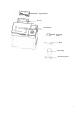
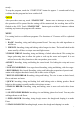
Ingredient Box Ingredient Box ok Drawer ok Drawer View Window View Window Kneading blade Kneading blade Hook Hook Measuring Cup Measuring Cup Measuring Spoon Measuring Spoon 5
INTRODUCTION OF CONTROL PANEL (The silkscreen may be subject to change without prior notice.) Loaf size: 500g/750g/900g If add ingredient Set/display working time Upper arrow is rise 1 Lower arrow is rise 2 Set/display delay time Warm Inner circle is knead 1, Outer circle is knead 2 Under one-level menu status, press this button to enter second-level menu.
steady。 To stop the program, touch the “START/STOP” button for approx. 3 seconds until a beep confirms that the program has been switched off. PAUSE After procedure starts up, touch “START/STOP” button once to interrupt at any time, the operation will be paused but the setting will be memorized, the working time will be flashed on the LCD. Touch “START/STOP” button again or within 10 minutes without touching any button, the program will continue. MENU Use setting knob to set different programs.
dessert 13.DOUGH RISE: Kneading, rising dough, Remove the dough and shaping it to make bread rolls, pizza, steamed bread, etc. 14.FERMENT/DEFROST: only heat with low temperature, the rising time can be set by yourself in the stated scope 15.Yogurt: only heat with low temperature, the rising time can be set by yourself in the stated scope 16.Pickled vegetables: Making Pickled vegetable paste is to make the chili powder more condensed, the taste more better. 17..DOUGH: kneading and rising, but without baking.
programs of QUICK, PIZZA DOUGH, ITALIAN DOUGH, DOUGH RISE, FREMENT/DEFROST, YORGUAT, PICKLED VEGE, DOUGH, JAM, BAKE, ROAST NUT, MEAT FLOSS, RICE VINEGAR, CAKE , ITALIAN CAKE and DO IT YOURSELF Note: select your desired loaf size by rotating Setting knob DELAY FUNCTION If want to use delay function, the maximum delay time is 13 hours, rotate the Setting knob to delay mark, press “OK” button, rotate the Setting knob to increase or decrease delay time, once press the button, the delay time will be increased a
will be continued automatically within 10 minutes, even without touching “START/STOP” button. If the break time exceeds 10 minutes the memory cannot be kept and the bread maker must be restarted, but if the dough is no further than the kneading phase when the power supply breaks off, touch the “ START/STOP” straight to continue the program from the beginning.
2. Clean all the parts according to the latter section “Cleaning and Maintenance”. 3. Set the bread maker in baking mode and bake empty for about 10 minutes. After cooling it down, clean once more. 4. Dry all parts thoroughly and reassemble them, the appliance is ready for use. USING YOUR BREAD MAKER 1. Lay the appliance on the firm and even surface. 2. Before making bread, weigh the ingredients you need respectively. 3. Place the pan in position, turn it clockwise until it clicks in correct position.
SUGAR BREAD, RICE BREAD, RICE FLOUR BREAD, QUICK, ITALIAN BREAD, GLUTEN FREE BREAD and DO IT YOURSEL, put the fruit ingredients into the ingredient box and then close the pan drawer. NOTE: During operation, the ingredients in the ingredient box will be automatically poured into the bread pan. 13. Once the process has been completed 10 beeps sound will be heard. Touch START/STOP button for approx. 3 seconds to stop the process and take out the bread.
with baking powder or soda in place of yeast. To obtain perfect quick bread, it is suggested that all liquid ingredients shall be placed at the bottom of the bread pan and dry ingredients on the top, but during the initial kneading, some dry ingredients may collect in the corners of the pan, so in order to avoid flour clumps, you may use a rubber spatula to help to knead dough. CLEANING AND MAINTENANCE Disconnect the machine from the power and let it cool down prior to cleaning. 1.
Flour that contains no baking powder, it is applicable for making express bread. 3. Whole-wheat flour Whole-wheat flour is ground from grain. It contains wheat skin and gluten. Whole-wheat flour is heavier and more nutrient than common flour. The bread made by whole-wheat flour is usually small in size. So many recipes usually combine the whole -wheat flour or bread flour to achieve the best result. 4.
(1) Pour 1/2 cup warm water (45-500C) into a measuring cup. (2) Put 1 tsp. white sugar into the cup and stir, then sprinkle 2 tsp. yeast over the water. (3) Place the measuring cup in a warm place for about 10min. Do not stir the water. (4) The froth should be up to 1 cup. Otherwise the yeast is dead or inactive. 9. Salt Salt is necessary to improve bread flavor and crust color. But salt can also restrain yeast from rising. Never use too much salt in a recipe. But bread would be larger if without salt. 10.
Observe the level of the measuring cup with your eyes horizontally. When you measure cooking oil or other ingredients, clean the measuring cup thoroughly without any other ingredients. 2. Dry measurements Dry measuring must be done by gently spooning ingredients into the measuring cup and then once filled, leveling off with a knife. Scooping or tapping a measuring cup with more than is required. This extra amount could affect the balance of the recipe.
times while the machine frequently, unless it is was working necessary such as add ingredients. And make sure that lid was closed well after being opened. Long blackout while the Do not use the ingredients machine was working and start over again. The rotation of the Check that the kneading kneading blade is blocked blade is blocked by grains, etc. Pull out the baking pan and check the driver is turning. If this is not the case, send the appliance to the customer service.
old or stale flour, warm e liquids make the dough rise too quickly and loaf fall in before baking no salt or not enough sugar too much liquid The bread is not baked in too much or not enough a/b/g the center liquid too much humidity h recipes with moist g ingredients, e.g.
ENVIRONMENT FRIENDLY DISPOL You can help protect the environment! Please remember to respect the local regulations: hand in the non-working electrical equipments to an appropriate waste disposal center. NOTE: To continuously improve its products, VIVOHOME reserves the right to modify this information without prior notification. Please contact customer service via support@vivo-home.com with any questions, comments, or concerns.