™ Table of contents Important Safety Instructions.................................................................1 Package Content.....................................................................................2 System Overview...................................................................................3 Installation..............................................................................................4 Cable Connection.....................................................................
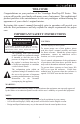
™ Welcome Congratulations on your purchase of the Vizualogic RoadTrip RT Series. This system will provide your family with many years of enjoyment. This sophisticated product provides video entertainment to rear seat passengers without altering the appearance of your vehicle’s original interior. Reviewing this owner’s manual thoroughly prior to operation will provide you with the best performance and help explain the simple requirements for proper care.
™ Package Content AUX Cable (1) USB Cable (1) 2
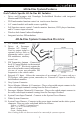
™ All-In-One System Features Each Vehicle Specific All-In-One Kit Includes: • • • • • • Driver and Passenger side Vizualogic PerfectMatch Headrest with integrated Monitor and DVD Player(s). DVD and monitor function control via touch screen function. A/V control module with multi-source capability. Full function remote control. Controls monitor functions, DVD player functions, and A/V source input selection. Wireless dual channel infrared headphones. Integrated wireless FM modulator.
™ Headrest Installation Section I - Headrest Installation 1. Remove the factory headrests (Detailed instructions can be found in the vehicle’s service manual. 2. Starting with the driver’s side headrest (Monitor A) insert the mini-din connectors into the driver side headrest post guides. 3. Slowly push the cables into the seat. If an obstruction is encountered, pull back slightly on the cable and rotate before continuing. Route the cables so that they exit the bottom of the seatback. 4.
™ Section III - System Set-up/Sub-Menu Controls Enter the Sub-Menu, touch the “MENU” button on the screen to enter the SubMenu. Use the “” and “” buttons to move up and down within the SubMenu. Once the desired item has been highlighted, press the “MENU” button until the desired setting is achieved. IR CHANNEL – This function changes the IR channel that the monitor transmits from: Ch.‘A’, Ch.
™ Single & Dual DVD System 7 9 8 6 5 4 1. 2. 3. 4. 5. 3 2 1 6. 7. 8. 9. Power Button Infrared Transmitter/Power Indicator AUX Jack Headphone Jack Mini USB Port DVD Loader Touch Screen Panel Eject Button SD Card Reader Single DVD System Only 1. 2. 3. 4.
™ Single & Dual DVD System Monitor 1 DS A1285 Monitor 2 PS A1285 POWER A/V OUTPUTS ANT EXTERNAL A/V INPUT Single DVD System Only Monitor 1 DS A1285 Monitor 2 PS A1286 POWER A/V OUTPUTS ANT EXTERNAL A/V INPUT 7
™ 19 20 21 22 The IR Remote Control Point the remote control no more than 3-4 meters (approx. 21 feet) from the remote control sensor on the front of the player. Keep remote within a ± 30˚ angle. 1. 2. 3. 4. 5. 6. 7. 8. 9. 10. 11. 12. Adjust Decrease Adjust Increase Title Eject Number Buttons Clear Slow Program Mute Repeat Zoom Play / Pause 13. 14. 15. 16. 17. 18. 19. 20. 21. 22. 23. 24.
™ Touch Menu Screens Once the unit is connected to the appropriate power source, press the POWER button to power the unit ON. Touch any area of the screen to enter the menu screen. The screen will display as below. Main Menu A-1285 Main Menu ent exit exi t A-1286 ent exit exit To enter the Main Menu screen, simply press the MENU key on the upper left corner. The screen will display as below.
™ Press the AUDIO menu key to enter the AUDIO setup menu. This screen allows you to set the FM modulator settings as well as the IR settings. Audio back A-1285 fM contro l -this Screen+ ir headphone - channel A + fM Source -this Screen+ fM radio ou t - 88.1 Mhz + Audio back exit exit ir headphone - channel b + fM contro l -other Screen+ A-1286 Press the VIDEO menu key to enter the VIDEO setup menu. This screen allows you to adjust the picture settings.
™ System Settings Press SETUP on the Remote Control to enter the system setting menu. Current Item --G eneral S etup Page -TV Display Angle Mark OSD Language Captions Screen Saver Last Memory Current Item Wide ON ENG Off ON ON Goto general setup page On the Remote Control, press either the UP or DOWN or LEFT or RIGHT arrow buttons to move to the desired menu item and press PLAY to select the menu item.
™ 4:3LB Allows you to see movies in their original aspect ratio. The entire frame of the movie will be displayed. 16:9 recorded movies will occupy a smaller portion of the screen and you will see black margins above and below the picture. 4:3PS The movie will be shown in full screen without any black margins. Parts of the image will be cutoff from the right and left side. 16:9 Allows you to see movies in their original aspect ratio. 16:9 Depending on the DVD screen format (e.g. 2.
™ When playing a DVD disc with the Angle option set to ON, the screen will display the angle mark. This will give you the possibility to view multiple angle DVDs. When the Angle option is set to OFF, no angle mark will be displayed. NOTE: DVD must have multiple angle options for this option to work. To select the language for your On Screen Display (OSD) use this menu item. There are multiple languages available.
™ - - Audio S etup P age- - --E qualizer Page -- Analog audio setup Equalizer 3D Processing HDCD Sound Mode Bass Boost Super Base Treble Boost Select the EQUALIZER menu item to setup your preferred Equalizer mode. Press ENTER to enter this selection. You can select one of these preset Equalizer modes to adjust the audio signal to your liking. Press ENTER to enter the Analog Audio setup page.
™ --V ideo setup page -- - - 3 D processing page -Pro logic ii Revers mode Off Color Setting Off Concert Living Room Hall Bathroom Cave Arena Church Go to video setup page Reverb MODE Select this menu item to setup your Video Quality modes. Press ENTER to enter this selection. Select 3D PROCESSING to setup your preferred 3D mode. Press PLAY to enter this selection and to set up your preferred Audio mode for a better surround effect. Press ENTER or the RIGHT arrow to enter this selection.
™ Color setting setup color setting setup Sharpness Brightness Contrast Gamma Hue Saturation luma delay sharpness brightness contrast gamma hue saturation luma delay Mio 00 00 NONe 00 00 1T Mio 00 00 NONe 00 00 1T contrast brightness You can set the Brightness to your liking. Press ENTER or the RIGHT arrow to enter the brightness control, then press the UP or DOWN arrow to adjust the image. Press the LEFT arrow to go back to the menu. You can set the Contrast to your liking.
™ color setting setup color setting setup sharpness brightness contrast gamma hue saturation luma delay sharpness brightness contrast gamma hue saturation luma delay Mio 00 00 NONe 00 00 1T hue Mio 00 00 NONe 00 00 1T saturation hue Iiiiiiiiiiiiii..........0 saturation iiiiiiiiii......0 hue saturation You can set the Hue (for NTSC) to your liking. Press ENTER or the RIGHT arrow to enter the Hue control, then press the UP or DOWN arrow to adjust the image.
™ - - Preference page - tv type PBC Parental default PAL OFF -- P reference page -tv type PBC Parental default 1- kid saf 2- g 3- pg 4- pg 13 5- pg r 6- r 7- nc 17 8- adult SET PARENTAL CONTROL PAL OFF reset load factory setting Set Age Control Grade: With this option you can select to reset to the factory preset values. For DVD discs with a rating system programmed (North America CARA) parents can prohibit watching content that might be inadvisable for children.
™ Creating a PIN Number Enter the PIN number with the number buttons of the remote control and press ENTER. Now enter the new password and press ENTER again. Confirm your new password and press ENTER again to save the PIN number. Please write down the PIN number and store in a safe location. Important: DO NOT forget the PIN number, there is no way to retrieve the PIN number if forgotten or lost. With this selection X you exit the system setup and return to normal viewing of the video.
™ Play Mode: There are five (5) play modes available when playing MP3/MPEG4 (.AV1) recorded discs: SINGLE - All the songs / videos will be played only once. REPEAT ONE - The current playing song / video will be repeated. REPEAT FOLDER - Only the songs / videos of the current folder will be repeated. FOLDER - Only all the songs / videos of this folder will be played once. SHUFFLE/RANDOM - The songs / videos will be played in random order.
™ Compatible disk types Some DVD discs may have special requirements for playing, with which this system may not compatible. Please refer to the specifications on the individual disc. DISC TYPE Content Size Total Play Time About 4.7 GB - 2 hrs. (Single Side & Single Layer) DVD AUDIO/VIDEO 12CM About 8.5 GB - 4 hrs. (Single Side & Double Layer) About 9.4 GB - 4 hrs. (Double Side & Double Layer) About 17 GB - 8 hrs.
™ 22
™ Specifications: ---------- Technical specifications Multimedia player supports: DVD, DVD-R, DVD-RW, DVD+R, DVD+RW, CD, CD-R, CD-RW, VCD, SVCD, MP3 and JPG picture disks. MPEG4 support: DivX 3.11/4.02/5.02/5.03/5.05 DivX Pro/Subtitles .srt .
™
™
99-1285-001 DISCLAIMER FM Modulator Notification for all European Union Vizualogic Customers. Due to E-1 regulations pertaining to FM Modulation in aftermarket mobile electronics products, the following changes have been made for all Vizualogic headrest kits shipped to Europe: - The systems will be shipped with the default set to FM Modulator OFF. - The FM Modulators will be inoperable as the antenna has been removed and the antenna receptacle disabled. 1493 Bentley Drive - Corona - CA - 92879 www.