
Installation Guide

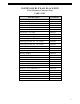
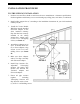
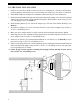
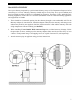
Table Of Contents

6
TO-THE-WALL INSTALLATION
1. Position stove and floor shield to conform to the stove manufacturer’s clearance specifications.
Position appliance and chimney so as to avoid cutting any ceiling joists, roof rafters, or wall studs.
2. Install Wall Thimble according to the installation instructions in your 2100 Chimney kit.
3. Install the Black Double Wall Pipe onto the installed Universal Adapter (H) of the 2100 insulated
chimney Pipe that has been securely installed through the Wall Thimble. Attach using (3) #8 X
3/4” self-tapping screws (see Detail C).
4. Slide Finishing Band (G) over Universal Adapter up to the end of the Double Wall Pipe (see
Detail C).
5. Attach Stove Adapter (A) to stove. If needed, attach Tee (E) to Stove Adapter using at least (3)
#8 X 1/2” self-drilling screws.
6. Make sure Stove Adapter and/or Tee align vertically and horizontally with chimney adapter.
7. Install Pipe Sections (B), Adjustable Telescoping Sections (B) and/or Slip Section (B) to Tee or
Stove Adapter using (3) #8 X 1/2” self-drilling screws.
8. Install two 45° Elbows (I) (recommended installation) or a 90° Elbow (I) (see Detail D) to top of
pipe section using (3) #8 X 1/2” self-drilling screws.
9. Install a Telescoping Section or a fixed length Pipe Section and Slip Section horizontally between
Elbow and Universal Adapter using at least (3) #8 X 1/2” self-drilling screws at each pipe joint.
Use a Pipe Hanger (F) if needed.
10. Fasten all pipe sections together, including Telescoping Sections and Slip Sections with at
least (3) #8 X 1/2” self-drilling screws.