
Assembly Instructions

IMPORTANT:
• ALLINSTALLATIONWORKSHOULDBEDONEBYACCREDITEDPROFESSIONAL.
• SHUTOFFPOWERSUPPLYATFUSEORCIRCUITBREAKER!
• USEONLYTHESPECIFIEDBULBS.DONOTEXCEEDTHEMAXIMUMWATTAGE!
PREPARING FOR INSTALLATION
Remove all of the contents from the carton. See the important notes above. Shut
off the power at the circuit breaker and completely remove the old xture from the
ceiling, including the old mounting strap.
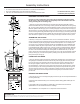
1.Takethemountingstrapassemblyfromthepartsbag.Mountingstrap(B)contains
severalthreadedholes.Twoofmountingscrews(A)shouldbeattachedtomountingstrap
(B).Youmayneedtotightennuts(C)thatholdthesescrewsinplace.Ifthescrewsarenot
attached,pleaseholdcanopy(F)uptomountingstrap(B).Lineuptheholesincanopy(F)
withtheholesinmountingstrap(B)andinsertmountingscrews(A)intomountingstrap(B)
sothatmountingscrews(A)protrudethroughtheholesincanopy(F).Mountingscrews(A)
arelong,sopleasetestthecanopyagainstthemountingstraptoseehowfaryoushould
insertthescrews.Tightennuts(C)ontomountingscrews(A)toholdthescrewsinplace.
ASSEMBLING THE FIXTURE
2.Rods(T,JandK)areonthexture’swires,butnotconnectedtothexture.Connect
rod(T)tothexturebodyatposts(SandQ).Bymeasuring,determinethecorrectnumber
ofrodsneededforproperhangingheight.Therearethreeoptional12inchrods(K)and
one6inchrod(J)included.Tolengthenthexture,addadditionalrods.Ifadditionalrods
areneeded,contacttheplaceofpurchasetoorder.Toshortenthexture,trimthewires
tothedesiredlengthaddingatleast8to10inchesofwiretothedesiredlength.Slideany
excessrodsoffthexture’swirestodiscard.Threadthewiresthroughtherodsandpull
thewiresuntiltautbeforethreadingtherodstogether.Threadbottomrod(JorK)onto
post(L)atthetopofthexture’sbody.Twistthetoprod(JorK)ontothethreadsofswivel
post(I)ofcanopy(F).Locktherodinplacebytwistingscrew(G).Pullthexture’swires
throughthetopofcanopy(F).
CONNECTING THE WIRES
3.Haveanassistantsupportthexture’sweightwhilecompletingthewiring.Refertothe
wiringdiagramandattachthexture’swirestothepowersupplywiresfromthejunction
box.ConnectHottoHot,NeutraltoNeutral,andGroundtoGround.Twisttheendsof
thewirepairstogether,andthentwistonawireconnector.Makesurealltwistsarein
thesamedirection.Ifthereisnohousegroundwirecomingfromthejunctionbox,locate
groundscrew(E)onthemountingbracket/mountingstrapandwrapthexture’sground
wirearoundthegroundscrew.Useascrewdrivertotightenthetopofgroundscrew(E)
ontothewiresandintothemountingbracket/mountingstrap.Tuckthewiresintothe
junctionbox.
FINISHING THE INSTALLATION
4.Pushcanopy(F)uptotheceilingandtightlythreadnuts(H)ontotheexposedthreadsof
mountingscrews(A).
5.Carefullyslidecandlesleeves(P)oversockets(N)beforeslidingglassshades(O)over
sockets(N).
6.Twistlightbulbs(notprovided)intosockets(N)inaccordancewiththexture’s
specications.Donotexceedthemaximumwattage.
Yourinstallationisnowcomplete.Turnonthepowerandtestthexture.
For Customer Service, please
contact the place of purchase.
CLEANING TIPS
Treat the xture gently! Regular cleaning will reduce the need for deep cleaning. For regular cleaning, turn off the light and wipe down the
xture with a clean lint-free cotton or microber cloth. Never spray cleaner directly onto the xture.
How to Identify the Fixture’s Wires
Hot Neutral Ground
Smooth
Ribbed
Bare Metal,
Green, or
Green Inner
Thread
Black
White
Black Inner
Thread
White Inner
Thread
House Wires
Fixture Wires
Hot
D
C
B
A
E
H
F
K
G
I
J
L
S
T
R
Q
N
O
P
M
Assembly Instructions