
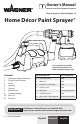
User Manual


English
© Wagner Spray Tech. - All Rights Reserved 7
Cleanup
Note: For a video showing cleanup of the Home
Décor Sprayer, visit www.homedecorsprayer.com.
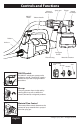
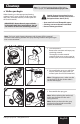
h Before you begin
When cleaning, use the appropriate cleaning
solution (warm, soapy water for chalk-type paint,
milk paint, and latex materials; mineral spirits for
oil-based materials)
IMPORTANT: Never clean air cap or air holes
in the nozzle with sharp metal objects. Do not
use solvents or lubricants containing silicone.
Special cleanup instructions for use
with flammable solvents (must have a
flashpoint above 100ºF (38ºC):
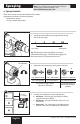
1. Turn turbine OFF.
Remove the container and empty any
remaining material.
Thoroughly rinse the material
container with warm, soapy water (or
mineral spirits for oil-based materials).
2. Disassemble the spray gun and clean
all parts with warm soapy water (or
mineral spirits for oil-based materials).
Note: If clogging occurs, make sure the
air vent hole (c) on the suction tube is
cleaned thoroughly.
3. Reassemble the spray gun.
Note: When replacing the nozzle seal,
make sure the groove in the seal is
facing outward.
Note: Make sure the tab in the spray
gun head is aligned with one of the
notches in the nozzle.
Note: For basic, quick-cleaning between color changes, ll the material
container with cleaning solution and spray cleaning solution through the gun
into a waste container.
Groove
Tab
Notch
1
2
3
(c)
Uncontrolled Copy