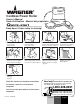
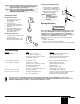
R Cordless Power Roller Owner’s Manual Gude d’utilisation • Manual del propietario Quick-start Easy does it from setup to cleanup: 1 Install the batteries Insérer les piles Instalar las pilas 5 Fill the fluid tank Remplir le réservoir à liquides Llenar el depósito de fluidos 2 Attach the strap Fixer la bandoulière Conectar la correa 6 Attach the drive housing Fixation du logement du mécanisme Conectar el mecanismo impulsor 3 4 Remove the drive housing Enlever du logement du mécanisme Extraer el mec
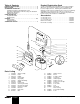
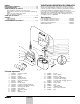
Table of Contents Product Registration Card PRODUCT REGISTRATION. . . . . . . . . . . . . . . . . . . . . . . . . . . . 2 PARTS LISTING . . . . . . . . . . . . . . . . . . . . . . . . . . . . . . . . . . . . 2 ASSEMBLING THE ROLLER . . . . . . . . . . . . . . . . . . . . . . . . . . 3 Installing the batteries and attaching the strap Removing and Attaching the Drive Housing to the Fluid Tank Attaching the Fluid Hose Filling the Fluid Tank USING THE ROLLER . . . . . . . . . . . . . . . . . . . . . . . . . .
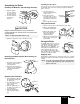
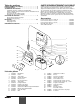
Assembling the Roller Checking the Inlet Valve Installing the Batteries and Attaching the Strap If the unit is new or has been stored for an extended period of time the inlet ball can become stuck and the pump may be difficult to prime. To check: 1. Turn the valve body counterclockwise and pull down to remove. 2. Shake the inlet valve assembly gently. If it does not rattle, remove the inlet ball retainer and clean the ball. 3. Reassemble the inlet valve. + + - + + - 1. Open the battery door.
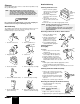
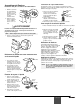
Cleanup Detailed Cleanup A thorough cleaning after each use of the roller is important to keep it in good working order. Cleaning the Roller Cover NOTE: 1. Pull one end of the splatter shield out of the end cap and slip opposite end off of the roller handle. 2. Press the locking tab and remove the roller cover and roller core. 3. Unscrew the end cap and slide the roller cover off of the roller core. 4. Clean the roller cover with the appropriate solvent.
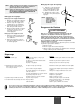
Cleaning the Pump Housing NOTE: Remove the pump carefully or the piston may come off. If the piston comes off, reassemble by sliding piston onto the brass piston connecting rod. NOTE: Wipe excess paint off the drive housing with an appropriate solvent. DO NOT IMMERSE UNIT IN SOLVENT OR OTHER LIQUID. 1. Clean pump housing with warm, soapy water or the appropriate solvent using the brush supplied. 2. Apply a thin layer of petroleum jelly to the pump O-Ring. NOTE: Be sure to clean all small parts thoroughly.
Table des matières CARTE D’ENREGISTREMENT DU PRODUIT ENREGISTREMENT DU PRODUIT . . . . . . . . . . . . . . . . . . . . . . 6 LISTE DES PIÉCES. . . . . . . . . . . . . . . . . . . . . . . . . . . . . . . . . . 6 ASSEMBLAGE DU ROULEAU . . . . . . . . . . . . . . . . . . . . . . . . .
Assemblage du Rouleau Vérification du clapet d’alimentation Installation des piles et fixation de la bandoulière Si l’appareil est neuf ou a été entreposé pendant une période prolongée, il est possible que la bille du clapet soit collée, rendant difficile l’amorçage de la pompe. Support de la bille 1. Dévisser le corps du clapet et le tirer vers le bas pour Bille l’enlever. Secouer délicateCorps de la ment l’ensemble du clapet clapet d’alimentation. d'alimentation 2.
Nettoyage Nettoyage à fond Un nettoyage à fond après chaque utilisation est important afin de garder en bon état de fonctionnement. Nettoyage du revêtement du rouleau 1. Sortir une extrémité du pare-éclaboussures du capu-chon d’extrémité en la tirant et glisser l’extrémité opposée hors du manche de rouleau. 2. Appuyer sur la languette de blocage et retirer le revêtement du rouleau ainsi que le rouleau. 3. Dévisser le capuchon d’extrémité et glisser le revêtement hors du rouleau. 4.
Nettoyage du corps de la pompe NOTE: Séparer la pompe avec précautions car le piston risque de sortir. Si le piston sort, remonter l’ensemble en glissant le piston sur la bielle en laiton. NOTE: Retirer l’excédent de peinture se trouvant sur le carter du moteur en l’essuyant avec un diluant approprié. NE PAS PLONGER LE MOTEUR DANS LE DILUANT NI DANS AUCUN AUTRE LIQUIDE. 1. 1. Nettoyer le corps de la pompe avec de l’eau tiède savonneuse ou un solvant approprié à l’aide de la brosse fournie à cet effet. 2.
Indice TARJETA PARA REGISTRAR EL PRODUCTO REGISTRAR EL PRODUCTO . . . . . . . . . . . . . . . . . . . . . . . . . 10 LISTA DE REPUESTOS . . . . . . . . . . . . . . . . . . . . . . . . . . . . . . 10 CÓMO ENSAMBLAR EL RODILLO . . . . . . . . . . . . . . . . . . . . . 11 Cómo instalar las baterías y colocar la correa Cómo quitar y colocar la caja de la transmisión al tanque de fluidos Cómo colocar las manguera de fluido Llene el recipiente con pintura CÓMO USAR EL RODILLO . . . . . . . . . . . . . . . . . .
Cómo ensamblar el rodillo Revise la válvula de admisión Cómo instalar las baterías y colocar la correa Si la unidad es nueva o si no se ha usado por un período prolongado, es posible que la bola de admisión se pegue y que sea difícil cebar la bomba. Sostén 1. Presione la de la bola lengüeta de Bola seguridad y retire el conjunto de la Cuerpo de la válvula. válvula de entrada 2. Gire el cuerpo de la válvula en sentido contrario a los punteros del reloj. 3. Retire el retén de la bola y la bola de admisión.
Limpieza Limpieza a fondo Es importante efectuar una limpieza a fondo del rodillo para mantenerlo en buenas condiciones. Limpie la cubierta del rodillo NOTA: Al utilizar pintura látex, limpie las piezas con agua tibia y jabón. Al utilizar pintura al óleo, se recomienda utilizar solventes derivados del petróleo. Siempre siga las recomendaciones del fabricante de la pintura sobre el uso de solventes. No se recomienda utilizar laca ni otros solventes fuertes. 1.
NOTA: NOTA: Limpieza de la caja de la bomba Extraer con cuidado la bomba ya que el pistón se sale con mucha facilidad. Si se sale el pistón, volver a montarlo deslizándolo en la varilla de conexión de bronce del pistón. Limpiar el exceso de pintura de la cubierta del mecanismo impulsor con un solvente apropiado. NO SUMERGIR LA UNIDAD EN SOLVENTE NI EN NINGUN OTRO LIQUIDO. 1. Limpiar la caja de la bomba con agua tibia y jabón o con un solvente apropiado utilizando el cepillo que se suministra. 2.
Wagner One Year Limited Warranty - Keep on file - English This product manufactured by Wagner Spray Tech Corporation (Wagner), is warranted to the original retail purchaser against defects in material and workmanship for one year from date of purchase if operated in accordance with Wagner's printed recommendations and instructions. This product is designed for home use only. If this product is used for professional/rental purposes, this warranty applies only for 30 days from date of purchase.