
Installation & Assembly

4 | P a g e
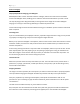
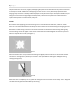
Smooth down the middle of the paper with a paperhanger’s brush, ensuring you have an accurate
pattern match and butt joint. Using the brush, work your way down the wallpaper drop and out to the
edges, removing air bubbles and creases (see Figure 5)
Figure 5
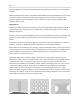
Once the wallpaper is in place, you should have 1-2” left at the bottom of the drop as well. Carefully run
the back of your scissors along the angle of the ceiling and the wall at the top of your drop, as well as the
bottom; whether it is along the baseboard or floor. This makes an impression of where you need to cut
and trip your paper for a perfect fit (see Figure 6).
Figure 6
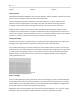
Gently pull the drop away from the wall, just enough to be able to cut along your impression to trim the
paper. Once you’ve trimmed, brush paper back into place, where it should fit perfectly.
Carefully wipe any paste off of the surface of the paper, the ceiling or floor, do this using a clean, damp
sponge. Rinse the sponge frequently to ensure it is always clean when touching the surface of the paper.
Hanging around Corners
As previously mentioned, corners are rarely, if ever, truly vertical. Never attempt to hang papers around
them. Always hang them into two parts, decorating first into the corner before going onto the next wall
and decorating back into the same corner.
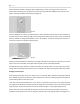
To do this, first measure the distance in 2 or 3 places, from the last drop into the corner. Add 5-10mm to
the longest of the distances measured and cut the length dry to that width. Paste in the normal way and
hang the paper. Fold the excess around the corner and brush tight in using a paperhangers brush.
On the next wall, measure the width of the piece cut off from the last drop and make a new vertical
plumb line at that width for the corner. Using the plumb line as a vertical guide, paste and hang the cut-