The World’s best selling electric floor heating brandTM Installation Manual: Foil Heaters For Wood & Laminate. TECHNICAL HELPLINE 0845-345-2288 Complete and submit the warranty form online at www.warmup.co.uk IMPORTANT Read this manual before attempting to install your foil heater. Incorrect installation could damage the heater and will invalidate your warranty.
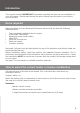
Contents Page 2 Introduction Items Required How to select the correct heater 3 Important Information DON’T ALWAYS 5 About the product Construction Technical Specification Installation Examples 6 Product Data 7 Compatible Wood / Laminates Compatible Insulation Cutting and Turning the Mat 8 Electrical Requirements Testing the heater 9 Step 1: Planning Your Installation Step 2: Check and prepare the subfloor These Installation instructions are NOT intended to replace or supersede the installatio
Introduction This manual contains IMPORTANT information regarding the safe use and installation of your foil heaters. Please read through the entire manual carefully before you install or use the product.
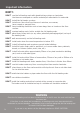
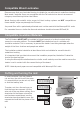
Important Information DON’T: DON’T use the foil heating mats with glued locking systems or laminates that have an underpad or cushion material pre-attached to its underside. DON’T install the foil heater up steps. DON’T install over floors that have traces of moisture, are uneven, have carpets or parquet floor. DON’T leave insulating materials such as bean bags; linen or towels on the floor surface. DON’T overlap heating mats, fold or wrinkle the foil heating mats.
Important Information ALWAYS: ALWAYS check with the manufacturer of your flooring, that their products are compatible with electric floor heating systems. ALWAYS operate the heating mat with a Warmup® floor sensor thermostat to ensure the floor does not exceed the maximum temperature of the wood laminate (usually 27°C). ALWAYS ensure all earth leads are connected to the earth ring. ALWAYS ensure that the system is operated with a Warmup® thermostat in floor sensor mode.
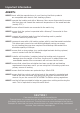
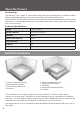
Heater Information About the Product Construction: The Warmup® Foil system is constructed using dual core fluoropolymer insulated heating cables sandwiched between two layers of specially reinforced aluminium foil. The aluminium foil along with the uniform spacing of the heating elements ensures even heat distribution. The heating elements are connected to the power supply cable, which exits the mat from one corner.
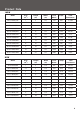
Making Electrical Provision for the Heater Product Data 140W Model Area (m2) Length (m) Width (m) Total Watts Amps Total Resistance WLFH-140W/140 1 2 0.5 140 0.61 377.86 WLFH-140W/210 1.5 3 0.5 210 0.91 251.90 WLFH-140W/280 2 4 0.5 280 1.22 188.93 WLFH-140W/420 3 6 0.5 420 1.83 125.95 WLFH-140W/560 4 8 0.5 560 2.43 94.46 WLFH-140W/700 5 10 0.5 700 3.04 75.57 WLFH-140W/840 6 12 0.5 840 3.65 62.98 WLFH-140W/980 7 14 0.5 980 4.26 53.
Heater Information Compatible Wood Laminates Please ensure that your laminate flooring is suitable for use with electric underfloor heating. Most wood / laminate floors are compatible with the Foil mats but we do not recommend using any wood flooring thicker than 18mm. Wood flooring with metallic strips as part of their locking systems are NOT compatible as these metallic strips may damage the Foil mats. Any wood floor with a pad already attached must not be used with the Warmup® Foil mats.
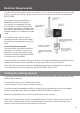
Making Electrical Provision for the Heater Electrical Requirements As with all electrical projects which are subject to Part P, all electrical work must be carried out by a certified electrician. All work must conform to the current IEE wiring regulations BS7671:2008. The system must be protected by a dedicated 30mA RCD at all times.
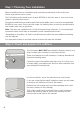
Step 1: Planning Your Installation Before installing, draw an installation plan showing the placement of the mats, floor sensor, and junction box or boxes. The Foil heating mats should cover at least 80-90% of the floor area of your room to be used as a primary heat source*. Choose the combination of heating mats that best enables you to cover the recommended 80-90% of your room. Plan to use the larger foil heating mats as much as possible and to use smaller mats only as gap fillers.
Step 3: Laying Out Your Heating Mats Roll out the foil heating mats on top of the insulation material. Keep the heating mat at least 50mm from the edges of the room. The mats should be laid so that the exposed sections of wires are facing downwards. Ensure that the heating mat is completely flat. Care should be taken not to fold or crease the mats at any time during installation. 50mm Position it in such a way that the power cord will be able to reach the point where the thermostat will be connected.
Step 4: Install the thermostat floor sensor Position the sensor approximately 300mm into the heated area in-between the heating wires runs on the mat. Do not allow the sensor tip to come into contact with any of the heating element wires. Warmup recommend the use of conduit when installing the floor sensor. The conduit will protect the sensor and will allow for easier replacement should there be a problem after flooring has been laid. Run the sensor cable back to the thermostat.
Floor Plan 12
Warranty Terms and conditions apply REGISTER YOUR HEATER ONLINE AT: www.warmup.co.uk THE 15- YEAR ELEMENT OF THIS GUARANTEE DOES NOT EXTEND TO THERMOSTATS WHICH ARE COVERED BY A 3 YEAR GUARANTEE. THIS GUARANTEE DOES NOT AFFECT YOUR STATUTORY RIGHTS. Warmup® Foil Heater is guaranteed by WARMUP PLC (“Warmup”)to be free from defects in materials and workmanship under normal use and maintenance, and is guaranteed to remain so subject to the limitations and conditions described below.
Control Card 14
Heater Information Warmup Plc 702 Tudor Estate, Abbey Road, London NW10 7UW T:0845 345 2288 F:0845 345 2299 E: www.warmup.co.uk 0 The WARMUP word and associated logos are trade marks. © Warmup Plc. 2009 - Regd. TM Nos. 1257724, 4409934, 4409926, 5265707. E & OE. V2.