
Installation manual
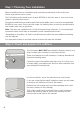


Position the sensor approximately 300mm into the heated
area in-between the heating wires runs on the mat.
Do not allow the sensor tip to come into contact with any of
the heating element wires.
Warmup recommend the use of conduit when installing the
floor sensor. The conduit will protect the sensor and will
allow for easier replacement should there be a problem
after flooring has been laid.
Run the sensor cable back to the thermostat. The sensor
wire MUST not cross over the foil heater wires.
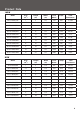
Test the floor sensor using a multi-meter. The floor sensor
ohms reading values can be found in the thermostat
instructions.
Step 4: Install the thermostat floor sensor
11
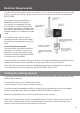
Before fitting the final floor covering test the heating
mats to ensure that they have not been damaged during
installation. See page 8 for details.
You are now ready to lay the final floor finish. Take care not
to damage the heating mats. Do not drive nails or screws
into the floor or cut the floor panels on top of the heater.
If the floor is not being laid immediately, all heating mats
must be protected with cardboard to prevent damage.
Immediately prior to the floor being laid, test the heating mat to
ensure it has not been damaged.
Once the flooring has been installed, connect the
thermostat ensuring that it is set to reach a maximum
temperature of 27°C.
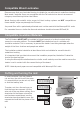
A Warmup® thermostat with a floor sensor MUST be used
in order to accurately monitor the floor temperature and
your comfort level.
Always zone each room with a foil heating system with its
own thermostat controller. This allows each room to be
controlled individually saving you energy by only heating
the zone when required.
WARNING:
ELECTRICAL WORK WHICH IS SUBJECT TO PART P BUILDING REGULATIONS MUST
BE CARRIED OUT BY A QUALIFIED ELECTRICIAN.
ALL WORK MUST CONFORM TO THE CURRENT IEE WIRING REGULATIONS.
Step 5: Install the floor
Step 6: Connect the thermostat