
Owner manual


SETUP & INSTALLATION
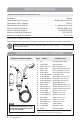
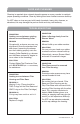
1. Remove existing shower head from shower
pipe by turning counterclockwise.
2. Thread Housing Collar clockwise onto shower
pipe and hand tighten. (g. A)
3. Insert Gaskets into both ends of Hose. (g. B)
4. Thread Hose onto Filter Base and hand
tighten. (g. C) (Note: If your Hose has a
hex-tting on one end, it is recommended that
the end with the hex-tting be threaded onto
the Filter Base.)
5. Thread opposite end of Hose onto Swivel
and hand tighten. (g. D)
6. Thread Swivel onto Shower Wand and then
secure Swivel on Filter Housing Post. (g. E)
7. Prior to using for the rst time, direct
Shower Wand into the drain and turn water
“ON”. Allow System to ush for at least
5 minutes or until water runs clear. (g. F)
This will remove any ne, black carbon
particles left over from the manufacturing
process, expel trapped air and condition
the Cartridge for normal use. (This water
may be used to water plants.)
Congratulations! Your new WaterChef
®
Shower Filtration System is ready!
F
IMPORTANT
Repeat flushing procedure each time a Cartridge is installed.
3
www.waterchef.com
NOTE
For most installations plumber’s tape is NOT necessary.
However, if you experience leaking between your existing
shower pipe and the Housing Collar, simply apply two to three
wraps of provided plumber’s tape to shower pipe threads in
a clockwise direction and then reattach Filter Housing.
A
C
D
E
B
Due to continuing product development, actual product
appearance may vary from images and illustrations.