
Installation Manual

2
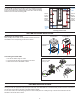
LMLS-MB1 MOUNTING OPTIONS
The LMLS-MB1 is designed to be able to mount to a standard 4” square
junction box as well as a 2-gang junction box. Using a small screwdriver,
punch out the holes for the corresponding junction box. Holes are clearly
marked on the rear side of mounting plate.
Mounting plate back view
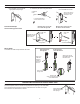
LMLS-MB1 MOUNTING INSTRUCTIONS
Mounting to the Junction Box
After punching out the holes, use the provided screws to mount the
LMLS-MB1 to the corresponding junction box as shown.
Connecting the RJ-45 Cable
1. Run RJ-45 cable through the J-Box.
2. Connect the RJ-45 cable and photosensor as shown.
3. Slide sensor into the LMLS-MB1 to finish.
Run RJ-45 cable
through J-Box.
Slide sensor into the
LMLS-MB1 to finish.
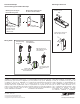
LMLS-MB2 MOUNTING OPTIONS
The LMLS-MB2 can be mounted to a wall with the provided screws or by using the double-sided tape. Using the provided template,
marking the wall with appropriate hole spacings is made easy. The LMLS-MB2 has a small break-away tab at the bottom of the bracket
for use when running the RJ-45 cable on the wall surface if desired.
For the screw holes, use a #40 drill gauge bit size to drill a 0.098”pilot hole. If drilling through a wall the recommended hole size
diameter to drill for the cable is 0.875”.
2-gang
Hole for
4"Square
J-box
2-gang
2-gang 2-gang
Hole for
2-gang
wall box
Hole for
2-gang
wall box
Hole for
4"Square
J-box
Hole for
2-gang
wall box
Hole for
2-gang
wall box
Mounting to a
4” square Jbox
Mounting to a
2 gang wall box
4 square J-Box
2 screws
2 gang
4 screws