
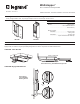
Installation Manual

3
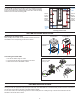
LMLSMB-2 MOUNTING WITH DOUBLE-SIDED TAPE
The LMLS-MB2 can be mounted to a wall using the double-sided tape. Using the
provided template, mark the wall with the appropriate hole spacings. The LMLS-MB2
has a small break-away tab at the bottom of the bracket for use when running the
RJ-45 cable on the wall surface, if desired.
Or
Remove tab
when running RJ-45 cable
on the wall surface
Hole size diameter to
drill for cable is 0.875"
0.098"pilot
holes
Align screw holes on
mounting bracket to
markings on wall.
Cable goes
through wall
Cable goes
on wall surface
Or
Mounting when running the
RJ-45 cable through wall.
Mounting when running the RJ-
45 cable on the wall surface.
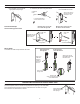
Slide sensor into the
LMLS-MB2 wall mount
bracket to finish.
Plug RJ-45
cable into
the RJ45
socket on
the end of
the unit.
RJ-45 Cable Going
Through Wall
RJ-45 Cable Run
on the Wall Surface
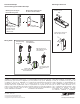
Use template to mark
wall with appropriate
hole spacings.
1. Use template to mark wall with
appropriate hole spacings.
2. Drill screw pilot holes using #40 drill bit.
3. Use provided screws to mount
the LMLS-MB2 to the wall.
0.098” pilot
holes
0.098” pilot
holes
Template hole size
diameter to drill or
cable is 0.875”
LMLS-MB2 MOUNTING WITH SCREWS
Placement Example
when mounting with screws
Wiring Detail
Connect RJ-45 cable and photosensor as shown.
Run RJ-45 cable
through wall.