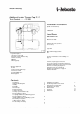
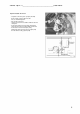
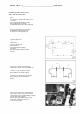
Water heating Additional heater Thermo Top Z / C Test Control ~ ~ ~ S 289 Installation Instructions (Guide for instructions) TT9903/04 Land Rover DEFENDER Td5 Model Year 1999 Valid for all series (in terms accessories) Type: RF Only valid for flying models left Legend of Figure 1 1Thermo Top Z / C-D 2Security system and fan relay 3Clock screening 4Muffler 5Dosing pump For more information on the validity, see page 2 Vehicles, engine types and series accessories that are not mentioned in these installati
Thermo Top Z / C_________________________________Land Rover Heating / mounting kit Amount 1 Number Order Description Water heater Thermo Top Z / C-D and accessories 892 44A Additional equipment required: 1 Mounting Kit Land Rover Defender Model 99 Thermo Top Z / C-D 675 02A Validity Manufacturer Type Trade name No. EG-BE / ABE No.
Thermo Top Z / C_________________________________Land Rover General Tips - Protect the bare parts of the body, such as holes, with an anticorrosive - Pipes, ducts and cables should be covered by protective pipes where they are vulnerable - The acute angles must be covered corner guards (supply pipe cut).
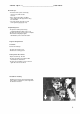
Thermo Top Z / C_________________________________Land Rover Security system and relay fan - Positioning the ends of the plate Connection of the safety system (3/3) of fan relay (3/1) and the ground terminal on the mounting bracket as shown in Figure 3. - Drill a bore of a diameter of 2.5 mm for the security system, and a diameter of 4.0 mm for the fan relay and backsplash. - Fix the plate terminal system security with metal screws 3,5 x13, and relay fan and backsplash with metal screws 5.
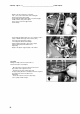
Thermo Top Z / C_________________________________Land Rover Implementation of the fan - Separate connector green / purple (4/2, 4/4) theft security system (15A) near the fan, as shown in Figure 4 - Fix circular connectorse - Install connectors in accordance with the scheme of Figure 5cffffffffffffffffffffffffffffffffffffffffffffff - Connect the black connector (4/5) Fan K3/30 and connector Green / Purple (4/2) near the fan - Connect the red connector (4/1) relay K3/87a fan and connector green / purple (4/2
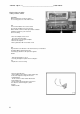
Thermo Top Z / C_________________________________Land Rover Clock and preset option setting summer / winter CAUTION: When mounting the clock preselection not exert any pressure on the LCD screen. TIP: It is recommended to choose the location presented to install the preset clock (6/2) button and the summer / winter (6/1)! Please validate installation location to your customers before mounting.
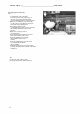
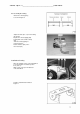
Thermo Top Z / C_________________________________Land Rover Pre-assembly of heating - Shorten the exhaust piping as shown in Figure 8 - Tighten the bolts (9/1, 2, 3) in the heating (No 10 Nm) zzzzzzzzzzzzzzzzzzzzzzzzzzzzzz - Replace the exhaust piping (9/6) heating and secure it with a clamp (9/5) - Train the exhaust piping as shown in Figure 9 eeeeeeeeeeeeeeeeeeeeeee - Put two washers (9/4) on the lower studs (9/3) Installation of heating - Move the template (10/1) on the trunk Wheel as shown in Figure
Thermo Top Z / C_________________________________Land Rover - Mount the bracket (12/5) on the wheel as safe shown in Figure 12, using 2 M6x20 screws, 2 washers and 2 nuts collars - Attach the strap (12/3) at the short ends support with a screw M6x20 (12/4) and a nut collar as shown in Figure 12 - Align the support and position the bore (12/2) on the support rod (12/1) - Remove again the support and the belt - Make a hole diameter of 7 mm (12/2) the support rod - Mount the bracket (12/5) on the wheel as saf
Thermo Top Z / C_________________________________Land Rover Positioning relative to the circuit water and non-return valve TIP: Secure all hose clamps with a pitch of 2.0 + 0.
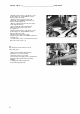
Thermo Top Z / C_________________________________Land Rover - Replace the hose water hose curvature 180 ° (17/1) on the water inlet of the heating, tilt down and secure it with a clamp - Connecting the flexible water pipe (17/1) in water pipe flexible vehicle (17/2) at the output motor using a connection pipe 20x15 and 2 clamps - Connecting the flexible water hose of a curvature of 90 ° (18/3) of flexible water pipe of the vehicle (18/1), level of the heat exchanger, using a connecting tube 20x15 and 2 cl
Thermo Top Z / C_________________________________Land Rover Exhaust duct - Place the cover (20/1) of the conduit exhaust ports (20/2) - Put the exhaust conduit (20/2) on the heating, and secure it with a clamp, as shown in Figure 20 - Attach the exhaust duct (20/2) with a cord cable Flue CAUTION: When assembling the flue, ensure that there has a sufficient distance between the pipes and cables! especially careful to maintain this sufficient distance cables for vehicles provided with an air conditioning sy
Thermo Top Z / C_________________________________Land Rover Fuel inlet CAUTION: Install the fuel conduit so that it can be protected in case of falling rocks! In sharp edges, protect against friction the fuel conduit and the harness! TIP: Be sure to install the metering pump in the correct location, To do this, refer to the "Installation Guide". Dosing pump - Make a hole diameter of 9 mm fixing the metering pump (23/4) and insert a M6 nut.
Thermo Top Z / C_________________________________Land Rover Fuel levy - Cut the end of the sampling line fuel (24/1) - Shorten the riser 300 mm - Insert the riser in the removal of fuel (24/1) - Replace the hose (25/2) on the riser and secure with a clamp - Insert the fuel line Mecanyl (25/1) in the hose and secure with a clamp - Attach fuel line Mecanyl (25/1) on the tank of the vehicle along the vehicle's connectors and fix with a power cable - Reassemble the vehicle tank in accordance with manufacture
Thermo Top Z / C_________________________________Land Rover 14
Thermo Top Z / C_________________________________Land Rover 15
Thermo Top Z / C_________________________________Land Rover Final tasks - Reinstall the vehicle battery - Reinstall the removed parts in the reverse order of disassembly - Check that all cables, hoses, connectors and clamps, as well as all connections power are secured - Cover all connectors with a loose cable cord - Protect the components of heating with anti-corrosive wax (Tectyl ML, No.
No. order Description 67366A RISER FOR ROVER DISCOVERY TD5 1 67503A BAG SMALL PARTS LAND ROVER DEFENDER TD5 1 Amount 152560 SPRING WASHER DIN128-A6-PHRF 1 19445A COLLET NUT M6 3 242780 ELBOW ROOM 1 24304A WASHER DIN9021-A7 0.4 ST-A3G 1 337749 NUT M6 x15.5 2, 36189A 6kt-SCHR.DIN933-M6X16-8.8-A3G 1 67365A SUPPLY PIPE 4.5 bis 7.5 x3 1 88837A WAY VALVE 2X8 K-PROT ENVELOPE. 1 90290B CONNECTING TUBE 20 X 15 2 91885A FIX.