NG Owner’s Manual EX-315 � SX-315 REGISTER TODAY. We are so glad that you have joined us on the journey to grilling greatness. Register your grill and gain access to fun and engaging WEBER information, including tips, tricks and how to get the most out of your grilling experience. PHONE APP EMAIL weber.com Keep this Owner’s Manual for future reference, thoroughly read through it, and if you have any questions please contact us today.
Welcome to WEBER Important Safety Information DANGER, WARNING, and CAUTION statements are used throughout this Owner's Manual to emphasize critical and important information. Read and follow these statements to help ensure safety and prevent property damage. The statements are defined below. m DANGER: Indicates a hazardous situation which, if not avoided, will result in death or serious injury. m WARNING: Indicates a hazardous situation which, if not avoided, could result in death or serious injury.
TABLE OF CONTENTS We are so glad that you have joined us on the journey to grilling happiness. Please take some time to read through this Owner’s Manual to ensure that you are up and grilling quickly and easily. We want to be with you for the life of your grill, so please take just a couple of minutes to register your grill. When you sign up for a WEBER-ID as part of your registration, we will deliver special grillrelated content just for you to enjoy.
The WEBER Promise Warranty Thank you for purchasing a WEBER product. Weber-Stephen Products LLC, 1415 S. Roselle Road, Palatine, Illinois 60067 (“WEBER”) prides itself on delivering a safe, durable, and reliable product. This is WEBER’s Voluntary Warranty provided to you at no extra charge. It contains the information you will need to have your WEBER product repaired in the unlikely event of a failure or defect. Pursuant to applicable laws, the customer has several rights in case the product is defective.
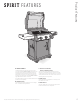
Product Features SPIRIT FE ATURES B C A D E A WEBER CONNECT Confidently tend to the grill and your guests while using the integrated WEBER CONNECT technology. This device monitors internal grill temperature and uses food temperture probes allowing you to monitor the temperature of your food. You can also monitor your grill from your smart device with the WEBER CONNECT app via Bluetooth® or Wi-Fi connection. One food temperture probe is included. Additional food probes are sold seperately.
Getting Started Important Information about Natural Gas & Gas Connections What is Natural Gas? Natural gas (NG) is a combustible, gaseous mixture of simple hydrocarbon compounds, usually found in deep underground reservoirs formed by porous rock. It is a fossil fuel composed almost entirely of methane. Natural gas is delivered by your local utility through an underground pipeline system. General Specifications • Two burner and three burner grills are designed to operate at 7" of water column pressure (.
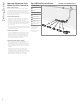
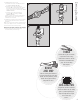
A C B D Getting Started Hose Connection & Leak Checking Connect the Hose to the Gas Supply - RI L EG V HA L I NG T OOL S • M US T - HA VE GR L IN GR ILL ING TOO AVE LS T-H •M S U U IL ST A quick-disconnect fitting connects your grill to the gas supply. Gas will not flow unless the quickdisconnect is properly engaged. 1) Check that all burner control knobs are in the off position. Check by pushing in and turning knobs clockwise (A).
Getting Started What is a Leak Check? Once the hose is properly connected, it is necessary to perform a leak check. A leak check is a reliable way to verify that gas is not escaping after you connect the hose to the gas supply. The fuel system in your grill features factory-made connections that have been thoroughly checked for gas leaks and the burners have been flame-tested. WEBER recommends performing a thorough leak check after assembly, as well as annually.
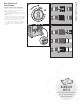
Disconnect the Hose from the Gas Supply Getting Started 3) If bubbles appear there is a leak: a) If the leak is at the gas source (F). Turn off the gas. DO NOT OPERATE THE GRILL. b) If the leak is at any fittings indicated in illustration (G), re-tighten fitting with a wrench and recheck for leaks with soap and water solution. If leak persists, turn off the gas. DO NOT OPERATE THE GRILL. c) If the leak is at any fittings indicated in illustration (H), turn off the gas. DO NOT OPERATE THE GRILL.
Operation The Very First Time You Grill A C Perform an Initial Burn-Off Heat the grill on the highest setting, with the lid closed, for at least 20 minutes prior to grilling for the first time. Every Time You Grill Meal-to-Meal Maintenance The Meal-To-Meal Maintenance plan includes the following simple, yet important, steps that should always be performed prior to grilling.
Operation Igniting the Grill A Using the Crossover Ignition System to Ignite the Grill The crossover ignition system ignites burner 1 furthest to the left with a spark from the igniter electrode. You generate the energy for the spark by pushing the igniter button. You will hear the igniter clicking. Burner(s) 2 (and 3) can be lit after burner 1 is lit. All burners should be lit for preheating, however, all burners do not have to be lit while grilling. 1) Open the grill lid (A).
Operation Integrated WEBER CONNECT Technology Using the WEBER CONNECT Module A WEBER CONNECT App B C First things first. Download the WEBER CONNECT app.
Please follow these steps for setting a notification to alert you when your grill has reached a target internal temperature: 1) Push any button located on the temperature controller to turn ON the WEBER CONNECT module. 2) Push the BELL button to activate grill temperature notification. 3) While the display is blinking, push the + or buttons to set the target grill temperature. Push the CHECKMARK button to confirm your selection. 4) Reapeat steps 2 and 3 to update or set a new target temperature.
Tips and Hints The Flame Direct or Indirect OFF HIGH MEDIUM BURNER 1 BURNER 2 BURNER BURNER 3 1 BURNER 2 BURNER 3 DIRECT HEAT SETUP INDIRECT HEAT SETUP Use the direct method for small, tender pieces of food that take less than 20 minutes to cook, such as: hamburgers, steaks, chops, kabobs, boneless chicken pieces, fish fillets, shellfish, and sliced vegetables.
Preheat each and every time. Try not to peek. If the cooking grates aren’t hot enough, food will stick, and you will likely never have a chance of searing properly or developing those handsome grill marks. Even if a recipe calls for medium or low heat, always preheat the grill on the highest setting first. Open the lid, turn up the heat, close the lid, and then let the cooking grate heat up for 15 minutes on high. The lid on your grill is for more than just keeping the rain out.
Product Care Cleaning and Maintenance A D Cleaning the Inside of the Grill Over time, the performance of your grill can diminish if it has not been maintained properly. Low temperatures, uneven heat, and food sticking to cooking grates are all signs that cleaning and maintenance are overdue. When your grill is off and cool, start by cleaning the inside, from the top down. A thorough cleaning is recommended at least twice a year. Consistent use may require quarterly cleanings.
Look inside the cookbox for any grease accumulation or leftover food particles. Excessive accumulation can cause a fire. 1) Use a plastic scraper to scrape debris off the sides and bottom of the grill into the opening in bottom of the cookbox (G). This opening leads debris into the slide-out catch pan. Product Care Cleaning the Cookbox G Cleaning the Grease Management System The grease management system consists of an angled slide-out grease tray and a catch pan (H).
Troubleshooting GRILL WILL NOT IGNITE SYMPTOM • Burner does not ignite when following the electronic ignition instructions in the “Operation” section of this Owner's Manual. CAUSE SOLUTION There is a problem with gas flow. If the grill will not ignite, the first step is to determine if there is gas flowing to the burners. To check this, follow the instructions below for “Using a Match to Determine if there is Gas Flow to the Burners.
Proper Burner Flame Pattern SYMPTOM • Grill does not reach desired temperature or heats unevenly. • One or more of the burners fail to ignite. • Flame is low when burner is on high position. • Flames do not run the whole length of the burner. • Burner flame pattern is erratic. CAUSE SOLUTION Fuel hose is bent or kinked. Straighten fuel hose. Burner ports are dirty. Clean burner ports. Refer to “Cleaning the Burner Ports.
Troubleshooting A LOSS OF POWER SYMPTOM • WEBER CONNECT module does not turn on. CAUSE SOLUTION Wires are disconnected. Check that all of the wires are connected securely to the terminals on the back of the WEBER CONNECT module and to the control board inside the cabinet. Refer to the "WEBER CONNECT Wire Chart". Batteries are old. Install new batteries. Refer to “Replacing Batteries for the WEBER CONNECT Module” on this page. Alternative external power bank may be depleted.
Troubleshooting Auxiliary Power Input A Connecting an External Power Bank Micro USB 52769_060920 As an alternative to using six D alkaline batteries to power the WEBER CONNECT Module during your cook, you can instead connect an external rechargable power bank, sold sperately. The power bank should have a minimum capacity of 10,000 mA hours with a 5 volt micro USB connector. The shelf inside the grill cabinet can accept a power bank with a maximum dimension of 4" wide x 7" deep x 1.25" high.
Grilling Guide Grilling Guide Type Thickness/Weight Approximate Total Grill Time ¾ inch (19 mm) thick 4 to 6 minutes direct high heat 1 inch (25 mm) thick 6 to 8 minutes direct high heat 2 inches (5 cm) thick 14 to 18 minutes sear 6 to 8 minutes direct high heat, then 8 to 10 minutes indirect high heat Flank Steak 1½ to 2 pounds (0,68 - 0,91 kg), ¾ inch (19 mm) thick 8 to 10 minutes direct medium heat Ground Beef Patty ¾ inch (19 mm) thick 8 to 10 minutes direct medium heat 3 to 4 pounds (1,
1 Spirit - EX/SX-315 NG - US - 072520 27 2 3 28 4 29 Replacement Parts SPIRIT EX-315 • SX-315 5 6 30 7 8 9 31 32 10 11 12 13 33 34 35 36 37 38 14 15 16 17 18 19 20 21 39 22 23 24 25 26 40 41 42 43 44 23
weber.com U.S.: 1-800-446-1071 Canada: 1-800-446-1071 Compliance Statements for WC2 CONTROLLER FCC Compliance: This equipment has been tested and found to comply with the limits for a Class B digital device, pursuant to part 15 of the FCC rules. These limits are designed to provide reasonable protection against harmful interference in a residential installation.