Assembly Instruction | Instrucciones de montaje | Instructions d’assemblage wedi Fundo® Primo Shower System | Sistema de ducha | Système de douche
wedi Fundo® Primo wedi Fundo® Shower System-Primo EN Overview & General Product Description of the wedi Fundo® Shower Systems The wedi Fundo® Primo Shower System offers full warranty coverage like all wedi Shower Systems, thanks to its consistent and inherently waterproof core, and it’s range of specially engineered components. Fundo Primo is internally waterproof due to its wedi XPS foam‘s closed cell structure, and naturally protects against mold or mildew like every wedi XPS foam based product.
wedi Fundo® Primo Sistema de ducha wedi Fundo® Primo ES Visión de conjunto y descripción general de los sistemas de ducha wedi Fundo El sistema de ducha wedi Fundo Primo cuenta con una cobertura de garantía completa, al igual que todos los sistemas de ducha wedi, gracias a su uniforme y natural impermeabilidad medular y la variedad de sus elementos de diseño especial.
wedi Fundo® Primo Système de douche wedi Fundo® Primo FR Aperçu et description générale du produit des systèmes de douche wedi Fundo Comme tous les systèmes de douche wedi, le système de douche wedi Fundo® Primo offre une couverture de garantie complète, grâce à sa nature étanche complète et naturelle, et à sa gamme de composants spécialement conçus.
wedi Fundo® Primo Tools needed for installation | Herramientas necesarias para la instalación | Des outils sont nécessaires pour l’installation EN Bucket Utility Knife Caulk Gun 1/4 in.
wedi Fundo® Primo Before Installation | Antes de instalar | Avant l’installation Prepare la instalación / sitio de instalación Préparer l’installation / le site d’installation bloques de 2 × 4 pulg.
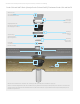
wedi Fundo® Primo Assembly Overview | Descripción general del montaje | Présentation de l’assemblage Fundo Click and Seal™ Drain | Drenaje Fundo Click and Seal™ | Écoulement Fundo Click and Seal™ wedi Drain Cover Tapa de drenaje wedi Grille d’écoulement de wedi Cover Frame Collarín de la tapa Collerette de grille Height Adjustment Piece Pieza de ajuste de altura Pièce de réglage de la hauteur Snap Ring 2 Anillo de retención 2 Circlip 2 Alignment Ring 1 Anillo de alineación 1 Bague d’alignement 1 Stra
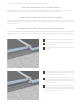
wedi Fundo® Primo Assembly Overview | Descripción general del montaje | Présentation de l’assemblage wedi Fundo® Shower bases may be cut and/or extended wedi prefabricated extensions are pre-notched. They can be joined with other extensions in a mitered design joining two or more sides of a shower to be extended. Make interlocking notch connections on-site as needed for mitered connections. Consult wedi’s manual for using wedi sloped extensions.
wedi Fundo® Primo Assembly Overview | Descripción general del montaje | Présentation de l’assemblage EN A wedi shower base can be cut to size using a circular saw with standard carbide blade. You can remake the 1/2 in. × 1/2 in. perimeter channel by cutting through the cement surface using the circular saw set to cut 1/2 in. deep. You can use a sharp utility knife to cut the new channel 1/2 in. wide through the blue exposed foam side.
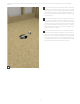
wedi Fundo® Primo Installation instructions wedi Fundo® Primo onto wooden or concrete floors | Instrucciones para instalar wedi Fundo® Primo en pisos de madera o concreto EN Cut the 2 inch waste pipe even and flush with the subfloor surface. Make sure that the cut out fits to the Fundo base‘s drain. Cut out a 5 in. diameter hole around the 2 in. pipe‘s center to allow for the wedi drain to be inserted into the subfloor while the cut out area must remain free of deflection.
wedi Fundo® Primo Instructions d’installation du wedi Fundo® Primo sur planchers en bois ou en béton EN Cut the Fundo base to fit between framed walls and so its wedi drain unit can connect with the floor waste pipe. Consider also the space needed by a curb or extension before cutting your wedi base. Consider that cutting the base may change the slope design and tile layouts should be considered before cutting. Consider that enough material thickness remains available to later remake the 1/2 in.
wedi Fundo® Primo Installation instructions wedi Fundo® Primo onto wooden or concrete floors | Instrucciones para instalar wedi Fundo® Primo en pisos de madera o concreto EN Next, install the Fundo Click and Seal™ drain unit. Drain components are delivered inserted inside the Drain Body. Please take the parts out and use step by step following our manual here. ES A continuación, instale la unidad de drenaje Fundo Click and Seal™.
wedi Fundo® Primo Instructions d’installation du wedi Fundo® Primo sur planchers en bois ou en béton EN Once inserted, turn the Drain Body clockwise until its plastic flap clicks in position in its final resting position. This will require no more than a quarter turn. Ensure a tight connection by pushing and pulling on the Drain Body and verifying a flat seat relative to the shower base surface.
wedi Fundo® Primo Installation instructions wedi Fundo® Primo onto wooden or concrete floors | Instrucciones para instalar wedi Fundo® Primo en pisos de madera o concreto EN Clean the subfloor with a moist sponge to remove dust and dirt, and apply a skimcoat of a suitable, modified tile adhesive/ thinset (ANSI 118.4 or better), and comb through with a 1/4 in. × 1/4 in. notched trowel. Notches should be applied uniformly and point towards the shortest side of the base area. You can also use a 1/2 in.
wedi Fundo® Primo Instructions d’installation du wedi Fundo® Primo sur planchers en bois ou en béton EN Press the Fundo firmly into the thinset bed (sloped side up) ensuring that the installation is level along its perimeter and sides, and thinset attachment and coverage is void free. Apply some weight equally and leave on surface and drain area to allow the thinset to initially cure without being disturbed (e.g. tile boxes).
wedi Fundo® Primo Installation instructions wedi Fundo® Primo onto wooden or concrete floors | Instrucciones para instalar wedi Fundo® Primo en pisos de madera o concreto EN Apply wedi-provided safe lubricant to the rubber part of the Compression Spacer. With the rubberized part pointing up now insert the Compression Spacer in between Drain Unit and waste pipe and on top of the Sealing Gasket. The Compression Spacer will push the Rubber Sealing Gasket down into its resting position.
wedi Fundo® Primo Instructions d’installation du wedi Fundo® Primo sur planchers en bois ou en béton EN Insert Strainer Key into Locking Nut at notch connections and with Strainer Key printed side up. The Strainer Key is used as a tool to tighten the compression seal of the Drain Unit, but remains in place later to serve as a hair catcher to protect the drain and make maintenance and cleaning easy.
wedi Fundo® Primo Installation instructions wedi Fundo® Primo onto wooden or concrete floors | Instrucciones para instalar wedi Fundo® Primo en pisos de madera o concreto EN Loosely insert the Alignment Ring 1 into the Drain Unit opening with printed side up. Align the notch in Alignment Ring 1 with the arrow printed on the Drain Unit.
wedi Fundo® Primo Instructions d’installation du wedi Fundo® Primo sur planchers en bois ou en béton EN Insert the Snap Ring 2 into Drain Unit opening with printed side up. Align its arrow and protruding key fitting into the notch of the Alignment Ring 1. The Snap Ring 2 needs to be secured in place with its perimeter notches snapping into grooves which are premade in the Drain Unit. Snap Ring 2 is used to secure the movable Alignment Ring 1, and it is needed to later support the Drain Cover unit.
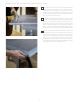
wedi Fundo® Primo Installation instructions wedi Fundo® Primo onto wooden or concrete floors | Instrucciones para instalar wedi Fundo® Primo en pisos de madera o concreto EN Push the wedi building panel fully into the channel of the shower base, being sure the bead of sealant is fully compressed. Smooth out any pushed out sealant on inside seam using a wedi Corner Putty Knife.
wedi Fundo® Primo Instructions d’installation du wedi Fundo® Primo sur planchers en bois ou en béton anels EN Apply continuous 1/2 in. beads of sealant between all connections of p and install with tightly butted seams. Excess sealant must be spread flat with a putty knife. All seams and fastener heads in the assembly are covered with a topical 1/2 inch bead of sealant and spread flat. The seams should be covered 1 in. on either side of a seam.
wedi Fundo® Primo Installation instructions wedi Fundo® Primo onto wooden or concrete floors | Instrucciones para instalar wedi Fundo Primo en pisos de madera o concreto EN Fasteners every 12 inches on either side of the niche, or a minimum of 1 fastener on each of the 4 corners, are set to create a flat transition to wall panels. Another 1/2 in. bead of wedi Joint Sealant is spread flat over fasteners and seams. ES Se colocan sujetadores cada 12 pulg.
wedi Fundo® Primo Instructions d’installation du wedi Fundo® Primo sur planchers en bois ou en béton EN A continuous 1/2 in. bead of sealant is set into the channel and along the vertical curb notch part. 1/2 in. beads of wedi joint sealant are equally applied on wall surfaces where the curb attaches. A 1/4 in. square notch trowel is used to apply a thinset mortar on the subfloor and on the wedi curb bottom (reference wedi Fundo installation in thinset mortar).
wedi Fundo® Primo Installation instructions wedi Fundo® Primo onto wooden or concrete floors | Instrucciones para instalar wedi Fundo® Primo en pisos de madera o concreto EN Weight is applied for a minimum of 30 minutes on and against the curb (from outside) and another 1/2 in. bead of sealant is applied over all curb seams and spread flat. The seams must be covered 1 in. either side of a seam.
wedi Fundo® Primo Instructions d’installation du wedi Fundo® Primo sur planchers en bois ou en béton EN Several Fundo Primo models naturally feature different perimeter height or thickness at the edge. Therefore, pre-made standard notch connections of wedi curbs must be modified in the field for a tight fit to the bases. Ramps and Extension panels can naturally not fit to all models and might be modified in the field as well.
wedi Fundo® Primo Installation instructions wedi Fundo® Primo onto wooden or concrete floors | Instrucciones para instalar wedi Fundo® Primo en pisos de madera o concreto EN Next, insert the Height Adjustment Piece into the threaded part of the Align-ment Ring 1. Dry fit the Height Adjustment Piece for the needed final height position of the drain cover unit.
wedi Fundo® Primo Instructions d’installation du wedi Fundo® Primo sur planchers en bois ou en béton EN The Height Adjustment Piece can be cut to height/length at its threaded part using a fine tooth saw for a fast, clean and safe process. Make a cut within one of the cutting grooves to adjust the extension to the height needed. Leave the extension a bit longer than needed (by one cutting groove).
wedi Fundo® Primo Installation instructions wedi Fundo® Primo onto wooden or concrete floors | Instrucciones para instalar wedi Fundo® Primo en pisos de madera o concreto EN Place the drain cover unit loosely on the Height Adjustment Piece were it fits into a tight seat. The cover is now vertically adjustable and can also move horizontally to fit the tile layout. ES Coloque la unidad de la tapa de drenaje en El pieza de ajuste de alturae, donde queda apretada de forma firme.
wedi Fundo® Primo Instructions d’installation du wedi Fundo® Primo sur planchers en bois ou en béton EN All fastener points are visibly covered with wedi joint sealant. All protrusions sealers free of acid or solvents on tile or grout installed over wedi product, (ie. plumbing fixtures) are sealed into the wedi assembly with wedi gaskets and apply only in amounts needed to treat the surface materials without and sealant.
wedi Fundo® Primo After Installation | Después de instalar | Après l’installation Todas las instalaciones de cantos rodados de fondo plano están sujetas a la qui durcit à l‘humidité et qui réagit très lentement lorsqu‘il est appliqué dans un recomendación general que se ha descrito anteriormente en relación con endroit où l‘humidité relative de l‘air est faible ; il réagira de manière excessive et los materiales ligantes en función de las dimensiones de la loseta.
wedi Fundo® Primo After Installation | Después de instalar | Après l’installation EN Where wedi® Building Panel or curb caps are installed over horizontal surfaces (seats, curbs, tubdeck transitions) do not set any fasteners and do not allow the glass door installation to penetrate the wedi panel as it is your waterproofing. Make sure that doors are installed tight to contain water inside the shower. Make sure doors are installed to only load bearing reinforced framing.
Tel. +1-847-357-9815 Fax. +1-847-357-9819 info@wedicorp.com www.wedicorp.com December 2022 wedi information and instruction is based on best knowledge and independent testing (ICC PMG Report). wedi reserves the right to modify technical information and instructions. La información y las instrucciones de wedi se basan en el mejor saber y en pruebas independientes (ICC PMG Report). wedi se reserva el derecho de modificar la información técnica y las instrucciones.