Assembly Instruction | Instrucciones de montaje | Instructions d’assemblage wedi Fundo Primo Shower System | Sistema de ducha | Système de douche
Assembly Instructions | Instrucciones de montaje | Instructions d’assemblage wedi Fundo wedi® Fundo Shower System-Primo GB Overview & General Product Description of the wedi Fundo Shower Systems All wedi® Waterproof Shower Systems including point and linear drain models offer reliable, costefficient solutions for constructing 100 % waterproof and mold proof showers. The product systems are entirely waterproof due to it’s XPS extruded polystyrene foam core.
Sistema de ducha wedi® Fundo Primo ES Visión de conjunto y descripción general de los sistemas de ducha Fundo wedi Todos los sistemas de ducha impermeables wedi®, entre ellos, los modelos con drenaje puntual o lineal, constituyen soluciones fiables y rentables para la construcción de duchas 100 % impermeables y resistentes al moho. Son completamente impermeables gracias a su núcleo de espuma de poliestireno extruido. Además, su alto grado de prefabricación los hace fáciles de limpiar e instalar.
Assembly Instructions | Instrucciones de montaje | Instructions d’assemblage wedi Fundo Système de douche wedi® Fundo Primo FR Aperçu et description générale du produit des systèmes de douche wedi Fundo Tous les systèmes de douche étanches wedi®, y compris les modèles avec écoulements ponctuels ou linéaires offrent des solutions fiables et économiques pour construire des douches 100 % étanches et résistantes aux moisissures.
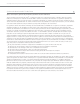
Drain to Base Assembly | Montaje del drenaje en la base | Assemblage de l’écoulement sur le receveur A B C D E F G 2” GB Legend Leyenda Légende A B C D E F G Caulking nut Rubber caulking gasket Drain body wedi sealant Rubber gasket Fiber gasket Locking nut Optionally a glue drain can be obtained from wedi. For a cement glue connection, the floor pipe must be cut 2 1/4 inches below the surface of the subfloor. Optionally a brass drain can be obtained from wedi.
Assembly Instructions | Instrucciones de montaje | Instructions d’assemblage wedi Fundo GB Tools Herramientas Outillage • • • • • • • • • • • • • • • • • • • Bucket Notch Trowel Drill with Thinset Mixer Utility Knife Straight Edge / T Square 5 ft or longer Speed Square Caulk Gun Handsaw Flat Head Screwdriver Screw gun Solid Putty Knife Paper Towels Level Circular Saw Saw Horse Tape Measure Permanent Marker Extension Cord for Powertools Shop vacuum cleaner ES • • • • • • • • • • • • • • • • • • •
GB Before Installation Antes de instalar Avant l’installation • • Installer has received instructions from wedi technical sales staff or is informed about proper installation methods as described wedi shower bases can be cut to size using a skilsaw. The Z notch channel must be remade and cleaned from sawdust or contaminants. ES • • • • El conjunto de drenaje de 2 in (5.08 cm) por debajo del piso está estabilizado y no se hundirá por acción de la carga de agua.
Assembly Instructions | Instrucciones de montaje | Instructions d’assemblage wedi Fundo GB Set up a continuous 1/4” bead of wedi sealant along the top side of the wedi Fundos’ valve groove profile. ES Extienda un cordón continuo de 0.25 in (6.35 mm) de sellador wedi sobre el lado superior del perfil de la muesca de la válvula de Fundo wedi. FR Tirer un cordon continu de 6 mm (1/4 po) de produit d’étanchéité wedi le long du profil rainuré supérieur de la vanne wedi Fundo.
GB Skim coat the thinset ANSI 118.4 and comb through with a 1/4” x 1/4” notched trowel. Channels pointing to the entrance. ES Coloque una capa fina de mortero cola (ANSI 118.4) y alise con una llana ranurada de 0.25 in x 0.25 in (6.35 mm x 6.35 mm). Las canales deben apuntar hacia la entrada. FR Étaler une fine couche de ciment-colle ANSI 118.4 et la ratisser avec une truelle dentelée de 6 mm x 6 mm (1/4 po x 1/4 po). Les rainures doivent être dirigées vers l’entrée.
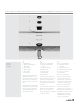
Assembly Instructions | Instrucciones de montaje | Instructions d’assemblage wedi Fundo GB Tighten (squeeze) the rubber caulking gasket firmly with the caulking nut (use a flat headed screwdriver) and finally insert the plastic frame and strainer on top (without adhesive). The frame and strainer will be held in a grout joint only once tiling commences.
14 GB Apply continuous 1/2” beads of sealant between all connections of panels and install with thigthly butted seams. Excess sealant must be spread flat with a putty knife. All seams and fastener heads in the assembly are covered with a secondary 1/2” bead of sealant and spread flat. The seams should be covered 1” on either side of seam. All fastener/washers are covered with sealant stretching 1” over the washer edges. ES Aplique cordones continuos de 0.5 in (12.
Assembly Instructions | Instrucciones de montaje | Instructions d’assemblage wedi Fundo 17 18 GB A continuous 1/2” bead of sealant is set into the channel and along the vertical curb notch part. A circle of 1/2” sealant bead is set against the wall panels where the curb attaches. A 1/2” x 1/2” bed of thinset mortar is applied to the subfloor and a skim coat on the bottom surface of the curb as a best practice. The tightly fitting curb is pressed into the connection area.
GB After Installation Después de instalar Après l’installation • • • • • Using a 2” drain plug, the wedi pressure fit drain / sealing gasket is water tested prior to ceramic tile installation and prior to other full surface flood tests. All bottom perimeter joints, curb joints and vertical joints are covered with wedi Joint Sealant. Coverage should be continuously visible for at least 3/4” to 1”. No mastic adhesives are used to install ceramic tile in the wedi system.
Assembly Instructions | Instrucciones de montaje | Instructions d’assemblage wedi Fundo GB After Installation Después de instalar Après l’installation • Where wedi building panel or curb overs / caps are installed over horizontal surfaces (seats, curbs, tubdeck transitions) do not set any fasteners and do not allow the glass door track installation to penetrate the wedi panel as it is your waterproofing. • Make sure that doors are installed tight to contain water inside the shower.
wedi Drain Cover Assembly / Insertion | Montaje o introducción de la cubierta de drenaje wedi | Assemblage/insertion de la grille d’écoulement wedi Legend A wedi Strainer B Strainer Collar C Optional Extension Collar A Leyenda B A Rejilla wedi B Collarín de la rejilla C Collarín de extensión opcional C Légende A Grille wedi B Collerette de grille C Collerette d’extension optionnelle GB Insert Strainer Collar into base hole (no glue / no screws).
D 05/15 K 05/15 A 90157000 wedi information and instruction is based on best knowledge and independent testing (UPC/IAPMO). La información y las instrucciones de wedi se basan en el mejor saber y en pruebas independientes (UPC/IAPMO). Les informations et les instructions wedi sont basées sur les meilleures connaissances et sur des tests indépendants (UPC/APMO). wedi reserves the right to modify technical information and instructions.