Assembly Instruction | Instrucciones de montaje | Instructions d’assemblage wedi One Step Shower System Sistema de ducha One Step | Système de douche One Step
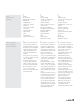
Assembly Instructions | Instrucciones de montaje | Instructions d’assemblage wedi One Step Shower System Drain connection | Conexión de drenaje | Connexion de l’écoulement A B C D E F G 2” GB Legend Leyenda Légende A B C D E F G Caulking nut Rubber caulking gasket Drain body wedi sealant Rubber gasket Fiber gasket Locking nut ES FR A Tuerca de estanqueidad B Junta de estanqueidad de goma C Cuerpo del drenaje D Sellador wedi E Junta de goma F Junta de fibra G Contratuerca A Écrou de calfeutra
GB Tools Herramientas Outillage • • • • • • • • • • • • • Bucket Notch Trowel Drill with Thinset Mixer Utility Knife Straight Edge / T Square 5 ft or longer Caulk Gun Flat Head Screwdriver Screw gun Solid Putty Knife Paper Towels Level Tape Measure Shop vacuum cleaner ES • • • • • • • • • • • • • GB Before Installation Antes de instalar Avant l’installation • • • Subfloor is sound, level and meets deflection criteria of maximum L/360"/ as per IRC.
Assembly Instructions | Instrucciones de montaje | Instructions d’assemblage wedi One Step Shower System GB Before Installation Antes de instalar Avant l’installation • • 2” drain assembly below floor is stabilized and will not sink under water load. Installer has received instructions from wedi technical sales staff or is informed about proper installation methods as described. ES • • El conjunto de drenaje de 2 in (5.
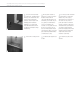
GB Dry fit the base and make sure that floor drain is located in the center of the wedi drain. Make sure the base walls are square and tight with the framework. ES Ajuste en seco la base y verifique que el drenaje del piso esté en el centro del drenaje wedi. Verifique que las paredes de la base estén perpendiculares y ajustadas a la armadura. FR Ajuster à sec la base du receveur et vérifier que l’écoulement dans le plancher est placé au centre de l’écoulement wedi.
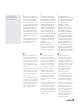
Assembly Instructions | Instrucciones de montaje | Instructions d’assemblage wedi One Step Shower System 7 GB You can now install waterproof wedi 1/2" building panels directly to the framework and seal all joints and fastener points as usual and per wedi building panel installation guidelines. (you may install other Backerboards but have to add topical waterproofing / membranes). GB 8 Your shower is ready for tile! ES Ahora puede instalar los paneles de construcción impermeables wedi de 0.5 in (12.
GB After Installation Después de instalar Après l’installation • • • ES Using a 2” drain plug, the wedi pressure fit drain / sealing gasket is water tested prior to ceramic tile installation. No mastic adhesives are used to install ceramic tile. A high quality modified thinset mortar is recommended. Tiles smaller than 2 x 2 inches require epoxy grout. Exception are pebble stones or river rock stones where a modified cement bade grout can be used. Large format tile can be used on wedi Fundo bases.
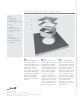
Legend A wedi Strainer B Strainer Collar C Optional Extension Collar A Leyenda B A Rejilla wedi B Collarín de la rejilla C Collarín de extensión opcional C Légende A Grille wedi B Collerette de grille C Collerette d’extension optionnelle GB Insert Strainer Collar into pan hole (no glue / no screws). Caulk between part and tile to create a flexible grout joint. Extension Collar can be cut to height if part is needed.