
Installation Guide
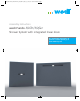
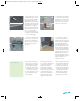


Legend
A Curb
B wedi Fundo Riolito/Riofino
C Building Panel
D Sealing collar
E Screws
F Drain body
A
B
C
E
F
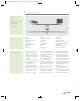
Tools
Drain to Base Assembly
•
Bucket
•
Notch Trowel
•
Drill with Thinset Mixer
•
Utility Knife
•
Straight Edge / T
Square 5 ft or longer
•
Speed Square
•
Caulk Gun
•
Handsaw
•
Flat Head Screwdriver
•
Cordless Drill
or Hammer
•
Solid Putty Knife
•
Paper Towels
•
Level
•
Circular Saw
•
Saw Horse
•
Tape Measure
•
Permanent Marker
•
Extension Cord for Powertools
•
ABS or multipurpose pipe
cement glue
•
Inside PVC Pipe Cutter
•
Shop vacuum cleaner
D
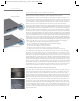
Before Installation
•
Subfloor is sound, level and
meets deflection criteria.
Wooden or concrete struc-
tural substrates are dry and
loadbearing. Steel framing is
loadbearing.
•
Floor joists not to exceed 16”
o.c. Subfloor panels
3
/4” T&G
EGP or equivalent.
•
If Shower base is to be
installed floor level, make
sure you build out a stable
depression and deep enough
to receive base + thin set
•
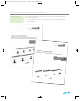
2” Floor pipe is cut 1
1
/4”
below surface of subfloor.
The cut out in the subfloor to
receive the drain trap is made
using the wedi supplied, oval
shape template.
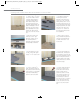
•
2” drain assembly below
floor is stabilized and will not
sink under water load
•
Make sure wedi drain and 2”
pipe is safely connected using
ABS/PVC multi use or ABS ce-
ment. wedi's drain is made of
ABS.
•
Only wedi products (wedi
sealant, wedi fasteners, wedi
building panel, wedi curb,
wedi ramp) are used for wedi
Fundo Riolito/Riofino assembly.
•
Installer has been instructed
by wedi staff or has been
informed about proper wedi
assembly steps through wedi
installation brochure and video.
•
Have 2 x 4 blocking installed
vertically between studs along
the bottom perimeter of fram-
ing to back the bottom of
wedi wall panels
•
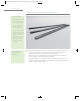
wedi shower bases can be cut
to size using a skilsaw. The Z
notch channel must be remade.
Remove all sawdust and contam-
inants from base and channels.
wedi_MA_Fundo_Riolito-Riofino_USA_2014_4C_v3_rz_Layout 1 09.12.14 08:32 Seite 3