
Use and Care Manual

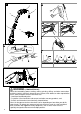
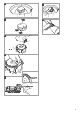
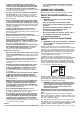
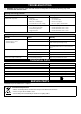

Table Of Contents

enough to carry the current that your power tool will draw.
An undersized extension cord will cause a drop in line
voltage resulting in loss of power and overheating. The
table below shows the correct size to use depending on
cord length and nameplate ampere rating. If in doubt, use
the next heavier gauge. The smaller the gauge number,
the heavier the cord.
Minimum gauge for extension cords
Volts Total length of cord
120V
7.6 m
(25 ft)
15.2 m
(50 ft)
30.4 m
(100 ft)
45.7 m
(150 ft)
AWG
18 16 16 12
VIBRATION EXPOSURE
Exposure to vibrations through prolonged use of power
tools could cause blood vessel or nerve damage in the
ngers, hands, and joints of people prone to circulation
disorders or abnormal swelling. Prolonged use in cold
weather has been linked to blood vessel damage in
otherwise healthy people. If symptoms occur such as
numbness, pain, loss of strength, change in skin color or
texture, or loss of feeling in the ngers, hands, or joints,
discontinue the use of this power tool and seek medical
attention. An anti-vibration system does not guarantee
the avoidance of these problems. Users who operate
power tools on a continual and regular basis must closely
monitor their physical condition and the condition of the
power tool.
ASSEMBLY
a WARNING! Do not connect the power tool to the
power supply before it is completely assembled.
SHAFT ASSEMBLY (A)
1. Install the lower shaft (A1) into the upper shaft (A2).
2. Grasp the lower shaft rmly and hold it steady. Click
the upper and lower shafts together rmly.
The trimmer is correctly assembled when the gap between
the upper and lower shafts has been closed.
GUARD ASSEMBLY (B, C)
1. Position the guard (B1) over the trimmer head (B2).
Ensure the trimmer line is fed through the hole in the
guard.
2. Push the guard into place and turn it in the direction
indicated until a click is heard and the guard is
securely locked (C).
Ensure the guard is securely in place by attempting to
twist the guard.
CORD RESTRAINT (D1) & (D2)
1. Make a loop in the extension cord and push the loop
through the slot in the handle.
2. Position the loop over the hook and pull the cord back
through the slot.
OPERATION
BEFORE STARTING
• Make sure you have the proper personal protective
equipment.
• Inspect the cleanliness of the power tool. Make sure the
handles are dry, clean, and free of oil and grease.
• Inspect for correct alignment of moving parts.
• Inspect for broken or damaged parts. Do not use the
power tool if any damage affects safety or operation.
Have damage repaired by an authorized service center.
• Inspect the power cord. If it is damaged, have it repaired
by an authorized service center.
• Inspect the extension cord. Replace it if it is damaged.
• Connect the power cord to the extension cord.
• Connect the extension cord to the power supply.
Keep the extension cord clear of the work area. Position
the cord so that it will not get caught on bushes, hedges,
tree trunks or other obstructions while you are working.
a WARNING: Check the extension cord before each
use and frequently while working. If damaged,
replace immediately. Never use the tool with a
damaged cord since touching the damaged area
could cause electrical shock, resulting in serious
injury.
STARTING AND STOPPING THE TRIMMER (E)
To start the trimmer, squeeze the trigger.
To stop the trimmer, release the trigger.
TRIMMING (F)
a WARNING
• The use of eye protection is recommended.
• Do not lean over the trimmer while trimming or
edging, objects may be thrown by the trimmer line.
• Do not allow trimmer head to rest on the ground.
• Do not overload the trimmer.
• Unplug the power tool from the power source
before making adjustments.
1. Cut with trimmer line at an angle using the tip.
2. Swing trimmer in and out of the cutting area taking
small cuts.
MAINTENANCE
a WARNING: Unplug the power tool from the power
source before performing maintenance. Severe
injury or death could occur from electrical shock
or body contact with moving parts.
AUTOMATIC TRIMMER LINE FEED SYSTEM
How the automatic trimmer line feed works
When initially switching on the trimmer, a small length of
trimmer line is fed out. A ‘clattering’ noise will be heard
when the trimmer line hits the trimmer line cutter (G1).
This is normal. After approximately 5 seconds the trimmer
line will be cut to the correct length and the noise will
reduce as the motor reaches full speed.
If the noise of the trimmer line being cut cannot be heard,
more trimmer line will need to be fed out. To feed more
trimmer line, stop the trimmer and allow the motor to stop
completely, then re-start, allowing the motor to reach full
speed.