
Use and Care Manual


ASSEMBLY
a WARNING! Do not install the battery pack until the
power tool is completely assembled.
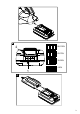
ASSEMBLING THE ATTACHMENT
Insert the attachment into the powerhead until it clicks into
position. Make sure the attachment release button passes
completely through the hole.
NOTE: T
o remove the attachment, press down fi rmly
on the attachment release button while pulling the
attachment out of the powerhead.
OPERATION
BEFORE STARTING
• Make sure you have the proper personal protective
equipment.
• Inspect the cleanliness of the power tool. Make sure the
handles are dry, clean, and free of oil and grease.
• Inspect for correct alignment of moving parts.
• Inspect for broken or damaged parts. Do not use the
power tool if any damage affects safety or operation.
Have damage repaired by an authorized service center.
• Lubricate the cutting blades.
• Install the battery pack
INSTALLING THE BATTERY PACK
NOTE: The battery pack is not shipped fully charged.
It is recommended that the battery pack be fully
charged before initial use. With regular use, the
battery pack will take 4 hours or less to fully charge.
It is recommended that the battery pack be charged
every 3 months when the tool is not in use. The
battery pack’s run time will improve after the third or
fourth charge.
1. Align the tongue of the battery pack with the cavity in
the powerhead.
2. Grasp the rear handle ! rmly.
3. Push the battery pack into the powerhead until it locks.
The latch button will click when locked into place.
NOTE: Do not use force when inserting the battery
pack. It should slide into place and click.
STARTING AND STOPPING THE TOOL
Remove the blade cover.
For added safety
, there is a lockout in the assist handle.
When operating, hold the hedge trimmer with both hands,
one hand to press the trigger lockout and squeeze the
trigger, and the other hand to squeeze the assit handle
lockout.
Release the trigger lockout and continue to squeeze the
trigger and assist handle lockout for extended operation.
To turn off the tool, release the trigger and trigger lockout.
The lockout and trigger must both return to their original
positions.
TRIMMING
1. Inspect area to be cut before each use - remove
objects which can be thrown or become entangled in
the cutting blades.
2. Always keep the hedge trimmer in front of your body.
Hold handle ! rmly with both hands and stand in a
secure and stable position.
3. Allow the cutting blades to reach full speed before
entering the material to be cut.
4. Always work going away from people and solid objects
such as walls, large stones, trees, vehicles etc.
5. If blade stalls, immediately stop the hedge trimmer.
Disconnect the battery and clear jammed debris
from the cutting blades. Inspect blades and repair or
replace as needed.
Top Cutting
Use a wide sweeping motion. A slight downward tilt of the
cutting blades in the direction of motion gives the best
cutting results.
Side Cutting
When trimming the sides of the hedge, begin at the
bottom and cut upwards, tapering the hedge inward at the
top. This shape will expose more of the hedge, resulting in
more uniformed growth.
MAINTENANCE
a WARNING: Remove the battery before performing
maintenance. Severe injury or death could occur
from electrical shock or body contact with moving
parts.
CHECKING THE BATTERY PACK CAPACITY
(B1)
Press the battery power level indicator button. The lights
will illuminate according to the battery’s current power
level.
Lights Battery Pack Power
Level
3 Green Lights 80 –100%
2 Green Lights 60 – 79%
1 Green Light 30 – 59%
No lights Below 30%. Charge
immediately.
REMOVING THE BATTERY PACK (B2)
1. Press in and hold the battery pack release button.
2. Grasp the rear handle and pull the battery pack out of
the powerhead.
CHARGING THE BATTERY PACK (C)
a WARNING: Do not use the charger in direct
sunlight. Recharge at temperatures between 0°C
and 40°C (32°F and 104°F).
a WARNING: If the battery pack is hot, allow it to
cool down before recharging.
1. Plug the charger into an AC power outlet.
2. Slide the charger over the battery pack terminals.
Make sure the charger and battery pack are fully
connected.
When the battery pack is charging, the LED will blink.
When the battery pack is fully charged, the LED will stop
blinking but will remain illuminated.
Once the charging light turns green, remove the battery
8