PATENT PENDING USER'S MANUAL Model No. 831.150380 Serial No. The serial number can be found in the location shown below. Write the serial number in the space above. Serial Number Decal (under seat) CAUTION Read all precautions and instructions in this manual before using this equipment. Save this manual for future reference. SEARS, ROEBUCK AND CO.
TABLE OF CONTENTS FULL 90 DAY WARRANTY . . . . . . . . . . . . . . . . . . . . . . . . . . . . . . . . . . . . . . . . . . . . . . . . . . . . . . . . . . . . . . . .2 IMPORTANT PRECAUTIONS . . . . . . . . . . . . . . . . . . . . . . . . . . . . . . . . . . . . . . . . . . . . . . . . . . . . . . . . . . . . . .3 BEFORE YOU BEGIN . . . . . . . . . . . . . . . . . . . . . . . . . . . . . . . . . . . . . . . . . . . . . . . . . . . . . . . . . . . . . . . . . . .4 PART IDENTIFICATION CHART . . . . . . . . . .
IMPORTANT PRECAUTIONS WARNING: To reduce the risk of serious injury, read the following important precautions before using the weight bench. 9. Keep hands and feet away from moving parts. 1. Read all instructions in this manual before using the weight bench. 10. The weight bench does not include weights. The weight bench is designed to support a maximum of 510 pounds, including the user, a weight bar and weights. Do not place more than 310 pounds, including a weight bar and weights, on the weight rests.
BEFORE YOU BEGIN Thank you for selecting the WEIDER® PRO 335 Weight Bench. The versatile PRO 335 Weight Bench is designed to be used with your own weight set (not included) to develop every major muscle group of the body. Whether your goal is a shapely figure, dramatic muscle size and strength, or a healthier cardiovascular system, the PRO 335 Weight Bench will help you to achieve the specific results you want. HELPLINE at 1-800-736-6879, Monday through Saturday, 7 a.m. until 7 p.m.
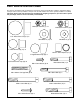
PART IDENTIFICATION CHART This chart is provided to help you identify the small parts used in assembly. The number in parenthesis below each part refers to the key number of the part. The second number refers to the quantity needed for assembly. Important: Some parts may have been pre-assembled for shipping purposes. If you cannot find a part in the parts bags, check to see if it has been pre-assembled.
ASSEMBLY Before beginning assembly, carefully read the following information and instructions: • As you assemble the WEIDER® PRO 335, make sure that all parts are oriented as shown in the drawings. • Place all parts of the WEIDER® PRO 335 in a cleared area and remove the packing materials; do not dispose of the packing materials until assembly is completed. THE FOLLOWING TOOLS (NOT INCLUDED) ARE REQUIRED FOR ASSEMBLY: • Two (2) adjustable wrenches • Read each assembly step before you begin.
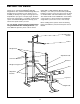
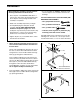
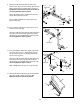
3. Press two 2 1/2” Square Bushings (22) into the Weight Carriage (15). Press two 1” Round Inner Caps (21) into the Weight Carriage. 3 22 Press a 2 1/2” Square Bushing (22) into the Carriage Stop (18). The hole in the Square Bushing must be aligned with the indicated hole in the Carriage Stop. 21 15 22 21 22 Align these Holes 18 4. Slide the Weight Carriage (15) onto the Upper Lat Tower (41). The Weight Carraige must be oriented as shown.
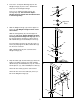
6. Slide the Left Upright (42) onto the indicated M8 x 48mm Carriage Bolts (3). Hand-tighten an M8 Nylon Locknut (7) onto each Carriage Bolt. Be sure that the Upright is turned as shown. Do not tighten the Nylon Locknuts yet. 6 17 Attach the Right Upright (43) in the same manner. 7 Attach the Left Barbell Lock Pin (46) to the Left Upright (42) with an M8 Nylon Locknut (7). Attach the Right Barbell Lock Pin (17) to the Right Upright (43) in the same manner.
. Lubricate an M10 x 75mm Bolt (5). Attach the Bench Frame (33) to the Cross Brace (30) with the M10 x 75mm Bolt and an M10 Nylon Locknut (4). The Bench Frame must be turned as shown. Do not overtighten the Nylon Locknut. 9 Lubricate 5 4 33 Attach the Bumper (24) to the Bench Frame (33) with an M4 x 25mm Screw (44). 16 30 Press a 38mm x 50mm Inner Cap (16) into the Bench Frame (33). 24 44 10. Press a 38mm x 50mm Inner Cap (16) into each end of the Front Leg (20).
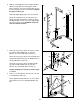
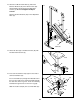
13. Lubricate an M10 x 75mm Bolt (5). Attach the Backrest Brackets (38) to the Bench Frame (33) with the M10 x 75mm Bolt and an M10 Nylon Locknut (4). Do not overtighten the Nylon Locknut. 13 Rest the Backrest Brackets (38) on the Adjustment Tube (37). 37 38 4 33 5 Lubricate 14. Attach the Seat (35) to the Bench Frame (33) with two M6 x 16mm Screws (6). 14 35 33 6 15. Press 3/4” Round Inner Caps (25) into the ends of all three Pad Tubes (27).
16. Wet the ends of the Lat Bar (31) with soapy water. Slide a Handgrip (39) onto each end of the Lat Bar. 16 39 CAUTION: Allow the Handgrips (39) to dry thoroughly before using the Lat Bar (31). 31 39 17. Be sure that all parts have been tightened properly. The use of all remaining parts will be explained in ADJUSTING THE WEIDER PRO 335 beginning on page 12 of this manual.
ADJUSTING THE WEIDER PRO 335 The weight bench is designed to be used with your own weight set (not included). The steps below explain how the weight bench can be adjusted. See EXERCISE GUIDELINES on page 14 for important exercise information and refer to the accompanying exercise poster to see the correct form for each exercise. Refer also to the exercise information accompanying your weight set for additional exercises. Inspect and tighten all parts each time you use the weight bench.
ATTACHING THE LAT BAR TO THE HIGH PULLEY STATION 10 Attach the Lat Bar (31) to the Cable (10) with a Cable Clip (34). WARNING: Always sit on the backrest when using the high pulley station. The backrest must be in the level position (see ADJUSTING THE BACKREST on page 12). 34 31 LOCKING THE BARBELL To change weights while your barbell (not included) is on the Uprights (42, 43), secure your barbell with the Barbell Lock Pins (17, 46).
EXERCISE GUIDELINES THE FOUR BASIC TYPES OF WORKOUTS PERSONALIZING YOUR EXERCISE PROGRAM • Muscle Building We have not specified an exact length of time for each workout, or a specific number of repetitions or sets for each exercise. It is very important to avoid overdoing it during the first few months of your exercise program, and to progress at your own pace. If you experience pain or dizziness at any time while exercising, stop immediately and begin to cool down.
doing a toning workout, and 30 seconds after each set if you are doing a weight loss workout. Plan to spend the first couple of weeks familiarizing yourself with the equipment and learning the proper form for each exercise. COOLING DOWN End each workout with 5 to 10 minutes of stretching. Include stretches for both your arms and legs. Move slowly as you stretch—do not bounce. Ease into each stretch gradually and go only as far as you can without strain.
MUSCLE CHART N A O B P C Q D R E S F L G T M H U I V J W K A. B. C. D. E. F. G. H. Sternomastoid (neck) Pectoralis Major (chest) Biceps (front of arm) Obliques (waist) Brachioradials (forearm) Hip Flexors (upper thigh) Abductor (outer thigh) Quadriceps (front of thigh) I. J. K. L. M. N. O. P.
EXERCISE MONDAY WEIGHT SETS REPS WEIGHT SETS REPS Date: / / AEROBIC EXERCISE TUESDAY Date: / / WEDNESDAY EXERCISE Date: / / THURSDAY AEROBIC EXERCISE Date: / / EXERCISE FRIDAY WEIGHT SETS Date: / / Make photocopies of this page for scheduling and recording your workouts.
PART LIST—Model No. 831.150380 Key No. Qty. Part No.
EXPLODED DRAWING—Model No. 831.
Model No. 831.150380 The model number and serial number of your WEIDER® PRO 335 are listed on a decal attached to the frame. See the front cover of this manual to find the location of the decal. QUESTIONS? All replacement parts are available for immediate purchase or special order when you visit your nearest SEARS Service Center. To request service or to order parts by telephone, call the toll-free numbers listed at the left.