
User manual


Connecting the VP-300N-5 1:3 High Resolution UXGA DA
7
5 Connecting the VP-300N-5 1:3 High Resolution UXGA DA
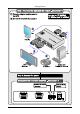
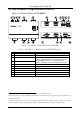
To connect your VP-300N-5 1:3 High Resolution UXGA DA
1
, as the example
in Figure 4 illustrates, do the following
2
:
1. Connect a computer graphics source to the INPUT 15-pin HD connector.
2. Connect the OUTPUT 15-pin HD connectors to up to three
3
acceptors, as
follows:
Connect the OUTPUT 1 connector to acceptor 1 (for example, a
projector)
Connect the OUTPUT 2 connector to acceptor 2 (for example, an LCD
monitor)
Connect the OUTPUT 3 connector to acceptor 3 (for example, a
display)
3. Connect the 5V DC power adapter (wall transformer) to the 5V DC socket and
connect the transformer to the mains electricity.
4. If required, set the:
Hs and Vs switches
ID Bit switch to ON
1 From this section on, all the information is relevant to the VP-200N-5, VP-300N-5 and VP-400N-5, unless noted otherwise
2 Switch OFF the power on each device before connecting it to your VP-300N-5. After powering up your VP-300N-5, switch
on the power on each device
3 Two for the VP-200N-5
; four for the VP-400N-5