
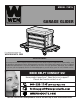
Product Manual
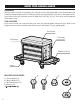


ASSEMBLY
7
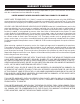
WARNING: Do not the item until it is fully assembled according to the instructions. Failure to
follow the safety instructions may result in serious personal injury.
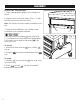
ATTACH THE CASTERS
1. Gather both side trays (Fig. 1 - 3) and all four cast-
ers (Fig. 1 - 2).
2. Align the casters with the outermost holes on the
side trays.
3. Fasten with a washer, and a round-head nut (Fig. 1
- 1) using a 14mm wrench (not included) to tighten it.
Repeat with all four casters.
ATTACH THE SIDE TRAYS
1. Place the tool chest upside down, so that the seat
cushion is on the floor.
2. Align the outer holes on the side tray assembly (Fig.
2 - 1) with the outer holes on the tool chest (Fig. 2 -
2).
3. Fasten the side tray assembly to the tool chest us-
ing a 35mm M8 bolt, a washer, and a round-head nut.
Repeat on all four outer corners.
Note: Your garage glider comes with eight M8 bolts,
four of them are 35mm long and four of them are
40mm long. Be sure to use the shorter (35mm) bolts
for this step.
4. Tighten all four nuts with a 14mm wrench (not
included).
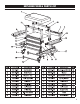
ATTACH THE SUPPORT BARS
1. Align the support bars (Fig. 3 - 1) with the inner
holes (Fig. 3 - 2) on the tool chest assembly.
2. Fasten the support bars to the tool chest assembly
using a 40mm M8 bolt, a washer, and a round-head
nut. Repeat on all four inner slots.
3. Tighten all four nuts with a 14mm wrench (not
included).
Fig. 3
Fig. 1
2
1
3
Fig. 2
1
1
1
1
2
2
2
2