
Product Manual A


Page 10
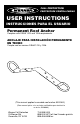
ENGLISH
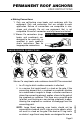
xed structural elements such as rebar or cross members
that are not shaped in a way that can capture the gate of
the hook.
iii. in a false engagement, where features that protrude from
the snap hook or carabiner catch on the anchor and without
visual conrmation seems to be fully engaged to the anchor
point.
iv. to each other.
v. directly to webbing or rope lanyard or tie-back (unless
the manufacturer’s instructions for both the lanyard and
connector specically allow such a connection).
vi. to any object which is shaped or dimensioned such that the
snap hook or carabiner will not close and lock, or where roll-
out could occur.
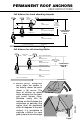
3. Do not pass the lanyard or lifeline through the roof anchor
D-ring/attachment hole and hook back into the lanyard or lifeline.
When connecting, make sure the connections are fully closed
and locked.
4. When using an energy-absorbing lanyard, connect the energy
absorber “pack” end to the harness.
5. When using a self-retracting lifeline, make sure the device is
properly positioned so that the retraction is not hindered.
6. Always protect the lifeline/lanyard from abrading against sharp
or abrasive surfaces on the roof.
b. Anchorage Strength
Depending on the application, the anchorage to which the roof
anchor is installed must meet strengths as given below:
1. FALL ARREST: Roof anchors installed for fall arrest applications
must be attached to a roof member capable of sustaining
static loads in the direction(s) permitted by the Personal
Fall Arrest System (PFAS) whenin use of at least 3,600 lbs.
(16kN) when certication exists (reference ANSI Z359.1 for
certication denition); or 5,000 lbs. (22.2kN) in absence of
certication. When more than one roof anchor is installed to a
roof structure, the strengths given above must be met at each
roof anchor’s installation point independently. EXAMPLE: If two
roof anchors are installed onto a roof structure, each anchor