
Installation Guide

Toilet Water Supply Kit
This kit includes the following:
1 ea. 3/8” x 12” , or 15“ or 20” corrugated riser
1 ea. 1/2” IPS sure grip ange
1 ea. 1/2 “ IPS x 3/8” OD comp. angle stop
1 ea. 1/2” x 4” Nipple
Instructions
1. Turn o water supply to house and drain water.
2. If you are remodelling, remove existing valve and ange
from wall.
3. Wrap the jaws of a wrench with painter’s tape to protect
the nish.
4. Apply PTFE paste or tape to ends of pipe.
5. Carefully thread pipe into tting and tighten.
6. Slide 1/2” IPS ange onto wall, covering the outlet.
7. Thread on valve, with outlet facing upwards. Do not over
tighten.
8. Slide 7/8” ballcock nut from toilet onto the supply tube
facing up towards toilet. Loosely tighten on toilet.
9. Gently bend tube to meet compression inlet and cut tubing
to length using a tubing cutter.
10. Slide nut onto supply tube, with the nut facing valve. Then
slide on ferrule. Push straight into valve opening being sure
supply seats rmly. Tighten onto valve.
11. Tighten nut onto toilet ballcock. Do not overtigten.
12. Turn on water and check for leaks.
Juego de Alimentación de
Agua para Indoro
Este juego incluye lo sigulente:
1 ea. Contrahuella corrugada de 3/8 "x 12“, o 15“ o 20”
1 ea. Brida de agarre seguro IPS de 1/2 ”
1 ea. 1/2 "IPS x 3/8" OD comp. tope de ángulo
1 ea. Niple de 1/2" x 4"
Instrucciones
1. Cierre el suministro de agua a la casa y drene el
agua.
2. Si está remodelando, retire la válvula y la brida
existentes de la pared.
3. Envuelva las mandíbulas de una llave con cinta de
pintor para proteger el nal.
4. Aplique pasta o cinta de PTFE a los extremos de la
tubería.
5. Enrosque con cuidado la tubería en la conexión y
apriete.
6. Deslice la brida IPS de 1/2 ”sobre la pared, cubrien-
do la salida.
7. Enrosque la válvula, con la salida hacia arriba. No
sobre apretar.
8. Deslice la tuerca de la llave de bola de 7/8 ”del
inodoro al tubo de suministro mirando hacia el
inodoro. Apriete ligeramente en el inodoro.
9. Doble suavemente el tubo para encontrar la
entrada de compresión y corte el tubo a la longitud
utilizando un cortatubos.
10. Deslice la tuerca sobre el tubo de suministro, con
la tuerca hacia la válvula. Luego deslice sobre la
férula. Empuje directamente en la abertura de la
válvula asegurándose suministre los asientos
rmemente. Apriete sobre la válvula.
11. Apriete la tuerca en la válvula de bola del
inodoro. No apriete demasiado.
12. Abra el agua y verique que no haya fugas.
Do not use chemicals to clean your faucet; only clean
it with a soft cloth.
No use productos químicios para limpiar la llave;
límpiela solomente con un trapo suave.
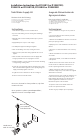
Ballcock Nut
comes with the
Toilet Flush Valve
Handle Varies
with chosen Valve
Installation Instructions for D103K12 or D103K12X;
D103K15 or D103K15X; D103K20 or D103K20X