WIRELESS DMX DIMMER AC ADAPTER QUICK START GUIDE
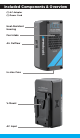
Included Components & Overview (1) AC Adapter (1) Power Cord Heat-Resistant Housing Fan Intake Air Outflow In-Line Fuse V-Mount AC Input
Warning • • • • • • • Only for use with the Westcott Flex Cine Wireless DMX Dimmer Do not block vents Keep dry and away from fire Do not submerge in water Do not attempt to open or modify Do not short terminals Do not alter or change V-Mount plate Operation Attaching to a Flex Cine Wireless DMX Dimmer 1. Plug one end of the power cord into the bottom of the AC Adapter and the other end into a wall outlet. 2.
Fuse Checking and Replacing a In-Line Fuse (250V 10A) 1. Allow the AC Adapter to cool for at least 2 minutes. 2. Locate the fuse compartment on the bottom of the adapter just above the power cord receptacle. 3. Using a thin flat object (ie. flat head screwdriver), open the fuse compartment tray. 4. Slide the compartment tray out and remove the blown fuse. 5. Insert the new fuse into the tray just above the ^ shape and ensure it’s aligned properly. 6.
Flex Cine Mounts & Modifiers Scrim Jim® Cine Frames Yokes Hard Diffusion Panels Barndoors Drum Softbox China Cubes Portable Softboxes Egg Crate Grids Learn more at FJWESTCOTT.
Warranty Westcott’s warranty obligations for this product are limited to the following terms. The F.J. Westcott Co. (“Westcott”) warrants this Westcott branded product against defects in materials and workmanship under normal use for a period of ONE (1) YEAR from the date of retail purchase from Westcott or an authorized retailer by the original end-user purchaser (“Warranty Period”).