USER MANUAL Bar Fridges with Ice Box, All Refrigerators and Upright Freezers Models WIM1000 WIM1200 WRM1300 WRM2400 WFM0700 WFM0900 WFM1800
congratulations contents Congratulations and thank you for choosing our refrigerator/freezer. We are sure you will find your new appliance a pleasure to use. Before you use the appliance, we recommend that you read through the relevant sections of this manual, which provides a description of your appliance and its functions. Important safety instructions . . . . . . . . . . . . .
Important safety instructions Please read the user manual carefully and store in a handy place for later reference.
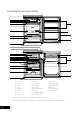
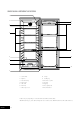
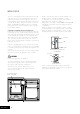
BAR REFRIGERATORS WITH ICE BOX features 10 1 3 8 7 18 6 2 20 11 21 13 14 18 15 WIM1000 illustrated 1 2 3 4 16 5 7 9 10 17 11 12 20 13 21 14 22 15 WIM1200 illustrated Light lens 17 Door bin 1 Ice box door 9 2 Light switch 10 Control knob 18 Plastic door strap 3 Ice box 11 Glass shelf 19 Metal door strap 4 Ice bin 12 Wine rack 20 Egg tray 5 Drain plug 13 Glass crisper cover 21 Door gasket/seal 6 Drip tray 14 Crisper 22 Door bin bottom 7 Ice tray 15 Adjustable
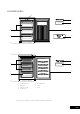
BAR REFRIGERATORS WITHOUT ICE BOX features 1 9 2 3 4 10 3 11 3 5 6 12 7 13 8 WRM1300 illustrated 1 Control knob 8 Levelling leg 2 Light lens 9 Door bin cover/lid 3 Wire shelf 10 Door bin 4 Light switch 11 Egg tray 5 Drain hole 12 Door gasket/seal 6 Glass crisper cover 13 Door bin bottom 7 Crisper Features may vary depending on model. Not all models will have features listed.
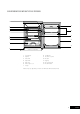
Single door all refrigerator features 1 2 10 11 3 4 5 12 13 6 7 8 14 WRM2400 illustrated 9 1 Control knob 8 Crisper 2 Light lens 9 Levelling leg 3 Fan and housing 10 Door bin cover/lid 4 Light switch 11 Door bin 5 Wire shelf 12 Egg tray 6 Drain hole 13 Door gasket/seal 7 Glass crisper cover 14 Door bin bottom Features may vary depending on model. Not all models will have features listed. WRM2400SC has grey outer cabinet. Refrigerator door is stainless steel.
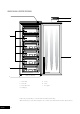
MAX MIN NORMAL BAR FREEZER features 1 MAX MIN 6 NORMAL 7 2 5 3 1 WFM0700 illustrated 4 1 6 2 7 5 3 WFM0900 illustrated 4 5 Door gasket/seal 2 Freezer bin 6 Ice tray 3 Bottom freezer bin 7 Ice bin 1 4 Temperature control Levelling legs Features may vary depending on model. Not all models will have features listed.
Single door all FREEZER features 1 5 6 2 7 3 WFM1800 illustrated 4 1 Control knob 5 Ice tray 2 Freezer bin 6 Ice bin 3 Freezer bin bottom 7 Door gasket 4 Levelling leg Features may vary depending on model. Not all models will have features listed. WFM1800SC has grey outer cabinet. Refrigerator door is stainless steel. WFM1800WC has white cabinet and door.
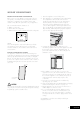
installing your new appliance Adequate ventilation around your refrigerator. Before you move your appliance into the place where it will operate, check that it will have adequate clearance. Clearance is required for air circulation and too little clearance may affect the performance of your appliance. We recommend minimum clearances of: • 30mm on each side. • 25mm above the refrigerator. • 50mm minimum/75mm maximum behind the refrigerator 1. Move the appliance into its final position. 2.
initial start-up This series of refrigerators has been fitted with a ‘wet wall’ evaporator which is positioned behind the rear liner. The rear liner will, at times be wet or appear frosted. This is normal and demonstrates that the refrigerator is functioning correctly. This product is designed to operate on a power supply of 220/240 volts 50Hz. Connect to a separate power point with a correctly earthed three pin socket. Do not use double adaptors.
ice box models – WIM1000 & WIM1200 The ice box compartment is not a deep freezer and is designed for making ice cubes. It is not recommended for the storage of frozen food. ice making To make ice cubes, fill the ice tray with water and place it in the ice box. To remove ice cubes easily, run water on the tray before gently twisting and inverting the tray. de-icing The de-icing system for the fridge compartment is automatic in models WIM1200, and vertical fridges WRM1300 and WRM2400.
initial start-up Your freezer was cleaned and polished before it left the factory. Before use, dust and wipe over inside and out using a clean dry cloth. This product is designed to operate on a power supply of 220/240 volts 50Hz. Connect to a separate power point with a correctly earthed three pin socket. Do not use double adaptors. MAX MIN NORMAL General Information The freezer transfers heat from food placed inside to the outside air.
reversing ice box door opening direction – Model wim1200 only If the position your fridge occupies would be better suited to a reverse opening arrangement, carefully follow these diagrams and instructions. The reversing of doors or replacement of light bulbs is not covered by warranty. Assistance, if required can be arranged by calling our service centre on 13 13 49. Normal service call and labour charges apply. Insert plug into the empty pin cavity on the other side.
reversing the door opening direction WIM1000 & WFM0700 In these examples the operation is changed from right side hinging to left side hinging. precautions • Turn off the appliance • Unplug the power cable • Remove all food from the appliance • Remove shelves and baskets • Do not lay the appliance down flat on its back as this will impair its operation. • When tilting the appliance to access the underside, support it so that it will not fall to the floor.
reversing the door opening direction WIM1200, WRM1300, WRM2400, WFM0900 & WFM1800 In these examples the operation is changed from right side hinging to left side hinging. precautions • Turn off the appliance • Unplug the power cable • Remove all food from the appliance • Remove shelves and baskets • Do not lay the appliance down flat on its back as this will impair its operation. • When tilting the appliance to access the underside, support it so that it will not fall to the floor.
lamp replacement for models WIM1200, WRM1300, WRM2400 lamp replacement for model WIM1000 The reversing of doors or replacement of light bulbs is not covered by warranty. Assistance, if required can be arranged by calling our service centre on 13 13 49. Normal service call and labour charges apply. 1. Switch off the power at the power point and remove the cord by pulling the plug. 2. Slide out the drip tray from beneath the ice box. 1.
General information Cleaning the refrigerator WARNING BEFORE CLEANING: Turn the refrigerator off at the power point and unplug the cord to prevent any chance of electrocuting yourself. • Doors and exterior (white & pacific silver) You should only clean the doors with lukewarm soapy water and a soft cloth. • Stainless Steel Your stainless steel refrigerator is manufactured from mark-resistant stainless steel.
what to do before calling for service problem solution problem solution Refrigerator is not operating • Check that the power cord is plugged into the power outlet properly and that the outlet is switched ‘ON’. • Try running another appliance from the power outlet. If no power is coming from the outlet you may have blown a fuse or tripped a circuit of your household power supply. • Try adjusting the temperature control to a slightly “colder” position.
Warranty FOR SALES IN AUSTRALIA AND NEW ZEALAND APPLIANCE: REFRIGERATION This document sets out the terms and conditions of the product warranties for Electrolux Appliances. It is an important document. Please keep it with your proof of purchase documents in a safe place for future reference should you require service for your Appliance. 1.
For more information on all Westinghouse appliances, or for dimension and installation information, call into your retailer, phone or email our customer care team or visit our website: AUSTRALIA phone: 1300 363 640 fax: 1800 350 067 email: customercare@electrolux.com.au web: www.westinghouse.com.au NEW ZEALAND phone: 09 573 2384 fax: 0800 363 600 email: customercare@electrolux.co.nz web: www.westinghouse.co.