
User Manual

8 INSTALLING OVEN ACCESSORIES
OPERATION
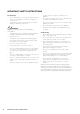
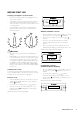
Slides (Telescopic runners)
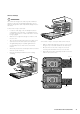
1. Obtain left hand side rack and left hand slide – see
image to identify.
L = left hand side
R = right hand side
2. Fit slide rear clips to the rear of wire at an angle as
shown below.
1
2
3. Push slide front clip over wire until secure.
3
CLICK!
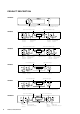
Catalytic liners (on selected models)
TIPS & INFORMATION
IMPORTANT
Models which contain catalytic liners have 2 catalytic
side liners (to be fitted by you) and a catalytic fan cover
(already fitted).
NOTE: If your model does not have catalytic liners, they
are available for purchase from the Customer Care Centre.
Catalytic liners are coated with a specially formulated
enamel coating. This porous coating enables a “self
cleaning” process. Catalytic liners must be installed first
but you can omit them, if you wish, with no effect to
cooking performance. Their sole purpose is to make oven
cleaning easier.
INSTALLING YOUR OVEN ACCESSORIES
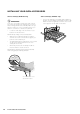
• The catalytic liners attach to each side of your oven.
There is a left hand and right hand version. The black,
shiny side of the liner needs to touch the oven wall,
while the coarse side faces the centre of the oven.
• Depending on the model, catalytic liners may or may
not have a cutout for the side light.
• To install the catalytic liner, firstly fit the liner onto the
side rack. The combined liner and side rack can then
be fitted onto the side of the oven.
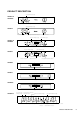
Side racks
• The side racks attach to each side of your oven.
There is a left hand and right hand version (see image
below for details).
• Insert the rear peg into the rear access hole provided,
ensuring that the peg is fully inserted.
• Then locate the front peg into the front access hole
and push in firmly.
• For the grill compartments on WVE626 and WVE665
models, the side rack fitment is the same as above.
Front Peg
Rear Peg
Left Hand
Side Rack
Left hand side rack
front peg rear peg
Left hand liner (shiny side
touches the oven wall)