FOOD DEHYDRATOR 6 TRAY 75-0301-W / 10 TRAY 75-0201-W DUE TO CONSTANT FACTORY IMPROVEMENTS, THE PRODUCT PICTURED MIGHT DIFFER SLIGHTLY FROM THE PRODUCT IN THIS BOX.
TABLE OF CONTENTS / ÍNDICE / TABLE DES MATIÈRES 2 GENERAL SAFETY RULES COMPONENT LIST CLEANING INSTRUCTIONS GROUNDING INSTRUCTIONS OPERATING INSTRUCTIONS CHOOSING FOODS PRE-TREATMEN OF FOODS TIPS RE-HYDRATING MAKING JERKY FOOD SAFETY WARRANTY 3 4 6 6 7 7 8 9 9 10 11 12 REGLAS IMPORTANTES DE SEGURIDAD LISTA DE COMPONENTES INSTRUCCIONES DE LIMPIEZA INSTRUCCIONES PARA HACER TIERRA INSTRUCCIONES DE OPERACIÓN SELECCIONE LOS ALIMENTOS PREPARACIÓN DE LOS ALIMENTOS CONSEJOS REHIDRATACIÓN CÓMO HACER CECINA SEGURI
READ AND FULLY UNDERSTAND ALL INSTRUCTIONS AND WARNINGS PRIOR TO USING THIS UNIT. YOUR SAFETY IS MOST IMPORTANT! FAILURE TO COMPLY WITH PROCEDURES AND SAFE GUARDS MAY RESULT IN SERIOUS INJURY OR PROPERTY DAMAGE. REMEMBER: YOUR PERSONAL SAFETY IS YOUR RESPONSIBILITY! 1. CHECK FOR DAMAGED PARTS. Before using the Dehydrator, check that all parts are operating properly and perform the intended functions.
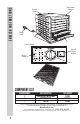
ENGLISH INSTRUCTIONS Dehydrator Cabinet Control Panel Power Cord 3 2 Control Panel On/Off Power Switch Drying Guide 1 2 COMPONENT LIST DIAGRAM NUMBER 1 2 3 PART DESCRIPTION TEMPERATURE CONTROL KNOB DEHYDRATOR TRAY FEET (4) PART NUMBER 75-0102 75-0103-N 75-0104 If any components of this unit are broken, the unit does not operate properly or you need a replacement instruction manual, visit us on the web at WestonProducts.
ENGLISH INSTRUCTIONS CLEANING INSTRUCTIONS WARNING! Before cleaning or servicing the Dehydrator, make sure it is unplugged and the Power Switch is set to the “OFF” position. Clean the Trays and inside of the Cabinet before using the Dehydrator for the first time and after each use. 1. Set the Power Switch to the “OFF” position. Disconnect the electrical cord from the outlet. 2. Allow the Dehydrator to completely cool before cleaning. 3. Remove the Trays from the Dehydrator Cabinet. 4.
1. Operate the Dehydrator on a clean, dry and level surface. 2. Plug the Dehydrator into a standard 120 Volt, 60 Hz wall outlet. 3. Position the Dehydrator at least 6” (15 cm) from any wall during operation to allow for proper air circulation. WARNING! DO NOT block the air vents at the rear of the Dehydrator. 4. Adjust thermostat to setting desired. 5. Turn the Dehydrator “On” (-). When “On”, the light should illuminate the Power Switch.
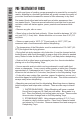
ENGLISH INSTRUCTIONS PRE-TREATMENT OF FOODS As with most types of cooking, proper preparation is essential for successful results. Adhering to a few basic guidelines will greatly increase the quality of your dried foods and decrease the amount of time necessary to dry them. Pre-treated foods often taste better and have a better appearance than non-treated foods.
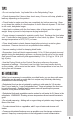
• Check dryness after 6 hours, then check every 2 hours until crisp, pliable or leathery depending on the product. • Check foods to make sure they are completely dry before removing. Open or cut down the middle of a few samples to check internal dryness. If the food is still moist, dehydrate longer. • Label each container with the food name, date of drying and the original weight. Keep a journal to help improve drying techniques. • Proper storage is essential to maintain quality food.
ENGLISH INSTRUCTIONS MAKING JERKY Your meat should be as lean as possible. Using lean meat will help the meat dry faster and aid in cleanup by decreasing fat drippings. Ground meat should be 80% to 90% lean. Ground turkey, venison, buffalo and elk are other excellent choices for jerky. Jerky seasonings are available for all tastes, or you can get creative and make your own. Whenever you make jerky, you should cure the mixture with cure (sodium nitrite).
COOK It’s crucial to cook food to a safe internal temperature to destroy bacteria that is present. The safety of hamburgers and other foods made with ground meat has been receiving a lot of attention lately, and with good reason. When meat is ground, the bacteria present on the surface is mixed throughout the ground mixture. If this ground meat is not cooked to at least o o o o 160 F to 165 F (71 C to 74 C), bacteria will not be destroyed and there’s a good chance you will get sick.
WESTON WARRANTY INFORMATION SAVE THIS WARRANTY INFORMATION FOR YOUR RECORDS! Weston Brands LLC warrants to the ORIGINAL RETAIL PURCHASER of this product that if operated in accordance with the printed instruction accompanying it, then for a period of 1 year from the date of purchase, the product shall be free from defects in material and workmanship.
DESHIDRATADOR DE ALIMENTOS 6 CHAROLAS 75-0301-W / 10 CHAROLAS 75-0201-W DEBIDO A CONSTANTES MEJORAS EN LA FÁBRICA, EL PRODUCTO QUE SE MUESTRA PUEDE SER LIGERAMENTE DIFERENTE DEL PRODUCTO EN ESTA CAJA.
INSTRUCCIONES EN ESPAÑOL REGLAS IMPORTANTES DE SEGURIDAD LEA Y ENTIENDA COMPLETAMENTE TODAS LAS INSTRUCCIONES Y ADVERTENCIAS ANTES DE UTILIZAR ESTA UNIDAD. ¡SU SEGURIDAD ES LO MÁS IMPORTANTE! NO SEGUIR LOS PROCEDIMIENTOS Y PRECAUCIONES PUEDE PROVOCAR LESIONES GRAVES Y DAÑOS MATERIALES. RECUERDE: ¡SU SEGURIDAD PERSONAL ES RESPONSABILIDAD DE USTED! 1. REVISE SI TIENE PARTES DAÑADAS. Antes de usar el deshidratador revise que todas las partes estén funcionando debidamente y realicen las funciones deseadas.
Cable de corriente 3 2 Panel de control GUÍA DE SECADO Interruptor de corriente encendidoapagado TEMPERATURA APAGADO ARTÍCULO HIERBAS INSTRUCCIONES EN ESPAÑOL Gabinete deshidratador Panel de control LEVANTAR EL PAN Guía de secado YOGUR VERDURAS ENCENDIDO APAGADO FRUTAS Y ROLLOS DE FRUTAS CARNES, PESCADO Y CECINA (JERKY) 1 2 LISTA DE COMPONENTES NÚMERO DE DIAGRAMA 1 2 3 DESCRIPCIÓN DE LA PIEZA PERILLA DE CONTROL DE TEMPERATURA CHAROLA DE DESHIDRATACIÓN PATAS (4) NÚMERO DE PIEZA 75-0102 75-0
INSTRUCCIONES EN ESPAÑOL INSTRUCCIONES DE LIMPIEZA ¡ADVERTENCIA! Antes de lavar o darle mantenimiento al deshidratador, revise que esté desconectado y que el interruptor de corriente esté en la posición “OFF” (apagado). Lave las charolas y el interior del gabinete antes de usar el deshidratador por primera vez y después de cada uso. 1. Ponga el interruptor de corriente en la posición “OFF”. Desconecte el cable eléctrico del tomacorriente. 2.
1. Opere el deshidratador en una superficie limpia y seca. 2. Conecte el deshidratador en un tomacorriente estándar de 120 volts y 60 Hz. 3. Coloque el deshidratador a por lo menos 15 cm (6”) de la pared durante su funcionamiento para permitir la circulación del aire adecuada. ¡ADVERTENCIA! NO bloquee las ventilas de la parte trasera del deshidratador. 4. Encienda el deshidratador “ON” (-). Cuando está en “ON”, el interruptor de corriente debe iluminarse. 5.
INSTRUCCIONES EN ESPAÑOL PREPARACIÓN DE LOS ALIMENTOS Como en la mayoría de los casos al cocinar, la preparación adecuada es esencial para obtener buenos resultados. Seguir unos simples lineamientos eleva en mucho la calidad de los productos deshidratados y reduce el tiempo necesario para deshidratarlos. Los alimentos pre-tratados suelen tener mejor sabor y aspecto que los no pre-tratados.
• Revise la sequedad después de 6 horas; después revísela cada 2 horas hasta que esté crujiente, plegable o curtido, según el producto. • Revise que los alimentos estén completamente secos antes de sacarlos. Abra o corte el centro de algunas muestras para revisar la sequedad interna. Si el alimento todavía está húmedo, deshidrátelo más tiempo. • Marque cada recipiente con el nombre del alimento, la fecha de elaboración y el peso original. Lleve un diario para mejorar sus técnicas de secado.
INSTRUCCIONES EN ESPAÑOL CÓMO HACER CECINA La carne debe de ser lo más magra posible. Usar carne magra ayuda a que se seque más rápido y a la limpieza, pues se reduce el goteo de grasa. La carne molida debe de ser de 80% a 90% magra. La carne molida de pavo, venado, búfalo y alce son otras opciones excelentes para hacer cecina. Hay condimentos para cecina para todos los gustos. Y usted puede ponerse creativo y hacer el suyo propio.
Hay que seguir ciertas reglas básicas al manejar alimentos. Las reglas son COCINAR, SEPARAR, LIMPIAR y ENFRIAR. COCINAR Es muy importante cocinar los alimentos a una temperatura interna que destruya cualquier bacteria que esté presente. Últimamente se ha puesto mucha atención en la higiene de las hamburguesas y otros alimentos elaborados con carne molida y con razón. Cuando se muele la carne, las bacterias presentes en la superficie se revuelven en toda la mezcla de la carne molida.
INFORMACIÓN DE GARANTÍA WESTON ¡GUARDE ESTA INFORMACIÓN DE GARANTÍA PARA SUS REGISTROS! Weston Brands LLC garantiza al COMPRADOR AL DETALLE ORIGINAL de este producto que si funciona en cumplimiento con las instrucciones impresas adjuntas, entonces por un período de 1 año desde la fecha de compra, el producto se considerará libre de defectos respecto del material y mano de obra.
DÉSHYDRATEUR ALIMENTAIRE 6 PLATEAUX 75-0301-W / 10 CHAROLAS 75-0201-W PARCE QUE NOS PRODUITS BÉNÈFICIENT DE PERFECTIONNEMENTS CONSTANTS APPORTÉS EN USINE, LES ILLUSTRATIONS PRÉSENTES PEUVENT ÊTRE LÉGÈREMENT DIFFÉRENTES DU PRODUIT REÇU.
INSTRUCTIONS EN FRANÇAIS 24 IMPORTANTES RÈGLES DE SÉCURITÉ LIRE ET COMPRENDRE COMPLÈTEMENT TOUTES LES DIRECTIVES ET AVERTISSEMENTS AVANT D’UTILISER CE PRODUIT. LE PLUS IMPORTANT EST VOTRE SÉCURITÉ! LE DÉFAUT D’OBSERVER LES PROCÉDURES ET MISES EN GARDE PEUT ENTRAINER DES BLESSURES GRAVES OU DES DOMMAGES MATÉRIELS. N’OUBLIEZ PAS : VOTRE SÉCURITÉ PERSONNELLE EST VOTRE RESPONSABILITÉ! 1. VÉRIFICATION DES PIÈCES.
Cordon d’alimentation 3 2 Tableau de commande GUÍA DE SECADO Interrupteur Marche/Arrêt TEMPERATURA APAGADO INSTRUCTIONS EN FRANÇAIS Casier Panel de control ARTÍCULO HIERBAS LEVANTAR EL PAN Guía de secado YOGUR VERDURAS ENCENDIDO APAGADO FRUTAS Y ROLLOS DE FRUTAS CARNES, PESCADO Y CECINA (JERKY) 1 2 DESCRIPTION DE LA PIÈCE NUMÉRO DE SCHÉMA 1 2 3 DESCRIPTION DE LA PIÉCE SÉLECTEUR DE TEMPÉRATURE PLATEAU DE DESSICCATION PIEDS (4) NUMÉRO DE LA PIÉCE 75-0102 75-0103-N 75-0104 N’hésitez pas à vis
INSTRUCTIONS EN FRANÇAIS INSTRUCTIONS DE NETTOYAGE AVERTISSEMENT! TOUJOURS DÉBRANCHER la trancheuse à viande de sa source d’alimentation avant d’en faire l’entretien, de la nettoyer, de changer des accessoires ou encore lorsqu’elle n’est pas utilisée. Nettoyer les plateaux et l’intérieur du casier avant une première utilisation du déshydrateur et après chaque utilisation. 1. Mettre l’interrupteur sur OFF (Arrêt). Débrancher l’appareil de la prise murale. 2.
1. Utiliser le déshydrateur sur une surface propre et sèche. 2. Brancher le déshydrateur sur une prise de courant murale standard de 120 V, 60 Hz. 3. Pour une bonne aération, placer le déshydrateur à au moins 15 cm (6 po) d’un mur. AVERTISSEMENT ! NE PAS boucher les évents à l’arrière du déshydrateur. 5. Allumer le déshydrateur (On) (-). L’interrupteur s’allumera alors. 6. Préchauffer le déshydrateur 5 à 10 minutes avant de mettre les aliments sur les plateaux. 7.
INSTRUCTIONS EN FRANÇAIS PRÉPARATION DES ALIMENTS Tout comme lorsqu’on fait la cuisine, une bonne préparation est le secret de la réussite. Observer quelques consignes élémentaires augmentera grandement la qualité des aliments séchés et réduira fortement leur durée de dessiccation. Les aliments préparés ont souvent un aspect et un goût supérieurs aux aliments non préparés.
• Après 6 heures, vérifiez la déshydratation, puis, selon le produit, vérifiez-le toutes les 2 heures jusqu’à ce qu’il soit croustillant, flexible, caoutchouteux. • Vérifiez les aliments pour vous assurer qu’ils sont complètement déshydratés avant de les retirer. Ouvrez ou coupez le centre de quelques échantillons pour vérifier la déshydratation interne. Si l’aliment est toujours humide, déshydratez plus longtemps.
INSTRUCTIONS EN FRANÇAIS PRÉPARATION DE VIANDE SÉCHÉE La viande doit être aussi maigre que possible, car elle sèche plus rapidement et facilite le nettoyage (moins de graisse exsudée). La viande hachée doit être 80 à 90 % maigre. La viande hachée de dinde, bison ou de venaison (cerf, sanglier, etc.) sont d’autres excellents choix pour le séchage.
CUIRE Il est crucial de cuire les aliments à une température interne sûre pour détruire les bactéries qui sont présentes. La sécurité des hamburgers et autres aliments faits avec de la viande hachée a reçu dernièrement beaucoup d’attention, et pour une bonne raison. Quand la viande est hachée, les bactéries présentes sur la surface sont mélangées dans l’ensemble du mélange haché.
INFORMATION SUR LA GARANTIE CONSERVEZ CETTE INFORMATION SUR LA GARANTIE POUR VOS DOSSIERS! Weston Brands LLC garantit à l’ACHETEUR AU DÉTAIL D’ORIGINE de ce produit contre tout défaut en matériau et en main-d’œuvre pendant un (1) an a partir de la date d’achat à condition qu’il soit utilisé conformément aux directives imprimées qui y sont jointes.
ATTENTION! PLEASE INSPECT THIS PACKAGE THOROUGHLY FOR MISSING PARTS OR ANY PRODUCT DAMAGE. IF YOUR PRODUCT CONTAINS SHIPPING DAMAGE, PLEASE CONTACT RETAILER FOR ASSISTANCE. For all other questions regarding product usage, missing parts, product damage, difficulty or warranty activation, please contact the Weston Brands Customer Service Team: 8:00 am to 5:00 pm ET, Monday thru Friday CustomerService@WestonProducts.com U.S. Residents Customer Service Line: 1-800-814-4895 (Outside U.S.