WH-TV/DVD21NO COMBINED 21" TV AND DVD PLAYER OWNER'S MANUAL TV + Please read this manual carefully before using this TV set and keep it for future reference.
CONTENTS Before Operation Warning and cautions.................................................................................1 Installation...................................................................................................2 Aerial connection........................................................................................2 Preparation of the remote control...............................................................2 Function buttons and external sockets............................
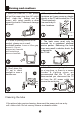
Warning and cautions 1. When you clean the TV set, please pull out the power plug from AC outlet. Don't clean the cabinet and the screen with petrol, paraffin or other powerful solvents. Permanent damage will result ! 4. Do not place the TV set near rain or moisture as it may cause an electric shock, or the TV set to catch fire. The TV set must only be used in dry in door locations. 2. In order to prolong the life of the product, please use in a well ventilated location. Leave a 10cm gap 5.
Installation Aerial Connection If the picture is not clear or snowy, we recommend that you use an outdoor aerial.In different places, the suitable antenna type and position are different. 300 twin-lead cable Antenna adapter (Not supplied) 75 coaxial cable COAXIAL OUT IN VIDEO L R AUDIO Aerial input 75 standard coaxial type Plug (Not supplied) AC power socket Note: * It is recommended that a 75 ohm coaxial antenna is used to avoid interference.
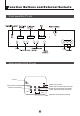
Function Buttons and External Sockets Front panel the TV set PROGRAME Rear panel of the TV set COAXIAL COAXIAL Antenna input socket Audio right channel output terminal Audio left channel output terminal Audio right channel input terminal Video output terminal Video input terminal OUT IN VIDEO L R AUDIO Audio left channel input terminal
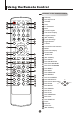
Using the Remote Control Buttons on the remote control Stand By POWER CALENDAR TIME OPEN/CLOSE CALL MUTE DVD Open/close Calendar SCAN SWAP Scan TV Time Menu Mute 1 2 3 4 5 6 7 8 Former Program Call Screen Display TV/AV 9 0 -/-- Program Number (Not available) TV/AV Exchange TV/DVD P+ Digital Selector TV/DVD Volume/Channel Selection V- MENU V+ MENU Exit Screen Display EXIT P.STD P- DVD STOP SETUP PAUSE/STEP STOP Picture Mode (Not available) REV FWD .
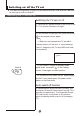
Switching on/ off the TV set This section explains the use of the power button and remote handset to turn your unit on and off. Switching the TV set on/ off Switching the TV set on/ off 1 Press the AC power switch on the front of the TV. The power indicator will light. 2 If the indicator is lighting in red, press the button on the remote control again.
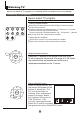
Watching TV You can watch a TV program on a channel which has been tuned to a broadcast. Watching TV programs How to select TV program Select the desired program 1 Using number buttons 1 2 3 4 5 6 7 8 9 0 Directly enter the channel number with the numeric keypad on the remote control.
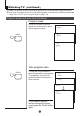
Watching TV continued Press the SWAP button to select the channel you were watching previously. Auto scan function scans through all programs in memory including those with "skip" set to "off" (see "Program skip" on page 13 ). Program swap and auto scan functions Program swap Press the SWAP button to select the channel you were watching previously. 18 AUTO I 8 AUTO I SWAP 18 AUTO I Auto program scan SCAN 1 Press the SCAN button to scan through all the memorised TV programs.
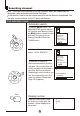
Searching channel This TV set has three methods to set the channels, which are respectively full automatic, semi- automatic and manual fine tune. In this section, how to use the remote control to set the channel is explained. You can also use the buttons on the TV set to set channel. Full automatic mode Automatic search 1 Press the MENU button. The MAIN MENU will appear with the PIC (picture) icon flashing. Press the MENU button a further 3 times until the TUN (tuning) icon is flashing.
Searching channel Continued Semi-automatic search Semi-automatic search 1 Press the P+/- buttons or the PROGRAMME NUMBER (0-9) to choose the desired channel (e.g. Channel 1). 1 AUTO I P+ V- MENU V+ P- 2 Press the MENU button. The MAIN MENU will appear with the PIC (picture) icon flashing. Press the MENU button a further 3 times until the TUN (tuning) icon is flashing. Press P- to enter the TUNING menu. 3 Press the P+/- buttons to select "SEARCH".
Searching channel Continued Manual fine tune Manual fine tune If the picture and/or sound are poor, try using the FINE TUNE feature. Do not use this feature unless reception is poor. P+ V- MENU V+ 1 Press the P+/- buttons or PROGRAM NUMBER 0-9 button to choose the desired channel (e.g. channel 1). 1 AUTO 1 P- 2 Press the MENU button. The MAIN MENU will appear with the PIC (picture) icon flashing. Press the MENU button a further 3 times until the TUN (tuning) icon is flashing.
Searching channel Continued Program skip Program skip Channels can be set so that they are skipped during program selection. P+ V- MENU V+ 1 Press the P+/- buttons or PROGRAM NUMBER 0-9 button to choose the desired channel (e.g. channel 1). 1 AUTO I P- 2 Press the MENU button. The MAIN MENU will appear with the PIC (picture) icon flashing. Press the MENU button a further 3 times until the TUN (tuning) icon is flashing.Press P- to enter the TUNING menu.
Convenient picture and sound control functions Multiple picture modes How to select picture modes You can quickly select the desired picture mode from STANDARD four preset modes and one customized mode. Press the P.STD button to select the desired P.STD picture quality. Five kinds of picture modes (i.e., "STANDARD","RICH", "USER","LISTEN", "SOFT" ) can be selected in turn.
Convenient picture and sound control functions Continued Black Stretch Automatically increases the contrast range Noise Reduce Picture Noise & Grain Reduction Circuit. (Use only on poor reception) Black stretch and noise reduce How to select BLACK STRETCH P+ V- MENU V+ 1 Press the MENU button. The MAIN MENU will appear with the PIC (picture) icon flashing.Press the MENU button a further 2 times until the FUN (function) icon is flashing.Press P- to enter the FUNCTION menu.
Convenient picture and sound control functions Continued Mute and Fade Sound mute 1 Press the MUTE button on the remote control to turn off the sound. MUTE will appear on the top left of the display. MUTE MUTE 2 Press MUTE again to turn the sound back on. Fade When FADE is turned on, the TV will protect the tube by fading the picture in when the TV is switched on, and fading the picture out when the TV is switched off. P+ V- MENU V+ P- P+ V- MENU P- 1 Press the MENU button.
Time functions Clock setting and timer on/off functions Clock setting The clock will only work if the TV set if left turned on or in standby. When the set is disconnected from the power supply or is turned off by the main power on the front panel, the clock loses power and will need to be reset when the power is reconnected. TIME 1 Press the TIME button, and the TIME menu appears on the screen.
Time functions Continued Sleep timer and program preset Sleep timer The sleep timer switches the set to stand-by after the sleep time has elapsed. Sleep time can be set in 10 minute intervals up to 180 minutes, as shown in the illustration. Setting the sleep time to zero turns off the sleep timer. TIME 1 Press the TIME button, and the TIME menu appears on the screen. 2 Press the P+/- buttons to select "SLEEP TIMER". P+ V- MENU V+ 3 press the V-/+ buttons to set the value of the SLEEP TIMER.
Set up function Screen saver and Calendar How to start screen saver function When the background function is ON a bouncing 'NO SIGNAL' will be displayed on a blue back ground. P+ V- MENU V+ NO SIGNAL 1 Press the MENU button. The MAIN MENU will appear with the PIC (picture) icon flashing. Press the MENU button a further 2 times until the FUN (function) icon is flashing.Press P- to enter the FUNCTION menu. P- 2 Press the P+/- buttons to select BACKGROUND.
Set up function Continued AVL AVL function Automatic Volume Level control reduces the effect of large volume changes. For instance, when advertisements come on. 1 Press the MENU button. The MAIN MENU will appear with the PIC (picture) icon flashing. Press the MENU button a further 2 times until the FUN (function) icon is flashing.Press P- to enter the FUNCTION menu. P+ V- MENU V+ P- BACKGROUND BLACK STRETCH NOISE REDUCE FADE AVL P+ 2 Press the P+/- button to select V- V+ MENU "AVL" .
Organise functions ORGANISE ORGANISE This feature enables TV programmes that may be on a wrong program number to be moved to another number. This feature is very useful when Automatic Search Tuning has been used because programmes are stored in the order they are found, which is usually not the desired order. When organising, it is best to start from the lowest programme number first. P+ V- MENU V+ P- P+ V- MENU V+ P- P+ V- MENU P- V+ 1. Press the MENU button.
Setting the Lock This TV set provides the option of locking various parts of the TV to guard against unauthorised viewing. Changing your password Changing your password This TV set can set a four digit password, the original one is 0000, if you want to reset it, please follow the instructions below. H.LOCK 1 Press H.LOCK button, the screen will show as the form on the right. P+ V- MENU 2 Press the 0 button four times, and enter the menu of LOCK setting.
Setting the Lock(continued) Setting the Lock Setting the Lock There are TUNING LOCK,AV LOCK, and CHILD LOCK, etc,you can set it due to your need. H.LOCK 1 Press the H.LOCK button, the screen will show as the form on the right. 1 2 3 4 5 6 7 8 9 0 2 Press the PROGRAM NUMBER 0-9 button 0 for four times(or input the password you set), and enter the LOCK menu. INPUT PASSWORD ---- LOCK SET CHANGE PW.
Basic Playback Basic Playback Preparations Press the DVD/TV button on the remote control or the TV to turn on the DVD player. Basic playback 1. Press OPEN/CLOSE to open the disc tray, place a disc on the disc tray. There are two different disc sizes. Place the disc in the correct guide on the disc tray. If the disc is out of the guide, it may damage the disc and cause the DVD player to malfunction. Do not place a disc which is unplayable in this DVD player (see "Playable discs"). 2.
Advanced Playback Advanced Playback IMPORTANT NOTE: ALL DESCRIBED FUNCTIONS ARE FOR DVD DISCS. There will be some differences for other kinds of disc. SUBTITLE Press " SUBTITLE ", the screen will display "SUBTITLE 01/XX XXXXX", "01" indicates the ordinal number of this language; "XX" indicates total number of language; "XXXXXX" indicates the language of country. (the number of language depends on disc). This function can select up to 32 languages displayed on screen.
Special Function Playback JPEG DISC PLAYBACK Users can record pictures from digital camera or scanner onto a CD-R or CD-RW disc using a personal computer, CD recording drive and suitable software. Be sure to use good quality recordable discs and trustworthy software with good instructions. Take care with recording settings: the disc must be recorded as data disc ISO9660 format, short file names (8 characters) are best, no multi-session and must be "finalised".
DVD System Setup DVD System Setup General Setup Process SETUP 1.Press the SETUP button, the General Setup Page,Preference Page and Password Setup Page will be displayed in turn. 2.Press CH+/or b item,then press submenu. PLAY/ENTER ..General Setup Page.. TV Display Angle Mark OSD Lang Spdif Output Caption Screen Saver to select,the to enter the or bu to setup,then 3.Press CH+/press PLAY/ENTER to confirm. 4.Press SETUP button to exit the menu. . LB 4 3:Ps . On 4 3:Lb ENG 16 9 On Off ..
DVD System Setup(Continued) DVD System Setup General Setup Page ANGLE MARK: Users can select a particular camera angle .when playing a DVD which offers multiple angles. This item allows you to set Angle Mark ON or OFF. On Screen Display (OSD) Language: Users can select on-screen display language. SPDlF OUTPUT MODE: Sets the audio outputs. This DVD player includes three kinds of audio output: 1. SPDlF OFF: An analog surround sound format is output through the back-paneI connections for 2-CH audio out or 5.
DVD System Setup(Continued) DVD System Setup Preference Page The Preference Page is only available when there is no disc in the player. These settings are applied consistently to all discs which are inserted and played. SETUP PLAY/ENTER TV TYPE: This player supports different TV output, including MULTI(Auto), NTSC, and PAL systems. Usually please set to MULTI. PARENTAL: The parental control function works in conjunction with the different censorship classes assigned to DVDs.
DVD System Setup(Continued) DVD System Setup SETUP DEFAULT: Resets all settings (except password and parental lock status) for this DVD player back to the manufacturers original settings. Press ENTER to perform the reset. ..Preference Page.. TV Type Auto Parental Password Default Reset PLAY/ENTER Note: Some functions may not be available depending on the type of disc.
Playable Discs The following discs can be played: You cannot play discs other than those listed above. You cannot play non-standard discs, even if they may be labelled as above. The performance of CD-R or CD-RW discs depends on the way the disc is prepared - see under "Special function playback - JPEG disc playback".
Disc Protection and DVD Characteristics Compare DVD disc with other discs: DVD Encode method LD Digital/MPEG Singleside doublelayer 9.4G Doubleside doublelayer 17G 133 242 266 Playing Time minutes minutes minutes 484 minutes Capacity Disc diameter Singleside singlelayer 4.7G Double -side single -layer 8.
Connecting the TV set to the other video and audio equipment Connection of AV input /output terminal The figure below shows how to connect external equipment using AV signals. an additional TV DVD, VCD or other units Video output To audio output To audio input To video input Laser DVD with output terminal DVD, VCD or other units There is also an AV input on the side of your television. Use the Left Audio input (white terminal on the TV), if you are connecting equipment with mono sound.
Troubleshooting guide To assist in location possible faults use help guide below. BREAKDOWN PHENOMENON PICTURE SOUND CHECKING The aerial direction and connection Picture with snow Double or Triple Image Noise Normal This is called ghosting which can be minimized with an outside aerial, and good quality cable and terminations. Altering the aerial direction can also minimize this effect.
Specifications Specifications Model WH-TV/DVD21NO Colour system PAL, NTSC PLAYBACK Sound system I Picture tube 51cm colour picture pure flat tube Sound output power 2X2W 10% THD Power requirements AC 240V~ 50Hz Power consumption 80W Dimension mm Accessories 500 Width x480 Remote control Owner's manual Battery(AA) Depth x485 Height mm x1 x1 x2 NOTE Design and specifications are subject to change without notice. The dimension in this manual is a approximation.