
Freestanding Compactor Instructions for Installation and use 220-240~volt, 50-Hz Models


Caring For Your Compactor
As is true of most appliances, proper care is needed to
give you continued satisfaction. Before cleaning the
compactor, turn the Key-knob to the OFF position and
remove. If you will be away for more than a couple of
days, remove the compactor bag. Lock the compactor
and remove the Key-knob. Store the Key-knob in a
safe place.
Clean exterior surfaces:
1. Wipe with warm, soapy water and a damp cloth.
Rinse. Dry with a soft cloth.
2. Wipe up spills right away. Some foods can damage
the finish if left on the compactor surface.
IMPORTANT: Wear protective gloves when cleaning
the inside of compactor in order to avoid cuts.
Clean inside the drawer:
1. Remove the bag. (See “Removing a filled bag” on
page 10.)
2. Wear protective gloves. There may be bits of glass in
the drawer.
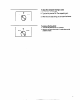
3. Press Side-lock latch down.
4. Hold Side-lock latch and tilt side of drawer until the
latch clears the drawer front.
NOTE: Drawer side can be removed by tilting it out,
then lifting out.
5. If drawer contains bits of glass, use vacuum to
remove.
6. Wash with a damp cloth using warm, soapy water.
Rinse. Dry with a soft cloth.
7. If drawer side was removed, slide it back into the tilted
position.
8. Press the Side-lock latch down while pressing the side
to the upright position.
9. Lock the Side-lock latch.