Thin Twin Washer »Dryer - 240 Voit Installation Instructions IMPORTANT: Read and save these instructions IMPORTANT: Installer: Leave Installation Instructions with the homeowner. Homeowner: Keep Installation Instructions for future reference. Save Installation Instructions for local electrical inspector's use.
Before yott start... Check location where washer/dryer will be installed. Proper Installation is your responsibility. The washer/dryer must not be installed or stored in an area where it will be exposed to water and/or weather. Make sure you have everything necessary for correct installation. Location: Should be large enough to fully open dryer door to 90°. See Panel G for "Recessed and closet installation instructions" and "Product dimensions.
A. For use where local codes permit use of flexible power supply cord. /oJJScm four-wire receptacle(14-30R) Figure 3 fhree-wire receptacle(10-30R) Figure 4 Four-wire installation is recommended (required for mobile homes): The power B. Four-wire connection... neufral (whife or confer) confer silvor-colorod forminal block screw power supply cord grounding wire (green) Three-wire installation (if a four-wire system is not available): The power Infernal cabinef-.
Connection details... DIRECT WIRE, cont. center silver-colored terminal block screw. neutral (white or. center) To connect a $eporo}e appliance harness grounding wire (green with yellow stripes) -external cabinet grounding connector internal cabinet grounding connector 4. Install copper, three-wire power supply coble through strain relief. 5.
The exhaust duct can be routed up, down, left, right or straight out the bock of the wosher/dryer. Space requirements ore provided on Ponei G and on the rear panel of the washer/dryer. Use the straightest path you can to avoid 90° turns. Mobile home installation This washer/dryer is suitable for mobile home installations.
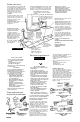
Do Not Remove ; Remove the two rear corner posts located at the back of the washer/dryer. Remove the two corner pieces attached to the lower front of the washer/dryer, Do Not remove the foam shipping pieces between the washer and dryer until the washer/dryer is in place n Numbers correspond to steps. rear comer posts 9. ' ■ Move 1_0 foam shipping pieces outward just enough to clear the washer !id. Open the washer lid. The latch under the ^ dryer will hold lid open.
Move washer/dryer to its permanent location. Remove cardboard/hardboard from under washer/dryer. washer/dryer into final position. • Tilt the washer/dryer forward raising book legs 1 inch off the floor so that the rear self-leveling legs will adjust. Gently lower the washer/dryer to the floor. • Check that the washer/dryer is level by placing a carpenter's level on top of the washer, first side to side, then front to back. — If it is not level, adjust the front legs up or down.
Recessed and closet installation instructions Recessed and closet installation instructions Recessed installation ^WARNING M. Fire Hazard It is recommended that the washer/dryer be exhausted to the outside. If washer/dryer is installed in a closet, the dryer MUST be exhausted outside. Failure to do so may result in a fire.
If washer/dryer does not operate... When moving the washer/dryer... Check the following to be sure that: 1. Electrical supply is connected. 2. House fuse or circuit breaker is intact and tight. 3. Washer lid or dryer door is closed. 4. Controls are set in a running or "ON" position. 5. Dryer start button has been firmly pushed. 6. Three shipping straps have beeh completely removed. • Disconnect the power supply cord, then tape securely to the washer/dryer. • Tape the drum to the front panel.