
Installation


9
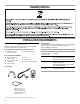
Route the Drain Hose
Proper routing of the drain hose avoids damage to your floor due
to water leakage. Read and follow these instructions.
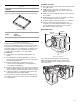
Remove drain hose from the washer
Gently pull the corrugated drain hose fr
om the shipping clips.
Laundry tub drain or standpipe drain
Connect the drain hose form to the corrugated drain hose.
A B
A. Snap either end of the drain hose for
m to the drain hose
at the point where the corrugation begins.
B. Bend drain hose over drain hos
e form and snap into place.
To keep drain water from going back into the washer:
■ Do not straighten the drain hose, do not force excess drain
hose into standpipe. Hose should be secure, but loose
enough to provide a gap for air.
■ Do not lay excess hose on the bottom of the laundry tub.
Floor drain
You may need additional parts. See Floor drain under “Tools
and Parts.”
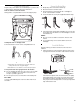
Secure the Drain Hose
1. Drape the power cord over the washer top.
2. Move the washer to its final location.
3. Plac
e the drain hose in the laundry tub or standpipe as
shown. See illustrations A and B.
4. Secur
e the drain hose using the supplied beaded tie strap.
A B C
5. If the washer taps and the drain standpipe are recessed, put
the hooked end of the drain hose in the standpipe as shown.
See illustration C.
NOTES:
■ Do not force excess drain hose back into the rear of the
washer.
■ To avoid siphoning, do not seal the drain hose into the
standpipe.
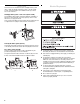
Level the Washer
Properly leveling your washer avoids excessive noise and
vibration.
1. Check the
levelness of the washer by placing a level on the
top edge of the washer, first side to side, then front to back.
If the washer is against a wall, move the washer out slightly
before tipping back. If the washer is not level, first prop the
front with a wood block and adjust the feet as necessary;
then prop the back and adjust feet as necessary. Repeat this
step until washer is level.