
Instruction for Use


5
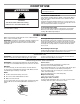
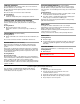
Oven Vent
The oven vent releases hot air and moisture from the oven, and
should not be blocked or covered. Blocking or covering vent will
cause poor air circulation, affecting cooking and cleaning results.
Do not set plastics, paper or other items that could melt or burn
near the oven vent.
The element can be used when the oven is in use as long as the
cookware does not extend more than ¹⁄₂" (1.3 cm) over the element.
Baking and Roasting
Before baking and roasting, position the racks according to the
“Positioning Racks and Bakeware” section. When roasting, it is not
necessary to wait for the oven to preheat before putting food in,
unless recommended in the recipe.
To Bake or Roast:
1. Push in and turn the oven control knob to the desired
temperature setting. The Oven Heating light will turn on and
remain on until the oven reaches the set temperature.
2. Place food in oven. The bake element will turn on and off to
maintain cooking temperature. The Oven Heating light will turn
on and off with the element.
3. Turn oven control knob to OFF when finished.
Broiling
Broiling uses direct radiant heat to cook food. Changing the
temperature when Custom Broiling allows more precise control
when cooking. The lower the temperature, the slower the cooking.
Thicker cuts and unevenly shaped pieces of meat, fish and poultry
may cook better at lower broiling temperatures.
■ For best results, use a broiler pan and grid. It is designed to
drain juices and help avoid spatter and smoke.
If you would like to purchase a broiler pan, one may be ordered.
Please refer to the cover for contact information.
It is not necessary to preheat the oven before putting food in unless
recommended in the recipe. Position food on grid in a broiler pan,
then place it in the center of the oven rack. Close the door to the
broil stop position to ensure proper broiling temperature.
To Broil:
1. Push in and turn oven control knob to BROIL HI or turn to
BROIL LO to broil at a lower temperature.
2. After broiling, turn the oven control knob to OFF.
RANGE CARE
General Cleaning
IMPORTANT: Before cleaning, make sure all controls are off and
the oven and cooktop are cool. Always follow label instructions on
cleaning products.
Do not clean your range with a steam cleaner.
Some models have a self-clean function. Surfaces may get hotter
than usual under self-clean conditions.
Keep children away during the self-clean cycle.
Soap, water and a soft cloth or sponge are suggested first unless
otherwise noted.
EXTERIOR PORCELAIN ENAMEL SURFACES (on some
models)
Food spills containing acids, such as vinegar and tomato, should
be cleaned as soon as the entire range is cool. These spills may
affect the finish.
Cleaning Method:
■ Glass cleaner, mild liquid cleaner or nonabrasive scrubbing
pad:
Gently clean around the model and serial number plate
because scrubbing may remove numbers.
STAINLESS STEEL (on some models)
NOTE: To avoid damage to stainless steel surfaces, do not use
soap-filled scouring pads, abrasive cleaners, Cooktop Cleaner,
steel-wool pads, gritty washcloths or abrasive paper towels.
Damage may occur to stainless steel surfaces, even with one-time
or limited use.
Cleaning Method:
Rub in direction of grain to avoid damaging.
■ Liquid detergent or all-purpose cleaner:
Rinse with clean water and dry with soft, lint-free cloth.
METALLIC PAINT (on some models)
Do not use abrasive cleaners, cleaners with bleach, rust removers,
ammonia or sodium hydroxide (lye) because paint surface may
stain.
DOOR GLASS:
Do not use harsh abrasive cleaners or sharp metal scrapers to
clean the oven door glass since they can scratch the surface,
which may result in shattering of the glass.
A. Oven vent
A