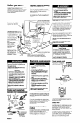
Thin Twin WasheriDryer 230 Volt, 50 Hz In Skrllation IMPORTANT: Read and save these instructions, I IMPORTANt Insbller: Leave Installation Instruct’- Ions with the homeowner, Homeowner: Keep Installation lnstr uctions future reference, Save Installation Instructions for locc electrical inspector’s use.
Before you start... Check locatlon where washer/dryer will be installed. Proper installation is your responsibility. The washer/dryer must not be installed or stored in an area where it will be exposed to water and/or weather. Make sure vou have evervthina necessarv for correct installation. _ - Important: Observe all governing codes and ordinances. Electric Shock Hazard Check code requlrements.
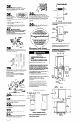
Exhaust reauirements Fire Hazard . Do Not use non-metal, tlexlble duct. Do Not use metal duct smaller than 4 Inches (10.2 cm) In diameter. . Do Not use exhaust hoods wlth magnetic latches. Check that exhaust system Is not longer than specltled. Exhaust systems longer than specltled will: - Accumulate Ilnt. - Shorten the llte ot the product. - Reduce performance and result In longer drylng times and Increased energy usage. Failure to r0ii0w speclrlcatlons may result In a tlre.
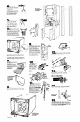
1 Insert a rearleveling leg into the hole in the rear corner on the bottom of the washer/dryer. Push leg in until it snaps into place. Do the same same thing with the other leveling leg in the other rear corner. 5 check other Check same adjust, -w/ A Numbers correspond to steps. h n Push up one leg: to see that the leg goes down. the other leg the way. (If legs do not repeat Step 4.) 6 n With one of the front legs in hand, check the ridges for a diamond marking.
18. 24. 24. Numbers correspond to steps. 19 IMPORTANT: THIS PROCEDUREMUST BE FOLLOWEDTO ASSUREPkOPER INSTALLATION. n Put “hook” end of drain hose into laundry tub or standpipe. Check proper length of drain hose. clamp for CHECK THAT DRAIN HOSE IS NOT TWISTED OR KINKED AND IS SECURELYIN PLACE. A B 20 Pk! (drain connector n Betore attaching water inlet hoses, run water through both faucets into a bucket. This will get rid of any particles in water lines that might clog hoses.
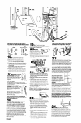
Closet installation 25 n Determine the length of exhaust duct that is needed to-connect dryer to the exhaust hood. See “Exhaust requirements,” Panel B. the - 26. Connz Ghaust duct to washer/dryer and then to the exhaust hood. l Use the straightest 90” turns. l l closet door n Remove ’ path possible to avoid Use duct tape to seal all joints in the exhaust system. Use caulking wall opening compound to seal exterior around exhaust hood. tape from dryer door and open dryer door.
If washer/drver does not opkate... l l l l l Check that the circuit breaker is not tripped or the house fuse blown. Check that power supply cord is plugged into wall receptacle. Check that washer lid or dryer door is closed. Check that controls are set in a running or ‘ON” position. Check that dryer ‘START” button has been firmly pushed. If you need assistance... Call your dealer or local authorized service company. When you call, you will need the washer/dryer model number and serial number.