61055024GB.fm Page 13 Monday, May 5, 2008 3:55 PM OPERATING INSTRUCTIONS INSTALLATION INSTRUCTIONS SAFEGUARDING THE ENVIRONMENT IMPORTANT NOTES BEFORE USING THE OVEN OVEN ACCESSORIES MAINTENANCE AND CLEANING TROUBLESHOOTING GUIDE AFTER-SALES SERVICE To make the most of your new oven, carefully read the instructions and keep them for future reference.
61055024GB.fm Page 14 Monday, May 5, 2008 3:55 PM INSTALLATION INSTRUCTIONS Recommendations IMPORTANT: Unplug the oven before any cleaning and maintenance operations. • Installation must be carried out by a qualified technician according to the manufacturer's instructions and in compliance with the current local regulations • After unpacking the oven, make sure it has not been damaged during transport and that the door closes properly.
61055024GB.fm Page 15 Monday, May 5, 2008 3:55 PM SAFEGUARDING THE ENVIRONMENT Disposal of packing • The packing material is 100% recyclable and is marked with the recycle symbol . • The various parts of the packing must be disposed of in compliance with local regulations; do not disperse in the environment.
61055024GB.fm Page 16 Monday, May 5, 2008 3:55 PM • The juices of fruit dripping from the pan may leave permanent stains. It is advisable to clean the oven before reusing it. • To avoid scratching the coating, do not drag pots and pans across the bottom of the oven. • Residual condensation after cooking could eventually damage the oven and surrounding kitchen units. It is advisable to: - set the lowest temperature; - cover food; - remove food from the oven; - dry the wet parts when the oven is cool.
61055024GB.fm Page 17 Monday, May 5, 2008 3:55 PM OVEN ACCESSORIES The accessories supplied depend on the model. The accessories provided with the oven are listed in the separate Product Sheet (under Accessories). Drip-tray (1) For collecting fat and bits of food when placed under the wire shelf, or as a plate for cooking meat, chicken and fish, etc., with or without vegetables. Pour a little water into the drip-tray to prevent spatters of fat and smoke.
1055024GB.fm Page 18 Monday, May 5, 2008 3:55 PM OVEN ACCESSORIES Grease filter (7) Use only for particularly greasy cooking. Hook it on the rear wall of the oven compartment, opposite the fan. It can be cleaned in a dishwasher and used with the fan-assisted function. 7 Sliding shelves (8) They allow the wire shelves and drip-trays to be pulled half out during cooking. Suitable for all the accessories, they can be cleaned in a dishwasher.
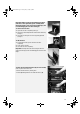
61055024GB.fm Page 19 Monday, May 5, 2008 3:55 PM Important: When carrying out the following operations make sure to wear protective gloves. Carefully follow these instructions in order to prevent possible injury and to avoid damaging the oven door and hinges. To remove the oven door: 1. Open the oven door completely (see fig. 1). 2. Lift the two catches and push them forward as far as the stop (see fig. 2). 3. Close the door enough to remove it by pulling upwards (see fig. 3). 1 To refit the door: 1.
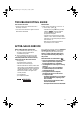
61055024GB.fm Page 20 Monday, May 5, 2008 3:55 PM Changing the rear oven lamp (if provided): 1. Disconnect the oven from the power supply. 2. Allow the oven cool before turning the lamp cover left to unscrew it (see fig. 1). 3. Replace the lamp (see note). 4. Screw the lamp cover back on. 5. Reconnect the oven to the power supply. 1 Note: Only use 25 W/230 V, E-14 type T300°C lamps available from the After-Sales Service. Important: Do not use the oven before refitting the lamp cover.
61055024GB.fm Page 21 Monday, May 5, 2008 3:55 PM TROUBLESHOOTING GUIDE The oven does not work: • Check the mains power and that the oven is electrically connected. • Turn the oven off and then on again to see if the fault has been eliminated. IMPORTANT: • Make sure the oven selector is not set to “0” or on the “lamp” symbol . - If the electronic programmer (if provided) indicates “ ”, consult the separate product sheet and/or the electronic programmer description.