
Instruction for Use


20
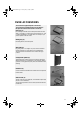
Changing the rear oven lamp (if provided):
1.
Disconnect the oven from the power supply.
2.
Allow the oven cool before turning the lamp cover left to
unscrew it (see fig. 1).
3.
Replace the lamp (see note).
4.
Screw the lamp cover back on.
5.
Reconnect the oven to the power supply.
Note: Only use 25 W/230 V, E-14 type T300°C lamps
available from the After-Sales Service.
Important: Do not use the oven before refitting the lamp
cover.
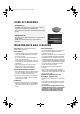
Replacing the side lamp (if provided):
1.
Disconnect the oven from the power supply.
2.
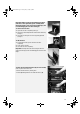
Remove the left side accessory holder grille after allowing
the oven cool (see fig. 2). Using a screwdriver, prise
outwards to remove the lamp cover (see fig. 3 - 4).
3.
Replace the lamp (see note).
4.
Refit the lamp cover, pressing it against the oven wall to
correctly hook it.
5.
Refit the side accessory holder grille.
6.
Reconnect the oven to the power supply.
Note: Only use 25 W/230 V, E-14 type T300°C lamps
available from After-Sales Service.
Important: Do not use the oven before refitting the lamp
cover.
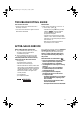
Replacing the side halogen lamp (if provided):
1.
Disconnect the oven from the power supply.
2.
Remove the left side accessory holder grille after allowing
the oven cool (see fig. 2). Using a screwdriver, prise
outwards to remove the lamp cover (see fig. 3 - 4).
3.
Do not replace the lamp with bare hands. Carefully remove
the halogen lamp from the lamp holder and replace it with a
new one (see note).
4.
Refit the lamp cover, press it against the oven wall to
correctly hook it.
5.
Refit the side accessory holder grille.
6.
Reconnect the oven to the power supply.
Note: Only use 20 W/12 V, G4 type T300°C lamps
available from our After-Sales Service.
Important: Do not use the oven before refitting the lamp
cover.
2
3
4
1
61055024GB.fm Page 20 Monday, May 5, 2008 3:55 PM