AMW 590 www.whirlpool.
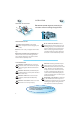
INSTALLATION MOUNTING THE APPLIANCE FOLLOW THE SUPPLIED separate mounting instructions when installing the appliance. PRIOR TO CONNECTING CHECK THAT THE VOLTAGE on the rating plate corresponds to the voltage in your home. ENSURE the oven cavity is empty before mounting. ENSURE THAT THE APPLIANCE IS NOT DAMAGED. Check that the oven door closes firmly against the door support. Empty the oven and clean the interior with a soft, damp cloth.
IMPORTANT SAFETY INSTRUCTIONS READ CAREFULLY AND KEEP FOR FUTURE REFERENCE DO NOT HEAT, OR USE FLAMMABLE MATERIALS in or near the oven. Fumes can create a fire hazard or explosion. DO NOT USE YOUR APPLIANCE FOR DRYING TEXTILES, PAPER, SPICES, HERBS, WOOD, FLOWERS, FRUIT OR OTHER COMBUSTIBLE MATERIALS. FIRE COULD RESULT. IF MATERIAL INSIDE / OUTSIDE THE OVEN SHOULD keep oven door closed and turn the oven off. Disconnect the power cord or shut off power at the fuse or circuit breaker panel.
PRECAUTIONS GENERAL THIS APPLIANCE IS DESIGNED FOR DOMESTIC USE ONLY! DO NOT USE THE CAVITY for any storage purposes. DEEP-FRYING DO NOT USE YOUR APPLIANCE FOR DEEP-FRYING, BECAUSE THE OIL TEMPERATURE CANNOT BE CONTROLLED. USE HOT PADS OR OVEN MITTS to prevent burns, when touching containers, oven parts, and pan after cooking. CAREFUL FOOD & ALCOHOL. Be extra careful when cooking or reheating food that contains alcohol. If you are adding alcohol (e.g. rum, cognac, wine etc.
ACCESSORIES GENERAL THERE ARE a number of accessories available on the market. Before you buy, ensure they are oven proof GLASS DRIP TRAY USE THE GLASS DRIP TRAY beneath the wire shelf. It may also be used as a cooking utensil or as a baking plate. THE GLASS DRIP TRAY is used to collect the dripping juices and food particles that otherwise would stain and soil the interior of the oven. Avoid placing vessels directly on the oven bottom.
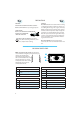
STAND BY THE OVEN IS IN “STAND BY” when the 24 hour clock is displayed. The displaying of the clock can be turned off by turning the function knob to the zero position and pressing the Back button. THE CLOCK WILL RETURN as soon as any button or knobs are operated or simply by pressing the Back button again. FUNCTION CHANGE PROTECTION IF THE MULTIFUNCTION KNOB is rotated e.g. switching to another function, during cooking, the oven will ask you to confirm this change before switching to the new function.
CHANGING SETTINGS WHEN THE APPLIANCE IS FIRST PLUGGED IN it will ask you to set the Language & Clock. AFTER A POWER FAILURE the Clock will flash and needs to be reset. YOUR OVEN HAS a number of functions which can be adjusted to your personal taste. TO RESET to the factory settings, simply keep the Back button pressed for 5 seconds. 1. TURN THE MULTIFUNCTION KNOB to the setting position. 2. USE THE ADJUST KNOB to choose one of the following settings to adjust. CLOCK 1. PRESS THE OK BUTTON. 2.
CHANGING SETTINGS CONTRAST 1. PRESS THE OK BUTTON. 2. TURN THE ADJUST KNOB to set the level of contrast suitable to your preference. 3. PRESS THE OK BUTTON again to confirm your selection. SET OK SET CONTRAST -/+ SET OK CONTRAST 8 BRIGHTNESS 1. PRESS THE OK BUTTON. 2. TURN THE ADJUST KNOB to set the level of brightness suitable to your preference. 3. PRESS THE OK BUTTON again to confirm your selection.
DELAYED START CONVENTIONAL -/+ TO SET COOKING END CONVENTIONAL COOKING END AT USE THIS FUNCTION when you need to have the cooking finished at a specific time. The oven needs to know the desired cooking duration and the time of day when the food should be ready. DELAYED START WORKS WITH THESE FUNCTIONS CONVENTIONAL 1. FOLLOW THE SETTING PROCEDURE for the function you wish to use and stop when the cooking time has been set. 2. PRESS THE OK BUTTON.
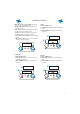
RAPID PREHEAT RAPID PRE- HEAT -/+ TO SET TEMPERATURE RAPID PRE- HEAT »»»»»» USE THIS FUNCTION TO PREHEAT the empty oven. PREHEATING is always done with the oven empty just like you would in a conventional oven before cooking or baking. DO NOT PLACE FOOD BEFORE OR DURING preheating in the oven. It will be burned from the intense heat. 1. TURN THE MULTIFUNCTION KNOB to the Rapid Preheat position. 2. TURN THE ADJUST KNOB to set the temperature. 3. PRESS THE OK BUTTON TWICE.
CONVENTIONAL CONVENTIONAL -/+ TO SET TEMPERATURE COOKING . . . HEATING UP »» CONVENTIONAL -/+ TO SET COOKING COOKING . . USE THIS FUNCTION just as you use your traditional oven when baking cookies, cakes, rolls and meringues. DELAYED START can be used with this function. TIME . 1. TURN THE MULTIFUNCTION KNOB to the Conventional position. 2. TURN THE ADJUST KNOB to set the temperature. 3. PRESS THE OK BUTTON to confirm your selection. (The cooking starts).
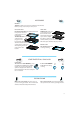
GRILL GRILL -/+ TO GRILL -/+ TO SET USE THIS FUNCTION TO quickly give a pleasant brown surface to the food. DELAYED START can be used with this function. CHANGE GRILL LEVEL GRILL POWER LEVEL GRILL -/+ TO COOKING . SET . COOKING LEVEL SUGGESTED USE: 4-5 COOKING fish steaks, thin slices of meat and poultry. 1-3 COLORING foods like gratin TIME . GRILL SHELF LEVEL SUGGESTED USE: LEVEL THIN SLICES OF MEAT, SAUSAGES & CHEESE TOAST. 3 1.
TURBO GRILL GRILL -/+ TO TURBO GRILL -/+ TO SET GRILL TURBO GRILL -/+ TO SET COOKING COOKING . . USE THIS FUNCTION TO cook such food as stuffed vegetables, chicken pieces. DELAYED START can be used with this function. CHANGE LEVEL TIME . TURBO GRILL POWER LEVEL LEVEL SUGGESTED USE: 4-5 COOKING fish steaks, thin slices of meat and poultry. 1-3 COLORING foods like gratin TURBO GRILL SHELF LEVEL SUGGESTED USE: LEVEL 3 FISH STEAKS, MEAT 2 CHICKEN PIECES 1.
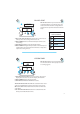
FORCED AIR FORCED AIR -/+ TO SET TEMPERATURE COOKING . . . HEATING UP »» USE THIS FUNCTION when baking rolls and cakes, cooking poultry and roast meats or baking on two levels. DELAYED START can be used with this function. FORCED AIR SHELF LEVEL FORCED AIR -/+ TO SET COOKING . . COOKING TIME . SUGGESTED USE: LEVEL 3 USED WHEN BAKING ON TWO LEVELS 2 CHICKEN PIECES 1 ROASTS 1. TURN THE MULTIFUNCTION KNOB to the Forced Air position. 2.
MAXI COOKING MAXI COOKING -/+ TO SET TEMP. COOKING . . . HEATING UP »» COOKING . . . -/+ TO SET COOKING COOKING . . USE THIS FUNCTION when cooking big roasts. USE THE WIRE SHELF in Glass Pan and place the roast on the wire shelf. TIME . 1. TURN THE MULTIFUNCTION KNOB to the Maxi Cooking position. 2. TURN THE ADJUST KNOB to set the temperature. 3. PRESS THE OK BUTTON to confirm your selection. 4. PRESS THE OK BUTTON to enter the cooking time. 5.
PASTRY PASTRY -/+ TO TEMP. USE THIS FUNCTION to bake pies, rolls, pizzas as and muffins. DELAYED START can be used with this function. COOKING . . . HEATING UP »» SET COOKING . . . -/+ TO SET COOKING COOKING . . TIME WHEN COOKING FOOD IN DISHES, place the dishes on the Wire shelf. . USE BAKING PLATE for rolls and pizzas. 1. TURN THE MULTIFUNCTION KNOB to the Pastry position. 2. TURN THE ADJUST KNOB to set the temperature. 3.
SPECIAL FUNCTIONS DEFROST -/+ TO CHANGE OVEN ««« SLOW TOO HOT COOKING USE THIS FUNCTION Warm kkeeping, i Dough D h proving, Defrosting and Cleaning. DELAYED START can be used with this function. SPECIAL -/+ TO CHANGE . . . 1. TURN THE MULTIFUNCTION KNOB to the Special position. 2. TURN THE ADJUST KNOB to select one of the functions. 3. PRESS THE OK BUTTON to confirm your selection. (The cooking starts).
AUTO RECIPES AUTO RECIPES -/+ TO CHANGE ROAST BEEF RARE 6/8 PORTIONS ROAST BEEF RARE START WITH EMPTY OVEN COOKING HEATING UP INSERT FOOD COOKING . . . ROAST BEEF RARE USE THIS FUNCTION to select one of the 15 preprogrammed Auto recipes. It is not possible to change the recipe settings before or during cooking. But it is possible to increase (if needed) the cooking time at the end of the cooking.
MAINTENANCE & CLEANING CLEANING IS THE ONLY MAINTENANCE normally required. Always allow the oven to cool to room temperature before cleaning. FAILURE TO MAINTAIN THE OVEN in a clean & dry condition could lead to deterioration of the surface that could adversely affect the life of the appliance and possibly result in a hazardous situation. DO NOT USE METAL SCOURING PADS, ABRASIVE CLEANSERS , steelwool pads, gritty washcloths, etc.
TROUBLE SHOOTING GUIDE IF THE OVEN DOES NOT WORK, do not make a service call until you have made the following checks: The Plug is properly inserted in the wall socket. Check your Fuses and ensure that there is power available. Check that the oven has ample ventilation. Wait for 10 minutes, then try to operate the oven once more. If “OFF” is displayed. Turn the multifunction knob to zero and press the OK button. THIS IS TO AVOID unnecessary calls for which you will be charged.