Instruction booklet TUMBLE DRYER Contents GB English,1 GB Important Information, 2-3 Installation, 4 Where to put your dryer Ventilation Electrical connection Levelling the tumble dryer Before you start using your dryer Dryer Description, 5 Open the door The Features Control Panel The Display, 6 Start and Programmes, 7-12 AQUALTIS AQC9 BF7 Choosing a Programme Special Programmes Table of Programmes The Controls Laundry, 13-14 Sorting your laundry Wash care labels Special clothing items Drying times
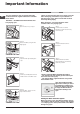
Important Information GB For your Condenser dryer to operate efficiently, you must follow the regular maintenance schedule shown below: Fluff Filter – You MUST Clean the fluff filter after every drying cycle. Failure to clean the filter after every drying cycle will affect the drying performance of your machine – It will take longer to dry and as a result will use more electricity during drying. Water Container – You must empty the water container after every drying cycle.
Condenser unit - You must clean the fluff from the condenser every month! GB Step 1 Open the Condenser Cover - hold the handle and pull towards you. Step 2 Remove the condenser by rotating the 3 clips then pulling the condenser towards you. (There may be some water in the tubes this is normal). Product Data Rated capacity of cotton laundry for the "standard cotton programme" at full load - kg 9.
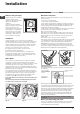
Installation Electrical connection • Place your dryer at a distance from gas ranges, stoves, heaters, or cooktops because flames can damage the appliance. If you are going to install the appliance under a work counter, be sure to leave a 10 mm space between the top and any other objects on or above the machine and a 15 mm space between the sides and lateral furnishings or walls. This is to ensure proper air circulation.
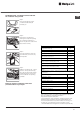
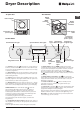
Dryer Description To open door The Features GB Rating Plate Water container Pull on handle Model & Serial Numbers Filter Air Intake Grille Condenser unit (cover open) Condenser cover handle (Pull to open) Control Panel On/Off Button & Light Option Buttons and Lights Start/Pause Programme ECO Light Button & Light Progress Light Display Panel Programme Knob Sensor Dry Timed Dry The On/Off button/ light , if the dryer is running and this button is pressed and held for more than 3 seconds the dry
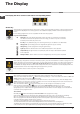
The Display GB The Display has three sections each with its corresponding button. Sensor Dry After selecting a programme that has a Sensor Dry Option, press and release the button until the required dryness sensing level is displayed. If the sensing option is not available the display will flash and the buzzer beeps three times. ! Some drying programmes are not compatible with all sensor drying levels.
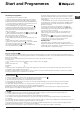
Start and Programmes Choosing a Programme 1. Plug the dryer into the electrical socket. 2. Sort your laundry according to fabric type (see Laundry). 3. Open the door and make sure the filter is clean and in place and the water container is empty and in place (see Maintenance). 4. Load the machine and make sure that the items are not in the way of the door seal. Close the door. 5. If the ON/Off light is not lit; press the On/Off Button . 6.
GB Special Programmes Shirts - High Heat option • This is a programme for Shirts made from Cotton. • It can be used for load sizes up to 3 kg (approximately 12 shirts). • The duration of this programme will depend on the size of the load, the dryness setting selected and the spin speed used in your washer. • Loads dried using this programme are usually ready to wear; the edges or seams may be slightly damp.
Refresh Thanks to a cool air flow, oxygen penetrates the fibers and transports unpleasant odors such as cigarette smoke, frying, smog out of the clothes. With this short program, you can easily refresh your garments in just 20 minutes. ! Airing is not a drying programme and should not be used for wet articles of clothing. • If can be used on any load size up to 9 kg, but is more effective on smaller loads. 20-minute programme that airs your clothes with cool air. Use also to cool warm clothes.
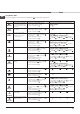
GB Programmes Table ! If the On/Off light is not lit; Press the On/Off Button Programme Easy Iron Refresh Cottons What it does How to set it Brief programme (approximately 10 minutes) that softens fibres of clothing that is ready for ironing. 1. Position the PROGRAMME knob on 2. Select Alarm Option if required. 3. Press the Start Button . . ! This is not a drying programme (see previous page). Options available Sound . 20 min cool programme to air your clothes 1.
GB Programme What it does How to set it Dries your sports clothes. 1. Position the PROGRAMME knob on 2. Select any Options if required. 3. Press the Start Button . Dries your cuddly toy. 1. Position the PROGRAMME knob on 2. Select any Options if required. 3. Press the Start Button . Heats your towel & bathrobe. 1. Position the PROGRAMME knob on 2. Select any Options if required. 3. Press the Start Button . Activewear Cuddly Toys Heat & Enjoy Notes / Options available . . .
GB The Controls • Programme knob ! Warning, if after pressing the start button the programme knob position is changed, the new position will NOT change the programme selected. To change programme press Start/Pause Button to pause the programme, the light flashes Amber, select new programme and any option, the light will then flash green. Press the Start/ Pause Button and the new programme will start. • Option Buttons/ Lights These buttons are used to customise the selected programme to your requirements.
Laundry Sorting your laundry Wash care labels • Check symbols on clothing labels to make sure that the articles can be tumble dried. • Sort laundry by fabric type. • Empty pockets and check buttons. • Close zippers and hooks and tie loose belts and strings. • Wring out each item in order to eliminate as much excess water as possible. Look at the labels on your garments, especially when tumble drying for the first time.
GB • Dryness: if you are going to iron some of your clothes, they can be taken out while still a bit damp. Others can be left longer if you need them to be completely dry. Special clothing items Blankets and bedspreads: acrylic items (Acilian, Courtelle, Orion, Dralon) must be dried with special care on a low heat setting. Avoid drying for a long period of time. • Heat setting. • Room temperature: if the room where the dryer is located is cold, it will take longer for the dryer to dry your clothes.
Warnings and Suggestions ! This appliance has been designed and built according to international safety standards. These warnings are given for safety reasons and must be followed carefully. General safety • This tumble dryer is not intended for use by persons (including children) with reduced physical, sensory or mental capabilities , or lack of experience and knowledge, unless they have been given supervision or instruction concerning use of the appliance by a person responsible for there safety.
Maintenance and Care GB Switching off the electricity Empty the Water Container after each cycle ! Unplug the dryer when not using it, when cleaning it, and during maintenance activities. Clean the filter after each cycle The filter is an important part of your dryer: it accumulates lint and fluff that is formed while drying. When finished drying, clean the filter by rinsing it under running water or with your vacuum cleaner.
Troubleshooting One day your dryer seems not to be working. Before you call your Service Centre (see Service), go through the following troubleshooting suggestions. Problem: Possible causes / Solutions: The dryer won’t start. • The plug is not plugged into the socket, or not making contact. • There has been a power failure. • The fuse has blown. Try to plug another appliance into the socket. • You are using an extension cord. Try to plug the dryer’s power cord directly into the socket.
Service GB Before calling the Service Centre: Spare Parts • Use the troubleshooting guide to see if you can solve the problem yourself (see Troubleshooting). • If not, turn off the dryer and call the Service Centre closest to you. This dryer is a complex machine. Repairing it yourself or having a nonauthorised person try to repair it could cause harm to one or more persons and to the machine, and could invalidate the spare parts warranty.
GB Guarantee 12 months Parts and Labour Guarantee Your appliance has the benefit of our manufacturers’ guarantee, which covers the cost of breakdown repairs for twelve months from the date of purchase. This gives you the reassurance that if, within that time, your appliance is proven to be defective because of either workmanship or materials, we will, at our discretion, either repair or replace the appliance at no cost to you.
11/2012 - Xerox Fabriano GB Extended Guarantees We offer a selection of protection plans that enable you to fully cover yourself against the expense of repair bills for the life of your policy. To find the ideal plan for you please call our advice line on UK: 08448 226 226 Republic of Ireland: 01 230 0233 Free Helpdesk Service We have a dedicated team who can provide free advice and assistance with your appliance if you experience any technical difficulties within the first 90 days of ownership.