
Installation Instruction


7
2. To avoid damaging oor, place cardboard supports from
shipping carton on oor behind washer. Tip washer back
and place on cardboard supports. Remove shipping base.
Set washer upright.
IMPORTANT: Removing shipping base is necessary
for proper operation.
NOTE: Keep shipping base in case you need to move
washer later.
3. Remove tape from washer lid, open lid, and remove cardboard
packing tray from tub. Be sure to remove all parts from tray.
NOTE: Keep tray in case you need to move washer later.
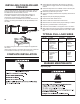
CONNECT DRAIN HOSE
Proper routing of the drain hose avoids damage to your oor
due to water leakage.
Remove drain hose from the washer drum
1. Remove cap from the washer drain port on the back of
the washer.
2. If clamp is not already in place on elbow end of drain hose,
slide it over end as shown.
3. Squeeze clamp with pliers and slide elbow end of drain
hose onto washer drain port and secure with clamp.
4. The washer drain system can be installed using a oor drain,
wall standpipe, oor standpipe, or laundry tub.
5. Place hose into standpipe (shown in picture) or over side
of laundry tub.
IMPORTANT:
n Drain hose is not to exceed 8" (203 mm) into drain pipe; do
not force excess hose into standpipe or lay on bottom of
laundry tub. Drain hose form must be used.
n It is the responsibility of the installer to install and secure
the drain hose into the provided plumbing/drain in a
manner that will avoid the drain hose coming out of, or
leaking from, the plumbing/drain.
8"
(203 mm)
Drain
hose
form